A Comprehensive Guide to Using eksctl
EKS Best Practices February 23, 2023
 Amazon Web Services (AWS) offers a managed solution for Kubernetes clusters with its Elastic Kubernetes
Service (EKS) product. EKS is a solid and proven product, but the number of options can be overwhelming
at times, and it can be a bit difficult to manage manually. WeaveWorks has developed a command-line tool
to facilitate the creation, modification, and deletion of EKS clusters: eksctl. It was written in Go, was first released in 2018, and is
officially endorsed by AWS.
The goal of eksctl was to provide a command-line tool that is easier to use than the AWS command-line
interface (CLI), which is just a wrapper around API calls to AWS and thus a very unsophisticated tool.
Eksctl leverages CloudFormation, which can sometimes be useful to know, e.g., to inspect what AWS
resources eksctl created. (Please note that in-depth knowledge of CloudFormation is not necessary at all
to use eksctl, but it can be useful for investigation and debugging.)
It should be noted that sometimes people tend to think of eksctl as an alternative to kubectl, but these
two tools address different needs. Eksctl is used to manage AWS resources (including the EKS cluster
itself) and is AWS-specific. It talks to AWS API endpoints and is more of a replacement for the AWS CLI.
Kubectl is an official part of Kubernetes and is used to query and manipulate Kubernetes resources, so
it works on any Kubernetes cluster. It talks to the Kubernetes API endpoints and can’t be replaced by
eksctl; there is no overlap between these two tools.
Executive summary
Eksctl is a user-friendly command-line tool that makes it easy to create and manage EKS clusters on AWS.
In this article, we will explore the following topics:
| Installing eksctl | To install eksctl, just download the latest release from Weaveworks’ github and follow the instructions in the official documentation. |
| Basic operations | Basic operations include creating, querying, and deleting clusters. |
| Advanced operations | Advanced functions include using a config file to improve automation, managing EKS addons, upgrading a cluster, managing nodegroups, and using eksctl on clusters not created with eksctl. |
| Eksctl vs. AWS command line | Eksctl is quite user-friendly and can implement dozens of AWS CLI commands in one line (especially when creating clusters). |
| Final thoughts | Eksctl is good for experimenting, but once a project becomes more established, different methods (mainly using infrastructure as code) will be appealing to better automate cluster management. |
Installing eksctl
It is very easy to install eksctl, and instructions for this are provided in the official documentation. Eksctl is written in
Go and is thus a self-contained executable. It is supported for all major operating systems, such as
Windows, MacOS, and Linux.
Eksctl does not require any configuration. However, you must have programmatic access to AWS (for example
to use the AWS CLI or AWS SDK) before you can use it. There are many ways to do this, which are covered
by the AWS
documentation. The most basic solution is to use an AWS access key ID and secret access key.
(Setting up programmatic access to AWS is outside the scope of this article.)
Basic operations
Creating a cluster
Creating an EKS cluster can be as easy as simply running the following command:
$ eksctl create cluster
This will create an EKS cluster in your default region, with a managed node group of two EC2 instances.
Eksctl provides reasonable defaults, such as the node instance types, and will also create a dedicated
Virtual Private Cloud (VPC) with all the necessary security groups. Importantly, you can still choose
what version of Kubernetes you want installed in the cluster.
Please note that this command can take 15 to 20 minutes to complete.You can easily create a
Fargate-backed cluster by adding the –fargate option:
$ eksctl create cluster --fargate
If you don’t specify a name, eksctl will assign a unique name to your cluster. If you want to use a specific name, use the –name option:
$ eksctl create cluster --name eksctl-test
Querying a cluster
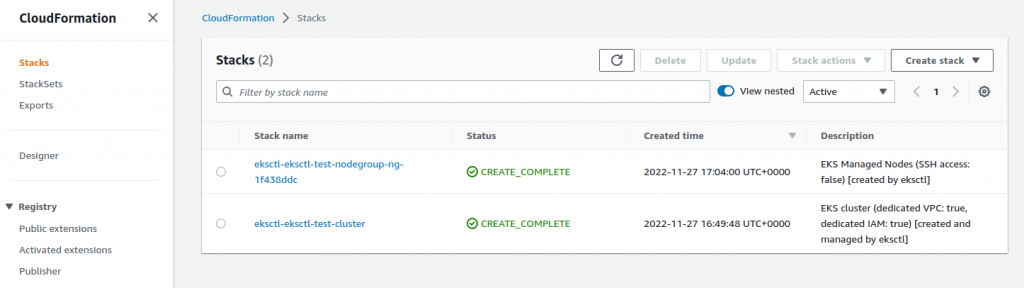
Let’s explore what has been created by the last command shown above. In the AWS CloudFormation console,
you can see the stacks that eksctl created to spring your cluster to life.
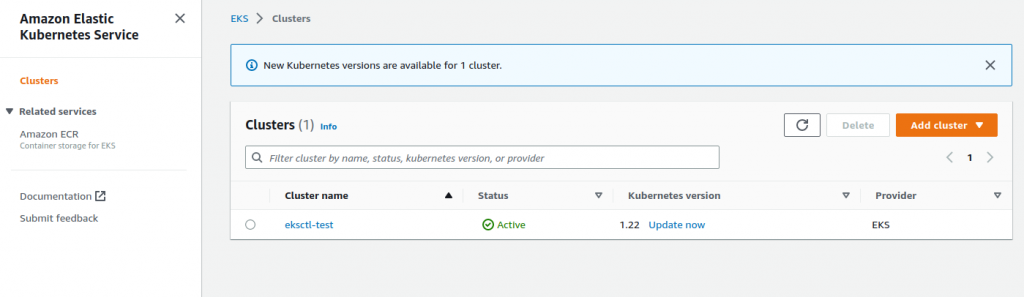
Of course, you can also head to the AWS EKS console, where you will be able to see your newly minted
cluster:
Eksctl offers numerous subcommands to query and inspect the cluster. To list the clusters in your default
region (whether managed by eksctl or not), run this command:
$ eksctl get cluster
        NAME		REGION		EKSCTL CREATED
        eksctl-test	eu-west-1	True
To get more details about a specific cluster, add the –name option:
$ eksctl get cluster --name eksctl-test
        NAME		VERSION	STATUS	CREATED			VPC			SUBNETS																	SECURITYGROUPS		PROVIDER
        eksctl-test	1.22	ACTIVE	2022-11-27T16:50:16Z	vpc-03efcc9b459aa208b	subnet-03fe99f38d4ebe30a,subnet-06262b175527c5f68,subnet-0929b69d4e528076e,subnet-0b1b494ca0a3933e6,subnet-0df0abbd576fca271,subnet-0f74cbe94ca2025ec	sg-0d0d67c90cdf8ae7f	EKS
You can also look at the node groups in a given cluster:
$ eksctl get nodegroup --cluster eksctl-test
        CLUSTER		NODEGROUP	STATUS	CREATED			MIN SIZE	MAX SIZE	DESIRED CAPACITY	INSTANCE TYPE	IMAGE ID	ASG NAME						TYPE
        eksctl-test	ng-1f438ddc	ACTIVE	2022-11-27T17:04:30Z	2		2		2			m5.large	AL2_x86_64	eks-ng-1f438ddc-fcc25d06-10b8-1e01-c110-052219873720	managed
As an aside, you will note that in one case, you need to specify the name of the cluster using the –name
option, while in the other, you need to use the –cluster option, which is an inconsistency in the
eksctl CLI.
Spend less time optimizing Kubernetes Resources. Rely on AI-powered Kubex - an automated Kubernetes optimization platform
Free 60-day TrialThe options we just reviewed are the most important for eksctl get, but there are many others, which you
can list using eksctl get –help.
Finally, you can inspect what’s happening inside the EKS cluster using kubectl. You will need to have
kubectl installed locally, and the version number of kubectl must be within one increment of the version
of Kubernetes running inside the cluster. When creating a cluster, eksctl will automatically update your
local kubectl configuration to access the newly created cluster, so you should be able to just run
kubectl and access the cluster immediately. For example:
$ kubectl get nodes
        NAME                                           STATUS   ROLES    AGE   VERSION
        ip-192-168-22-201.eu-west-1.compute.internal   Ready    <none>   22m   v1.22.15-eks-fb459a0
        ip-192-168-56-166.eu-west-1.compute.internal   Ready    <none>   22m   v1.22.15-eks-fb459a0
You can also look at the pods:
$ kubectl get pod --all-namespaces
        NAMESPACE     NAME                       READY   STATUS    RESTARTS   AGE
        kube-system   aws-node-h6tg5             1/1     Running   0          28m
        kube-system   aws-node-m49fn             1/1     Running   0          28m
        kube-system   coredns-5947f47f5f-8wzlb   1/1     Running   0          37m
        kube-system   coredns-5947f47f5f-f58nn   1/1     Running   0          37m
        kube-system   kube-proxy-4mpx8           1/1     Running   0          28m
        kube-system   kube-proxy-hkgzp           1/1     Running   0          28m
Deleting a cluster
Finally, to delete a cluster, simply run the following:
$ eksctl delete cluster --name eksctl-test
This operation will take a while; just be patient, and eventually the cluster will be deleted.
Getting help
Finally, maybe the most important thing for beginners to know is how to get help. Eksctl has reasonably
decent embedded help pages, which you can access using this command:
$ eksctl --help
Spend less time optimizing Kubernetes Resources. Rely on AI-powered Kubex - an automated Kubernetes optimization platform
Free 60-day TrialTo get help on a specific subcommand, specify it before –help. For example, for get,
run:
$ eksctl get --help
The help pages are far from perfect, however. They are quite succinct, for starters, and sometimes they
are incomplete. For example, eksctl create –help does not list the -f option to pass a configuration
file. The online documentation, however, is quite exhaustive and of
very high quality.
Advanced operations
Using a configuration file
Although eksctl provides good defaults, you will probably want to customize some options, such as the
instance types of node groups. It is possible to pass some of these options to the command line, but
eksctl offers a better way to handle such customizations: configuration
files. Using configuration files has many benefits over using command line options:
- They are clearer and easier for other people to understand.
- They allow you to track your changes, for example, by putting configuration files under source
control. - They are more readable when the cluster is heavily customized.
Here is an example of a configuration file:
apiVersion: eksctl.io/v1alpha5
        kind: ClusterConfig

        metadata:
          name: my-cluster
          region: eu-west-1

        nodeGroups:
          - name: large
            instanceType: m5.large
            desiredCapacity: 5
            volumeSize: 50
            ssh:
              allow: true
          - name: xlarge
            instanceType: m5.xlarge
            desiredCapacity: 2
            volumeSize: 100
            ssh:
              publicKeyPath: ~/.ssh/other.pub
You will notice that such a configuration file looks very similar to a Kubernetes manifest file, which
will certainly help DevOps engineers understand this format and write such config files.
The metadata section shows the region where you want the cluster to be deployed as well as its name.
Next, there are a couple of definitions for node groups. The first node group defines large instances
and allows for SSH access (the SSH public key is not specified, so it will use ~/.ssh/id_rsa.pub by
default). The second node group defines extra-large instances with a larger disk; this also allows SSH
access using the ~/.ssh/other.pub SSH key.
Spend less time optimizing Kubernetes Resources. Rely on AI-powered Kubex - an automated Kubernetes optimization platform
Free 60-day TrialYou will also need to pass this configuration file to many eksctl invocations by using the -f option,
like this, assuming your configuration file is named config.yaml:
$ eksctl create cluster -f config.yaml
$ eksctl delete cluster -f config.yaml
Addons
AWS allows a number of addons for EKS clusters, which you can enable and disable according to your needs.
Eksctl offers an interface to support this feature.
First of all, to list the addons available for a given cluster, run the following:
$ eksctl utils describe-addon-versions --cluster eksctl-test
The output will be a fairly large JSON file, but if you have jq installed, you can make more sense of it
like this:
$ eksctl utils describe-addon-versions --cluster eksctl-test | tail +3 | jq '.Addons[].AddonName'
        "aws-ebs-csi-driver"
        "coredns"
        "kube-proxy"
        "vpc-cni"
        "adot"
Some addons are enabled by default, such as the VPC-CNI driver. To enable more addons, you will need to
have a configuration file describing your cluster, as described in the previous section. You will then
be able to specify which addons you want to install and their configuration. This is done through the
“addons” section of the configuration file, which contains a list of addon configurations. Each addon
configuration specifies the name and version of the addon to install, as well as the addon configuration
tailored for your cluster and how the addon must work for you. Please consult the official documentation for more information.
Once your config file is ready, run the following to enable the addons:
$ eksctl create addon -f config.yaml
Again, we can see here a peculiarity of the eksctl CLI, where you need to use the create subcommand to
enable an addon…
If you need to update an addon, modify the config file and run the create addon command again.
Please note that some addons can have IAM policies attached to them. For these policies to have any
effect, you will need to have OpenID Connect (OIDC) enabled within your cluster and set up with an OIDC
provider. OIDC is a protocol
for authentication and authorization. In the case of EKS, an OIDC provider is used to map Kubernetes
entities, such as service accounts, to IAM roles.
To delete an addon, you don’t need the config file; just run the following:
$ eksctl delete addon --cluster <cluster-name> --name <addon-name>
Upgrading the cluster
An EKS cluster can be upgraded to a newer version of Kubernetes. Please note that upgrades can be done
only from one Kubernetes version to the immediately following version. For example, you can upgrade from
Kubernetes 1.22 to 1.23, but not from 1.22 to 1.24.
Upgrading requires three steps:
Spend less time optimizing Kubernetes Resources. Rely on AI-powered Kubex - an automated Kubernetes optimization platform
Free 60-day Trial- Upgrading the control plane, which is done by running eksctl upgrade cluster.
- Replacing the nodegroups by creating the new nodegroups and then deleting the old nodegroups (the
new nodegroups will use the new Kubernetes version). - Updating the addons as required.
Once again, the official documentation is very
good.
Managing node groups
By default, eksctl creates a single, scalable node group. For many types of workloads, this will actually
be enough, but if your cluster has more complicated requirements, you might need two node groups or
more, each one with different specifications. Eksctl can create and delete node groups using eksctl
create nodegroup and eksctl delete nodegroup.
Alternatively, node groups can be specified in the config file. This has already been described in the
previous section entitled “Using a configuration file.”
It’s useful to understand that, as far as eksctl is concerned, node groups are “immutable.” In other
words, they can’t be changed once they are created. In practice, if you want to make a change to a node
group, you will need to delete it and recreate it.
Finally, you can use the –asg-access option with eksctl create cluster to enable autoscaling. This will
enable an IAM policy to allow the cluster autoscaler to add or remove nodes to or from node groups as
required.
Non-eksctl clusters
Eksctl can perform many operations on EKS clusters that were created with other tools. However, some
eksctl subcommands are available only for clusters that have been created with eksctl, especially
subcommands related to addons and identity providers.
Eksctl is recommended by AWS to upgrade the Kubernetes version of an EKS cluster, as shown in the official
documentation.
Contrasting eksctl and the AWS CLI
As can be seen in the various examples above, eksctl is quite user friendly. It also provides real-time
feedback on lengthy operations, such as creating or deleting clusters. In contrast, the AWS CLI is
really just a wrapper around AWS API calls, so it is very low-level and not user-friendly.
One eksctl command can easily expand to dozens of AWS CLI commands, especially when creating a cluster
where eksctl will create many objects in one go: VPC, security groups, the cluster itself, nodegroups,
etc.
On the other hand, many operations have a one-to-one equivalence between eksctl and the AWS CLI. For
example, to upgrade a cluster, eksctl will use eksctl upgrade cluster, while the AWS cli will use aws
eks update-cluster-version. Even in these cases, though, eksctl is usually easier to use.
Final thoughts
Eksctl was developed to replace many complicated AWS command-line interface commands. Eksctl provides
some good defaults, and almost all options can be modified through a custom config file, which makes
eksctl a non-opinionated tool. The AWS CLI can still be used on clusters created by eksctl for
operations not supported by eksctl.
So, eksctl is definitely an improvement over purely using the AWS CLI. However, as your project matures,
you will probably want to move away from manual commands and use infrastructure-as-code (IaC) tools,
such as Terraform, to define and manage your cluster. IaC lends itself much better to automation, for
example, through a continuous deployment pipeline, than eksctl commands.
Finally, eksctl is sometimes quirky and inconsistent; for example, specifying the cluster name is
sometimes done with –name and sometimes with –cluster. Another example is that one would expect to be
able to modify a cluster by modifying the config file that was used to create it in the first place and
applying a certain command, but that is not the case: eksctl does not support this.