EKS Storage - A Comprehensive Guide
Chapter 5- Introduction: EKS Best Practices: A Free, Comprehensive Guide
- Chapter 1: EKS Fargate: Features and Best Practices
- Chapter 2: AWS ECS vs. EKS: Comparison and Recommendations
- Chapter 3: A Free Guide to EKS Architecture
- Chapter 4: A Comprehensive Guide to Using eksctl
- Chapter 5: EKS Storage - A Comprehensive Guide
- Chapter 6: A Free Guide to Using EKS Anywhere
- Chapter 7: Fundamentals of EKS Logging
- Chapter 8: EKS Security: Concepts and Best Practices
- Chapter 9: How the EKS Control Plane Works
- Chapter 10: EKS Blueprints: Deployment and Best Practices
- Chapter 11: EKS Cost Optimization: Tutorial & Best Practices
As you probably know, Amazon Web Services (AWS) offers a solution for managed Kubernetes clusters called
the Elastic Kubernetes Service (EKS). Kubernetes is a very flexible container orchestration platform
that relies on plugins for integration with the underlying infrastructure provider. In this article, we
will review how the various Kubernetes storage aspects integrate with the AWS public cloud system in the
context of a Kubernetes cluster running in EKS.
In Kubernetes, there are two types of storage: ephemeral and permanent. Ephemeral storage is short-lived
and deleted when the pod using it terminates. Examples of ephemeral storage are the root filesystems of
containers or the emptyDir
volume type. Ephemeral storage is typically not specific to the infrastructure provider.
Permanent storage, as the name implies, is long-lived: It usually outlives the pod that uses it and
typically persists until explicitly deleted. In Kubernetes, permanent storage is usually associated with
a persistentVolumeClaim
volume type, but sometimes it can be a hostPath. Permanent storage
volumes are strongly tied to the infrastructure provider (except for hostPath) and thus will be the main
focus of this article.
In the case of EKS, there are only three options for persistent storage volumes:
- Elastic Block Store (EBS), which is akin to a hard drive directly connected to the
container - Elastic File System (EFS), which is a network file system based on the longstanding
Network File System (NFS) that has been extensively used throughout the UNIX world for decades - FSx, a network file system specific to the Windows operating system (so it can only
be used for containers running Windows)
Before we dive in, let’s clarify the difference between a pod and a container. In essence, a container is
a component of a pod; a pod can run one or more containers. Usually, if more than one container runs
inside a single pod, one is usually the “app” container, and the other containers run some supporting
software (such as a network proxy or for logging) and are usually called “side-cars.”
Summary of key EKS storage options
Here are the various storage options you will encounter when working on EKS.
| Ephemeral volume types | Container’s root file system | This ephemeral volume that is always present and is destroyed when a container is terminated. |
| emptyDir volume type | This mounts an empty directory from the host into the container. It is destroyed when the container is terminated. |
|
| CSI ephemeral volumes | These are ephemeral volumes provided by the platform; they are seldom used in practice. | |
| Special | hostPath volume type | This mounts a named directory from the host into the container. Any change made by the container persists until the host is terminated. This volume type is risky and can expose the host to attacks from compromised containers; it should only be used in very specific cases. |
| Persistent volume types | EBS volumes | These persistent volumes are backed by EBS. Their main drawback is that they are constrained to a single AZ and, consequently, their use makes high availability more difficult to configure. They offer very high performance. |
| EFS volumes | These persistent volumes are backed by EFS, the network file system based on NFS. EFS has good performance and can be accessed from pods in different AZs. |
|
| FSx volumes | These Windows-specific volumes feature high performance, but they are available only to containers running Windows. |
Ephemeral volumes
Container’s root file system
There is one ephemeral volume that is always present: the container’s root file system. In practice,
engineers won’t usually need to contend with it because everything works out of the box without any
issue. It is still interesting to understand how a container’s file system is structured and also how to
ensure that the container doesn’t use too much storage within its root file system.
The diagram below illustrates how a container’s file system works:
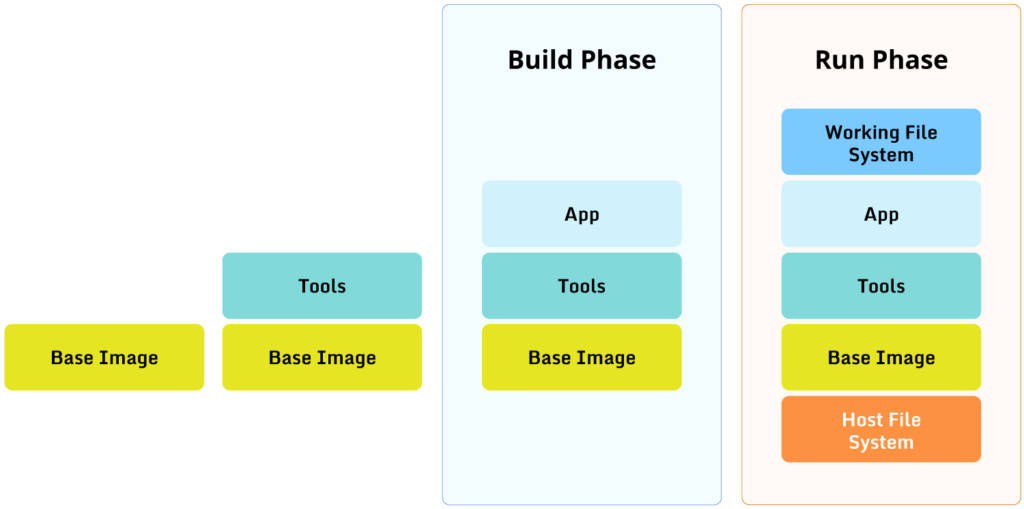
The left side of the diagram shows the container image being built. A container image is built using a Dockerfile; let’s assume our
Dockerfile looks like this:
$FROM ubuntu:22.04
RUN apt-get update && apt-get install curl git
WORKDIR /app
COPY app /app
ENTRYPOINT ["/app/my-app"]
Each phase of the build adds a file system layer, which works like this:
Spend less time optimizing Kubernetes Resources. Rely on AI-powered Kubex - an automated Kubernetes optimization platform
Free 60-day Trial- The build starts from an existing base image, in our case, ubuntu:22.04.
- The build runs some apt commands to install some tools, in our case curl and git, which creates a
new file system layer on top of the base image. - We set the working directory to /app, but this does not add a file system layer.
- Finally, the build copies the app directory into the container image, which creates a new file
system layer on top of the “tools” layer. - The last line in the Dockerfile instructs the container runtime to run the app when a container is
created based on the container image that we just built.
The right side of the diagram shows what happens when we run a container using the image we just built.
The stack of layers defined in the container image is sandwiched between the host file system at the
bottom and an ephemeral file system at the top. Anything running inside the container will see the
various layers from above, so to speak, with the top-most presenting files and directories that will
hide those of the layers below. For example, if the host file system already has curl installed, the
container will see the one in the “Tools” layer and not the one in the host file system.
Crucially, whenever a process running inside the container wants to perform a write operation (such as
creating a log file), it will do so only in the top-most ephemeral layer. (There are exceptions to this,
but let’s keep it simple for this illustration.) Whenever the container is terminated, the ephemeral
layer disappears with the container, so any data written into the top-most ephemeral container is lost.
Technically, the data that the container is writing into the ephemeral layer must be stored somewhere,
and the container runtime will usually store it in a temporary directory on the host. This means that if
left unchecked, the container might fill up the host’s file system. So, depending on your situation, it
might be worth making an extra effort to configure the container runtime to limit the amount of data the
container can write. For example, Docker has an
option to do just that.
The emptyDir volume type
Kubernetes offers the emptyDir volume type as an
easy way to mount an ephemeral volume into a container. The main reason why this volume type is
different from a container’s root file system is that an emptyDir is tied to the lifetime of a pod, not
the lifetime of a container. In practice, kubelet creates a temporary directory that will be mounted as
the emptyDir inside the pod. Once the pod terminates, kubelet will delete the temporary directory.
One typical usage of an emptyDir volume is to have some init containers
perform work or download files and store the result into an emptyDir volume. This can then be mounted by
the container running the actual app.
CSI ephemeral volumes
Generally speaking, the link between Kubernetes and the underlying infrastructure provider when it comes
to storage is the Container Storage Interface (CSI). The infrastructure provider must implement a CSI
plugin to allow Kubernetes to access the actual storage devices offered by the infrastructure provider.
Kubernetes allows the CSI plugin to provide ephemeral volumes to the containers. This option is seldom
used in practice, however: Other, simpler solutions such as emptyDir are used more often.
hostPath
This is a type of volume offered by Kubernetes that mounts a directory from the host system into the
container. Such a volume is persistent in the sense that the data in it survives if the pod that uses it
is terminated, but it is not truly permanent because the data disappears if the worker node is
terminated for any reason.
Please note that the use of hostPath is fraught with security risks and is thus strongly discouraged. The
hostPath volume type, compared to emptyDir, takes an existing directory on the host and mounts it inside
the pod, which gives the pod access to everything inside that directory. If the host directory contains,
for example, some system files, that will make it vulnerable to attacks or leaks if the pod is
compromised.
Spend less time optimizing Kubernetes Resources. Rely on AI-powered Kubex - an automated Kubernetes optimization platform
Free 60-day TrialThere are some cases where the use of hostPath is necessary, which usually involve apps that report
monitoring information or metrics from the host on which they are running. Outside of such very limited
use cases, though, there is little justification for using hostPath; instead, use safer options, such as
persistentVolumeClaims.
Persistent volumes
As mentioned earlier, a persistent volume is typically not deleted when the pod that uses it is
terminated. The most common use case for a persistent volume is within a StatefulSet. Pods
in a StatefulSet are handled carefully by the Kubernetes controller and are allocated one or more
persistent volumes. A StatefulSet can be scaled out and in; when it is scaled out because of an increase
in workload, new pods will be created with newly created persistent volumes attached to them. When a pod
is terminated because the StatefulSet is scaled back in, its persistent volume is preserved. When the
StatefulSet is scaled out again, a pod is recreated with the same name, and the persistent volume is
attached back to it.
Persistent volumes must be implemented by the infrastructure provider on which the Kubernetes cluster is
running by using a CSI plugin. In the case of EKS, there are three types of persistent volumes: EBS,
EFS, and FSx.
EBS-backed persistent volumes
An EBS-backed volume can be viewed fairly accurately as a hard drive connected directly to the pod. As
such, it is very fast and is block-based.
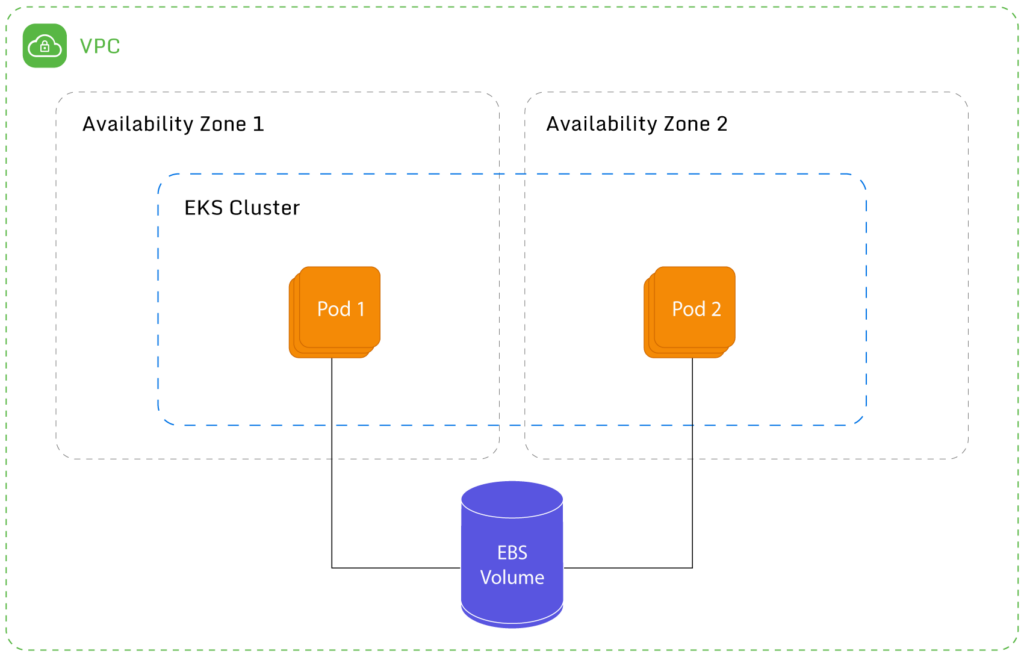
The following diagram illustrates an EBS-backed volume attached to a pod:
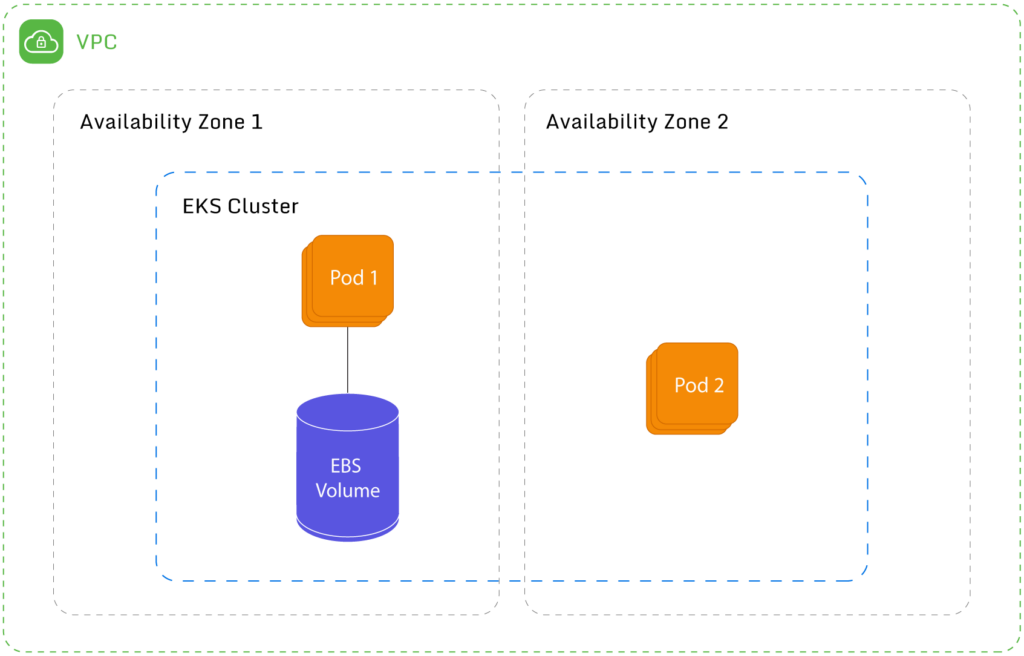
Unfortunately, the major drawback to using EBS-backed volumes is that each volume is tied to a specific
availability
zone (AZ). This means that if a pod running in AZ1 is terminated and “recreated” on a different
node in a different availability zone (say AZ2), it won’t be able to mount the EBS-backed volume because
the volume is located in AZ1. If you are experimenting, you might have a cluster limited to a single AZ,
but as soon as you are serious in your project, you will want high availability, which means using two
or more AZs.
Unfortunately, there is no easy solution to this problem. One solution would be to create multiple
managed node groups, one per AZ, and ensure that pods are scheduled on the same node group every time.
Although this would require additional work and introduces complexity, it should be good enough for most
workloads.
Also be aware that EBS volumes are not available to pods running in Fargate.
It should be noted that the EBS CSI driver is not enabled by default in EKS. The AWS documentation describes
how to add the EBS CSI driver to an existing cluster, which typically involves the following steps:
- Create an IAM policy and role to allow the EBS CSI driver to make the necessary calls to the AWS
API. - Install the EBS CSI addon in the target cluster.
The way to use EBS as the backend for a given persistentVolumeClaim is to use the appropriate storageClassName;
in the case of EBS, this is typically gp2.
Spend less time optimizing Kubernetes Resources. Rely on AI-powered Kubex - an automated Kubernetes optimization platform
Free 60-day TrialEFS-backed persistent volumes
EFS is a network file system using the same protocol as the veteran NFS. It is file-based and grows as
required based on how much data you write into it. Its performance is very good, and it has no issues
with multiple AZs like EBS. Generally speaking, EBS is cheaper (assuming that it is properly sized)
because you are billed based on size and not usage. It also has better performance, so you might need to
do your own research to determine which is best for you.
As can be seen from the diagram above, an additional advantage is that an EFS volume can be mounted by
two or more pods. To be fair, AWS recently introduced the ability for EBS volumes to also be mounted by
multiple instances, but this feature has a pretty
long list of limitations.
EFS is also available to pods running in Fargate. Note that with EFS, you are billed on actual usage,
unlike EBS, where you are billed by the size of the disk (no matter how full it is). This could
potentially make EBS more expensive than EFS if improperly sized.
Like the EBS CSI driver, the EFS CSI driver is not enabled by default in EKS clusters. The steps to
enable the EFS CSI driver are similar to the ones for the EBS CSI driver:
- Create an IAM policy and role to allow the EFS CSI driver to make the necessary calls to the AWS
API. - Install the EFS CSI addon in the target cluster.
For more detailed steps, please refer to the AWS documentation.
FSx-backed persistent volumes
FSx is a network file system like EFS that is specific to Windows, so it is available only to containers
running Windows, not Linux. Apart from that, it is similar in usage to EFS (except that it is not
available to pods running in Fargate), so we won’t cover it in detail in this article.
Installing the FSx CSI driver involves the following steps:
- Create an IAM role that can be attached to Kubernetes service accounts.
- Deploy the FSx CSI driver (which is done through a Kubernetes manifest file).
- Patch the controller service account created by the manifest file to be linked with the IAM role
created in the first step.
Please refer to the AWS
documentation for more information.
Recommendations
For ephemeral storage in EKS, emptyDir is the option you should consider first. In the event that you
need a large amount of ephemeral storage, some other option could be considered. One option is using an
ephemeral volume provided by the CSI driver, if available, or if not available, simply using a
persistent volume configured to be deleted when the pod that uses it is terminated.
For persistent volumes in EKS, EFS is most likely the best solution for the large majority of workloads.
It is fast and has very few limitations; for example, it is not limited to a single AZ and does not have
a fixed size.
If you are running Windows containers, FSx volumes are worth investigating.
EBS volumes should be avoided unless they are needed for very specific corner cases. For example,
Prometheus (which is a monitoring tool) does not officially
support NFS. In such a case, EBS volumes are the only option for persistent storage, even with
all the issues that they bring.
Spend less time optimizing Kubernetes Resources. Rely on AI-powered Kubex - an automated Kubernetes optimization platform
Free 60-day TrialConclusion
When it comes to ephemeral storage, EKS does not provide AWS-specific options. You can still rely on
options offered by Kubernetes itself, most notably, emptyDir.
EKS provides three CSI drivers: EBS, EFS, and FSx. If your workload runs Linux, you have to choose
between EBS and EFS. EBS has better performance, generally speaking, but requires more care in how the
node groups are set up because of the AZ limitation. EFS, on the other hand, is easier to set up and can
be used on Fargate. Some analysis is required to make the right choice. FSx is Windows-specific but is
probably a very good option if you are running Windows containers.

Instant access to Sandbox
Experience automated Kubernetes resource optimization in action with preloaded demo data.
Instant access to Sandbox
Experience automated Kubernetes resource optimization in action with preloaded demo data.