Kubernetes Service Discovery
Chapter 11- Introduction: Kubernetes Autoscaling
- Chapter 1: Vertical Pod Autoscaler (VPA)
- Chapter 2: Kubernetes HPA
- Chapter 3: K8s Cluster Autoscaler
- Chapter 4: K8s ResourceQuota Object
- Chapter 5: Kubernetes Taints & Tolerations
- Chapter 6: Guide to K8s Workloads
- Chapter 7: Kubernetes Service Load Balancer
- Chapter 8: Kubernetes Namespace
- Chapter 9: Kubernetes Affinity
- Chapter 10: Kubernetes Node Capacity
- Chapter 11: Kubernetes Service Discovery
- Chapter 12: Kubernetes Labels
Modern cloud-native applications run as microservices using pods or containers.
In these environments, microservices need to communicate dynamically without manual configuration.
Service discovery makes this possible.
In this article, we’ll explore service discovery in-depth and review how Kubernetes service discovery works.
Additionally, we’ll walk through some examples of working with Kubernetes service discovery to help you gain
practical configuration experience.
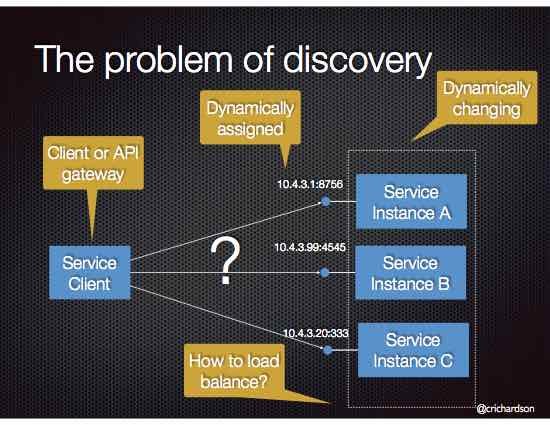
What is Service Discovery?
Service discovery is a mechanism by which services discover each other dynamically without
the need for hard coding IP addresses or endpoint configuration.
In modern cloud-native infrastructure such as Kubernetes, applications are designed using microservices.
The different components need to communicate within a microservices architecture for applications to function,
but individual IP addresses and endpoints change dynamically.
As a result, there is a need for service discovery so services can automatically discover each other.
Types of service discovery
There are multiple different types of service discovery. Let’s take a look at some of the most popular approaches.
Server-side service discovery
Server-side service discovery involves putting a load balancer (LB) in front of the service and
letting the load balancer connect to service instances. This process eliminates client-side complexity.
The client simply points to the IP or DNS name of the load balance.
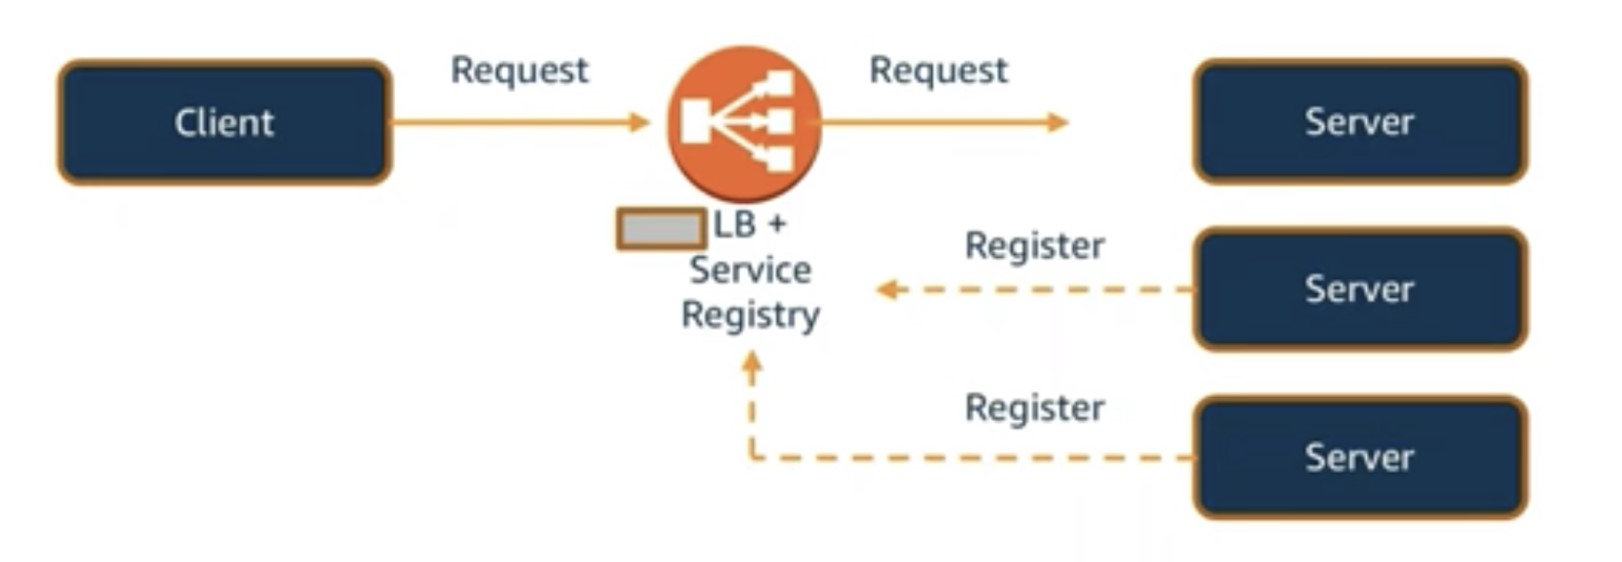
This approach simplifies service discovery for the clients, but the LB becomes a single point of failure and bottleneck.
Additionally, the LB must implement service discovery logic to point to the correct
instances of pods running at any point in time.
Service registry
Another approach to service discovery is to remove the LB
component and implement service discovery on the client-side using a centralized service registry.
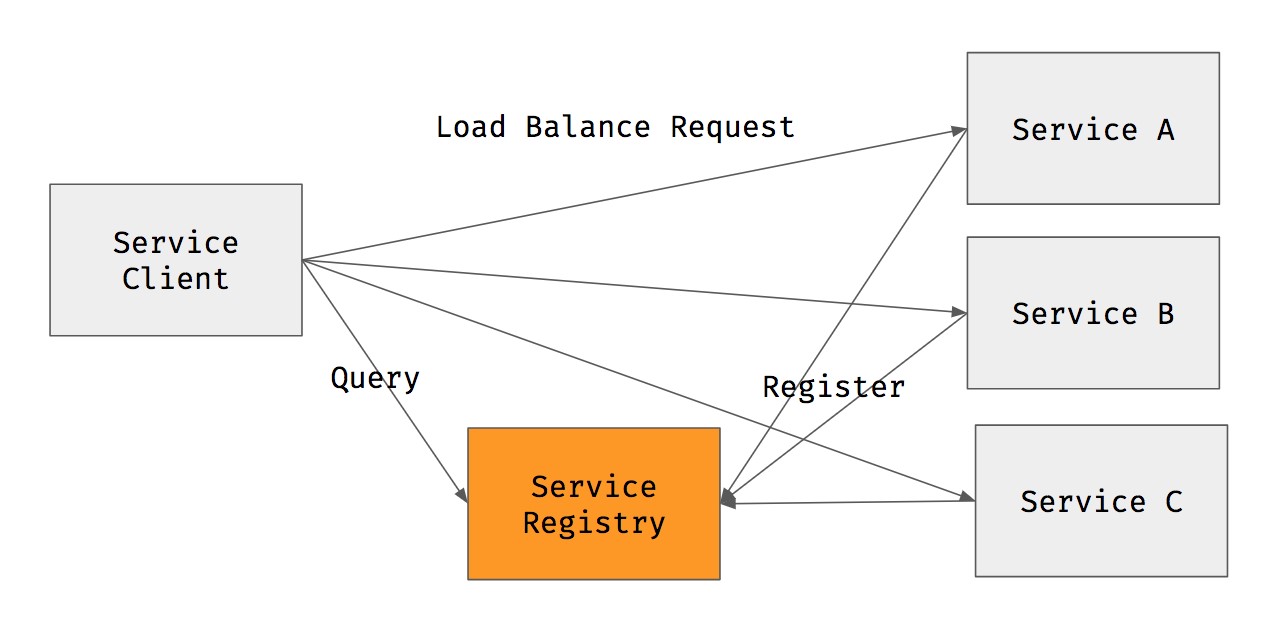
The service registry contains information about service endpoints where clients can send requests.
The main advantage of a service registry
compared to a server-side approach is that there is one less component to manage (no LB) and no bottleneck.
However, the tradeoff is that a service registry complicates the client-side logic. The client must
implement logic to keep the registry updated to ensure it contains the latest information about the
backend pods/containers.
Kubernetes Service Discovery
Now that we understand service discovery in general let’s explore the specifics of Kubernetes service discovery.
Kubernetes service discovery for API-aware clients
In Kubernetes, an application deployment consists of a pod or set of pods.
Those pods are ephemeral, meaning that the IP addresses and ports
change constantly. This constant change makes service discovery a significant challenge in the Kubernetes world.
One way Kubernetes provides service discovery is through its endpoints API. With the endpoints API,
client software can discover the IP and ports of pods in an application.
In the example below, the Kubernetes control plane ETCD acts as a service registry where
all the endpoints are registered and kept up to date by Kubernetes itself. For example, a service mesh can
implement logic to use an API for service discovery. That process is the native service discovery provided by Kubernetes.
Spend less time optimizing Kubernetes Resources. Rely on AI-powered Kubex - an automated Kubernetes optimization platform
Free 60-day Trial

Kubernetes service discovery using service objects and kube-proxy
Not all clients are API-aware. Fortunately, Kubernetes provides service
discovery in other ways in case the client doesn’t use the API directly.
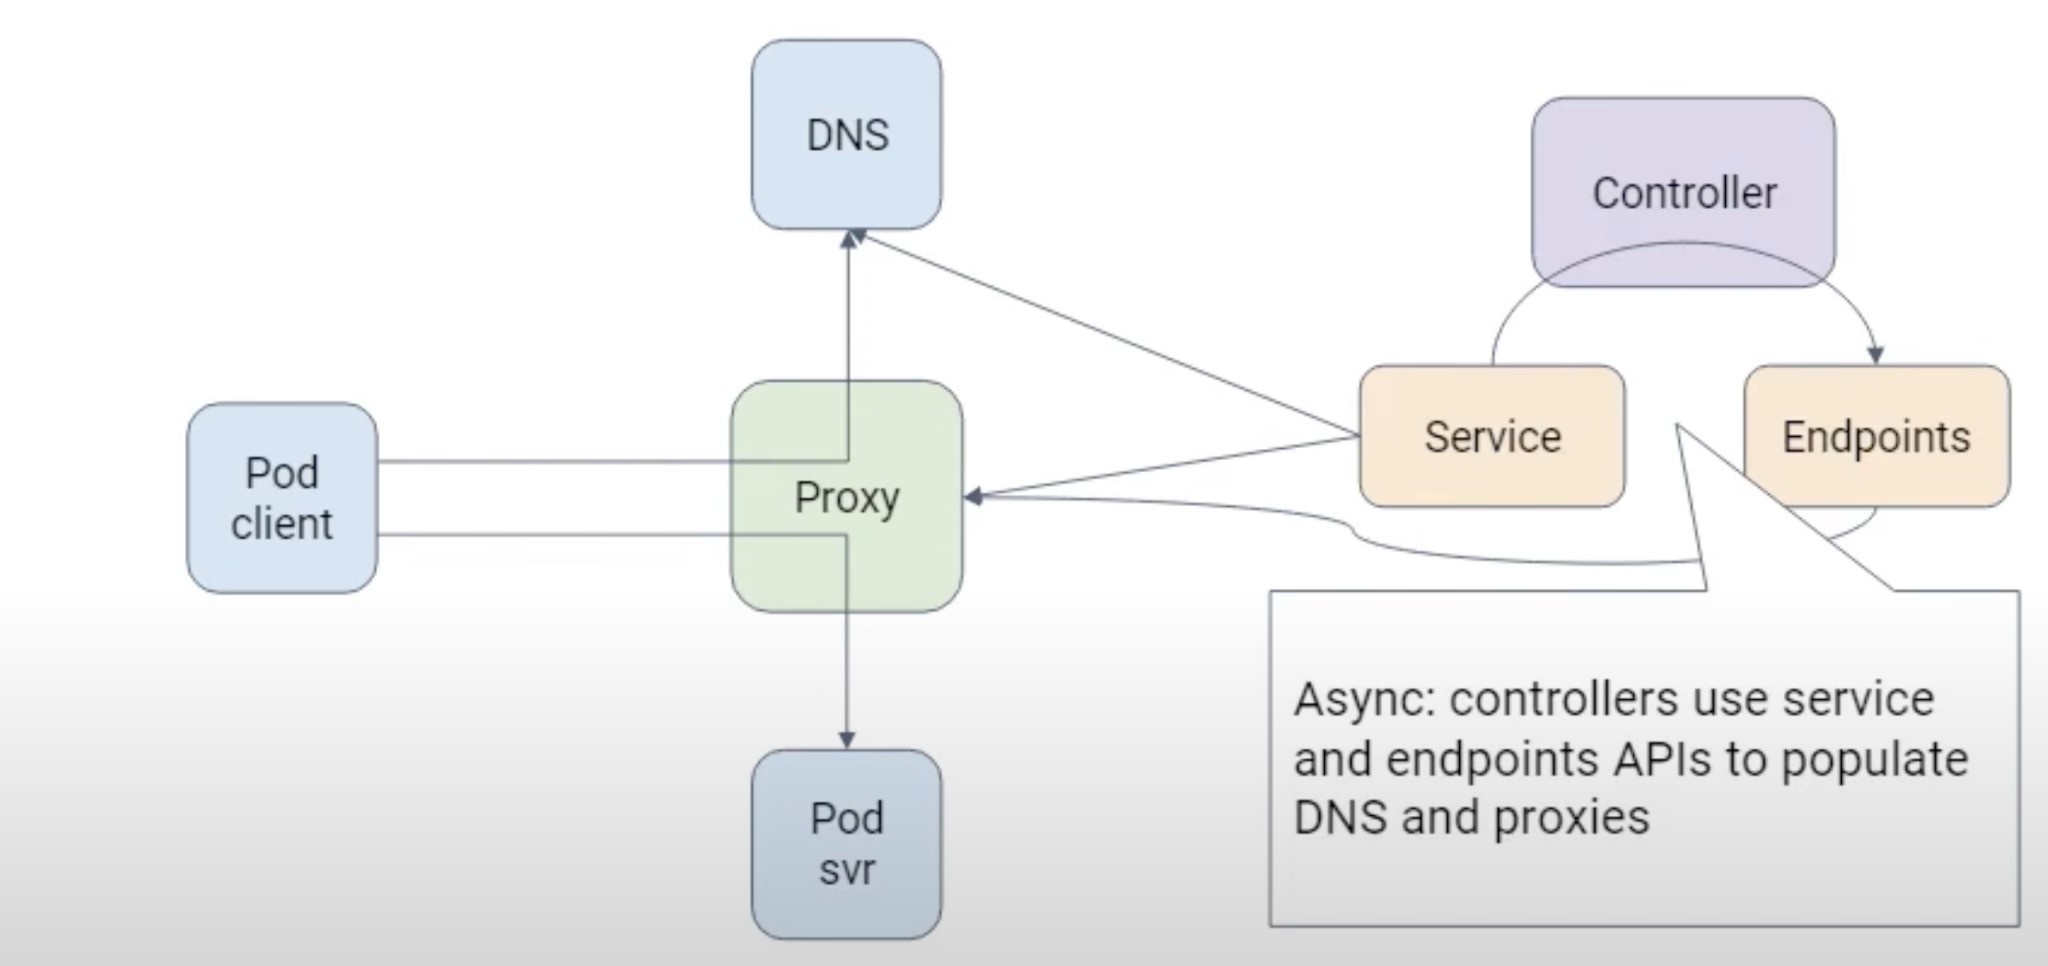
A Kubernetes service object is a stable endpoint that points to a group of
pods based on label selectors. It proxies requests to the backend pods using labels and selectors.
Since the pods can come and go dynamically in Kubernetes, a service object serves the purpose of never changing the
endpoint or IP address that will point to the list of running pods.
The requests are also load-balanced over a set of pods if multiple pods are running in the same application.
The clients can use the DNS name of the Kubernetes service. The internal
DNS in Kubernetes handles the mapping of service names to service IP addresses.
Using DNS for name to IP mapping is optional, and Kubernetes can use environment variables for this purpose.
When a pod is created, some variables are automatically injected into the pod to map the names to IP addresses.
A kube-proxy instance running on each worker node handles the underlying implementation of Kubernetes Service.
Kubernetes service discovery examples
Now, let’s get hands-on with Kubernetes service discovery. Note that you’ll need access to a Kubernetes cluster to follow along.
Below, we’ll walk through an example application deployment and see that Kubernetes DNS maps
the service names automatically. We’ll also see that the environment variables related to service
discovery are auto-injected into the pods. This gives the application developer a choice of using the
Kubernetes DNS names to connect to other services or using environment variables.
To get started, create a test namespace for this demo:
Spend less time optimizing Kubernetes Resources. Rely on AI-powered Kubex - an automated Kubernetes optimization platform
Free 60-day Trial$ kubectl create ns demo
namespace/demo created
Next, create an nginx app deployment:
$ kubectl -n demo apply -f
https://k8s.io/examples/application/deployment-update.yaml
deployment.apps/nginx-deployment created
Next, see if the pods are up and running and confirm if the endpoints are available.
You will notice that the endpoints are not available. This is because we have not created a service object yet.
$ kubectl -n demo get pods
NAME                                READY   STATUS    RESTARTS   AGE
nginx-deployment-559d658b74-k79zt   1/1     Running   0          45s
nginx-deployment-559d658b74-xjpvb   1/1     Running   0          45s

## check if the pods endpoints are available in Kubernetes ( not yet )
$ kubectl -n demo get ep
No resources found in demo namespace.
Create a service object for the deployment using the kubectl expose command.
$ kubectl -n demo expose deployment/nginx-deployment
service/nginx-deployment exposed

$ kubectl -n demo get svc
NAME               TYPE        CLUSTER-IP       EXTERNAL-IP   PORT(S)   AGE
nginx-deployment   ClusterIP   10.245.202.247   ‹none›        80/TCP    13s
Now, check the endpoints and see they report
pod IP/port addresses. Note there are two addresses , because we are running two replica pods for the deployment.
$ kubectl -n demo get endpoints
NAME               ENDPOINTS                         AGE
nginx-deployment   10.244.2.152:80,10.244.2.203:80   24s
You can see the service definition created by the expose command using this command:
$ kubectl -n demo get svc nginx-deployment -o yaml

- apiVersion: v1
  kind: Service
  metadata:
    name: nginx-deployment
    namespace: demo
    resourceVersion: "31628410"
    uid: 45a58559-d9e3-43a6-bfbc-e3ab6bb4aff0
  spec:
    clusterIP: 10.245.202.247
    clusterIPs:
    - 10.245.202.247
    ports:
    - port: 80
      protocol: TCP
      targetPort: 80
    selector:
      app: nginx
    sessionAffinity: None
    type: ClusterIP
  status:
    loadBalancer: {}
Spend less time optimizing Kubernetes Resources. Rely on AI-powered Kubex - an automated Kubernetes optimization platform
Free 60-day TrialNote the IP address of the service. It is auto-mapped by DNS. Additionally, as we can see below,
env vars are automatically injected into the service name by Kubernetes for service discovery.
$ kubectl -n demo get svc
NAME               TYPE        CLUSTER-IP       EXTERNAL-IP   PORT(S)   AGE
nginx-deployment   ClusterIP   10.245.202.247   ‹none›        80/TCP    82s
Now, let’s create a client pod to connect to the application deployment. We will test service
discovery by doing nslookup on the service name and see the auto-created
environment variables related to service discovery.
$ kubectl -n demo run tmp-shell --rm -i --tty --image nicolaka/netshoot --
/bin/bash
Let’s do a name lookup for the nginx service if we can find it (and yes we do):
bash-5.1# nslookup nginx-deployment
Server:10.245.0.10
Address:10.245.0.10#53

Name:nginx-deployment.demo.svc.cluster.local  ( auto mapped to FQDN )
Address: 10.245.202.247 ( IP of the service )
Access the app/service by Service name:
bash-5.1# curl nginx-deployment
‹!DOCTYPE html›
‹html›
‹head›
‹title›Welcome to nginx!‹/title›
‹style›
    body {
        width: 35em;
        margin: 0 auto;
        font-family: Tahoma, Verdana, Arial, sans-serif;
    }
‹/style›
‹/head›
‹body›
‹h1›Welcome to nginx!‹/h1›
‹p›If you see this page, the nginx web server is successfully installed and
working. Further configuration is required.‹/p›

‹p›For online documentation and support please refer to
‹a href="http://nginx.org/"›nginx.org‹/a›.‹br/›
Commercial support is available at
‹a href="http://nginx.com/"›nginx.com‹/a›.‹/p›

‹p›‹em›Thank you for using nginx.‹/em›‹/p›
‹/body›
‹/html›
bash-5.1#
Check the pod environment variables related to service discovery
bash-5.1# env
KUBERNETES_SERVICE_PORT_HTTPS=443
KUBERNETES_SERVICE_PORT=443
NGINX_DEPLOYMENT_PORT_80_TCP_PROTO=tcp
HOSTNAME=netshoot
NGINX_DEPLOYMENT_PORT_80_TCP=tcp://10.245.202.247:80
PWD=/root
HOME=/root
KUBERNETES_PORT_443_TCP=tcp://10.245.0.1:443
NGINX_DEPLOYMENT_PORT_80_TCP_ADDR=10.245.202.247
NGINX_DEPLOYMENT_SERVICE_PORT=80
NGINX_DEPLOYMENT_PORT_80_TCP_PORT=80
NGINX_DEPLOYMENT_SERVICE_HOST=10.245.202.247
TERM=xterm
SHLVL=1
KUBERNETES_PORT_443_TCP_PROTO=tcp
KUBERNETES_PORT_443_TCP_ADDR=10.245.0.1
NGINX_DEPLOYMENT_PORT=tcp://10.245.202.247:80
KUBERNETES_SERVICE_HOST=10.245.0.1
KUBERNETES_PORT=tcp://10.245.0.1:443
KUBERNETES_PORT_443_TCP_PORT=443
PATH=/usr/local/sbin:/usr/local/bin:/usr/sbin:/usr/bin:/sbin:/bin
_=/usr/bin/env
The output above shows that the DNS auto-created the mapping of service name to
IP address for the service that the client pod can use to access the nginx. The
successful curl command demonstrates the mapping works.
Additionally, we saw that the pod environment is auto-populated by the variables
related to service discovery. The client pod can use these variables to
connect to the nginx service.
Spend less time optimizing Kubernetes Resources. Rely on AI-powered Kubex - an automated Kubernetes optimization platform
Free 60-day TrialFinally, now that we’re done, clean up the namespace.
$ kubectl delete ns demo --cascade
namespace "demo" deleted
Conclusion
Kubernetes makes the transition from traditional virtual or bare metal systems to containers simple and
provides a reliable solution for service discovery and load balancing out of the box. A Kubernetes service
object (implemented through kube-proxy on Kubernetes nodes)
provides a stable endpoint or IP address that routes requests to a set of pods that serve an application or microservice.
An application can make use of DNS names, of Kubernetes Service, or environment variables available inside the pods to connect
to other services without needing to worry about the actual number of pods running and their IP addresses or port numbers.

Instant access to Sandbox
Experience automated Kubernetes resource optimization in action with preloaded demo data.
Instant access to Sandbox
Experience automated Kubernetes resource optimization in action with preloaded demo data.