Kubernetes Affinity
Chapter 9- Introduction: Kubernetes Autoscaling
- Chapter 1: Vertical Pod Autoscaler (VPA)
- Chapter 2: Kubernetes HPA
- Chapter 3: K8s Cluster Autoscaler
- Chapter 4: K8s ResourceQuota Object
- Chapter 5: Kubernetes Taints & Tolerations
- Chapter 6: Guide to K8s Workloads
- Chapter 7: Kubernetes Service Load Balancer
- Chapter 8: Kubernetes Namespace
- Chapter 9: Kubernetes Affinity
- Chapter 10: Kubernetes Node Capacity
- Chapter 11: Kubernetes Service Discovery
- Chapter 12: Kubernetes Labels
Kubernetes (K8s) scheduler often uses simple rules based on resource availability to place pods on nodes.
That’s fine for many use cases. However, sometimes, you may need to go beyond simple resource-based scheduling.
For example, what if you want to schedule pods on specific nodes? Or, what if you want to avoid deploying specific pods on the same nodes?
That’s where Kubernetes affinity and Kubernetes anti-affinity come in. They are advanced K8s scheduling techniques that can help you create flexible scheduling policies.
In general, affinity enables the Kubernetes scheduler to place a pod either on a group of nodes or a pod relative to the
placement of other pods. To control pod placements on a group of nodes, a user needs to use node affinity rules. In contrast,
pod affinity or pod anti-affinity rules provide the ability to control pod placements relative to other pods.
In this article, to help you hit the ground running with Kubernetes affinity, we’ll take a closer look at advanced scheduling methods,
deep-dive into the different types of K8s affinity, and provide a node affinity demo so you can get hands-on with Kubernetes advanced scheduling.
Kubernetes Advanced Pod Scheduling Techniques
Before we jump into Kubernetes affinity, let’s take a step back and review the different custom pod scheduling techniques
available to us. In the table below, you’ll see a breakdown of the various advanced scheduling methods,
including Node Affinity and Pod Affinity/Anti-Affinity.
| Technique | Summary |
|---|---|
| Taints and Tolerations | Allowing a Node to control which pods can be run on them and which pods will be repelled. |
| NodeSelector | Assigning a Pod to a specific Node using Labels |
| Node Affinity | Similar to NodeSelector but More expressive and flexible such as adding “Required” and “Preferred” Rules |
| Pod Affinity and Anti-Affinity | Co-locating Pods or Placing Pods away from each other based on Affinity and Anti-Affinity Rules |
Now let’s take a closer look at each technique.
K8s Taints and Tolerations
With Taints, nodes have control over pod placement. Taints allow nodes to define which pods can be placed on them and which pods are repelled away from them.
For example, suppose you have a node with special hardware and want the scheduler only to deploy pods requiring the special hardware.
You can use Tolerations for the node’s Taints to meet this requirement.
The pods that require special hardware must define toleration for the Taints on those nodes. With the Toleration, the nodes will allow the pods to run on them.
K8s NodeSelector
NodeSlector is the simplest way to schedule a pod on a node. It works by defining a label for a node and then binding the
pod to that node by matching the label in the pod spec. It is a simple approach that works in some cases. However, it is not flexible enough for complex pod scheduling.
Spend less time optimizing Kubernetes Resources. Rely on AI-powered Kubex - an automated Kubernetes optimization platform
Free 60-day TrialNode Affinity
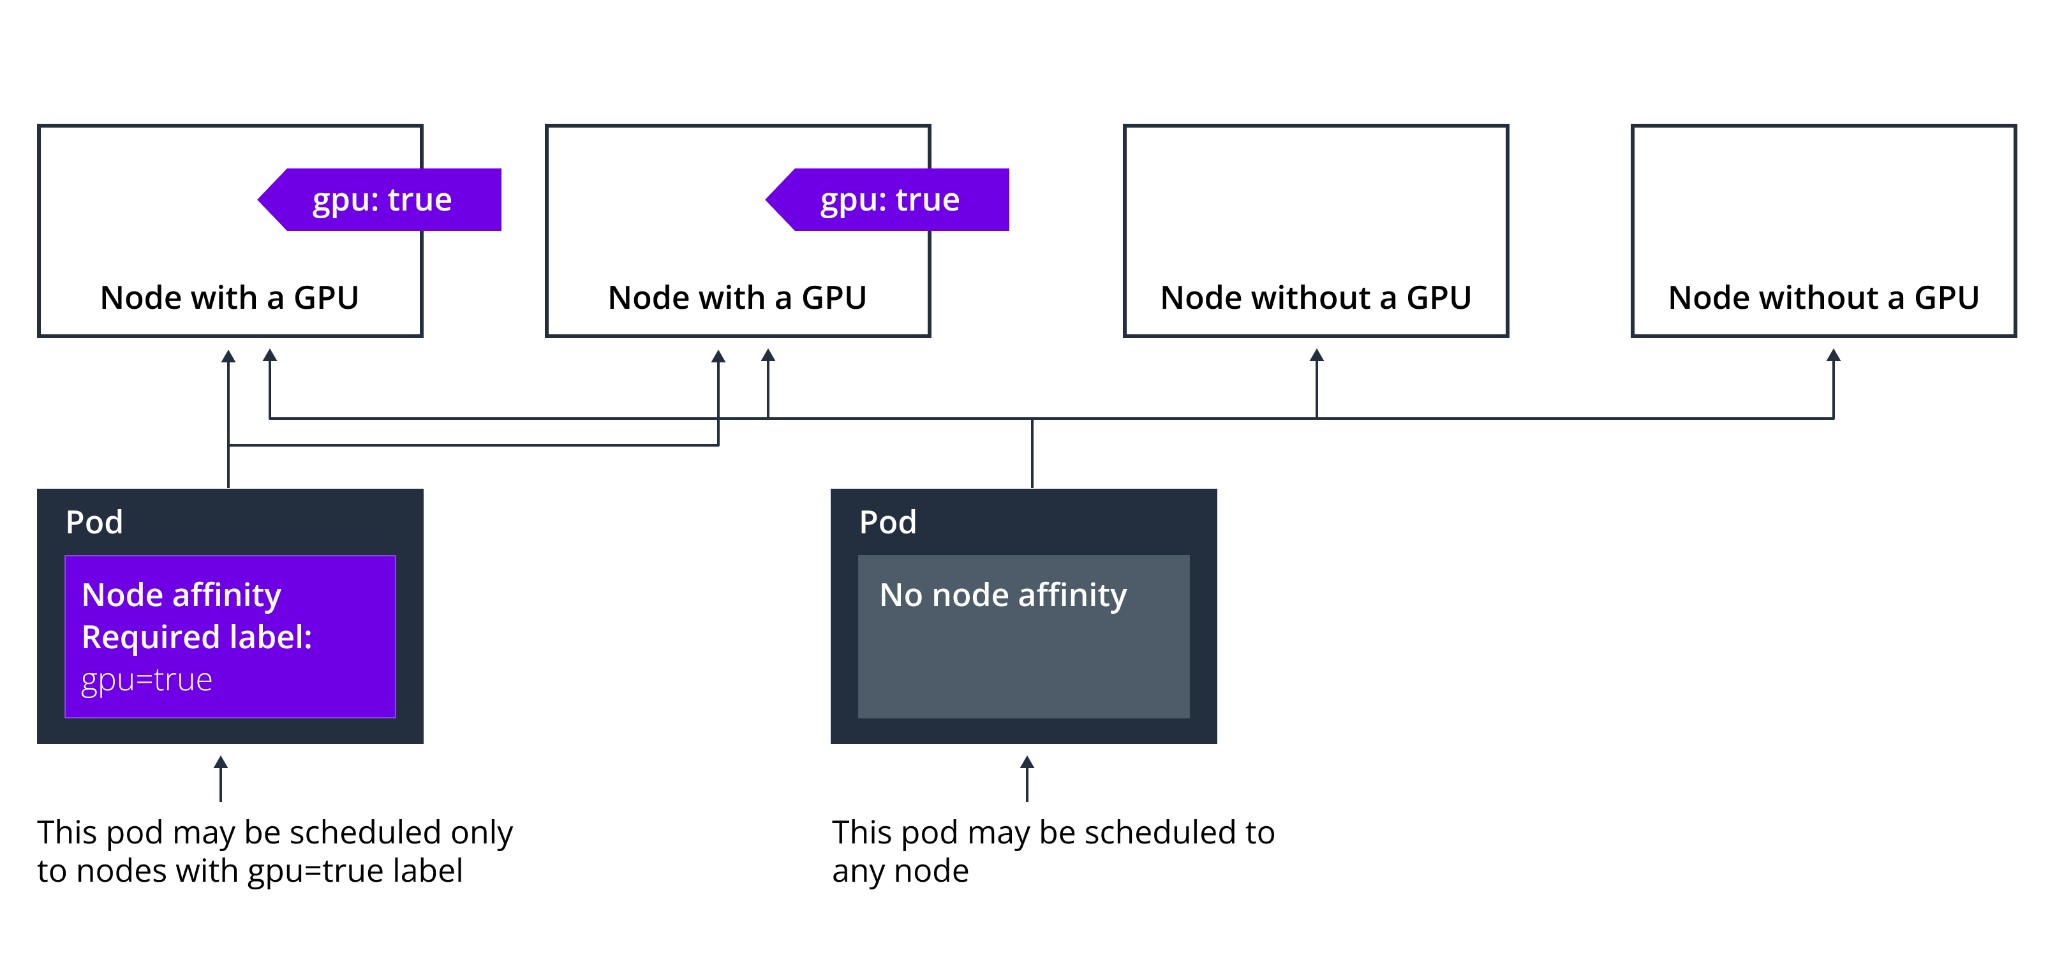
Node affinity rules use labels on nodes and label selectors in the pod specification file. Nodes don’t have control over the placement. If the scheduler places a
pod using the node affinity rule and the rule is no longer valid later (e.g., due to a change of labels), the pod will continue to run on that node.
There are many use cases for node affinity, including placing a pod on a group of nodes with a specific CPU/GPU and placing pods on nodes in a particular availability zone.

There are two types of Node Affinity rules:
- Required
- Preferred
Required rules must always be met for the scheduler to place the pod. With preferred rules the scheduler will try to enforce the rule, but doesn’t guarantee the enforcement.
Pod Affinity and Pod Anti-Affinity
Pod Affinity and Anti-Affinity enable the creation of rules that control where to place
the pods relative to other pods. A user must label the nodes and use label selectors in pod specifications.
Pod Affinity/Anti-Affinity allows a pod to specify an affinity (or anti-affinity) towards a
set of pods. As with Node Affinity, the node does not have control over the placement of the pod.
Affinity rules work based on labels. With an affinity rule, the scheduler can place the pod on
the same node as other pods if the label on the new pod matches the label on the other pod.

An anti-affinity rule tells the scheduler not to place the new pod on the same node if the label on the
new pod matches the label on another pod. Anti-affinity allows you to keep pods away from each other. Anti-affinity is useful in cases such as:
avoiding placing a pod that will interfere in the performance of an existing pod on the same node.

Like Node Affinity rules, Pod affinity rules also have “Required” and “Preferred” modes. In the “Required” mode, a
rule must be met for the scheduler to place the pod. In “Preferred” mode, scheduling based on the rule is not guaranteed.
Node Affinity Demo
Now that you understand Kubernetes affinity let’s jump into our Node Affinity demo.
In this demo, we’ll go through step-by-step instructions to:
- Explain how Node Affinity rules work by labeling some nodes in the cluster
- Create a deployment with a Node Affinity rule in a pod specification
- See that the pods are placed on the nodes with given labels.
First let us see the list of nodes in the cluster:
$ kubectl get nodes
                    NAME                                            STATUS   ROLES               AGE    VERSION
                    k8s-node-master-1   Ready    controlplane,etcd   723d   v1.15.12
                    k8s-node-master-2   Ready    controlplane,etcd   723d   v1.15.12
                    k8s-node-master-3   Ready    controlplane,etcd   723d   v1.15.12
                    k8s-node-worker-1   Ready    worker              723d   v1.15.12
                    k8s-node-worker-2   Ready    worker              723d   v1.15.12
                    k8s-node-worker-3   Ready    worker              723d   v1.15.12
                    k8s-node-worker-4   Ready    worker              723d   v1.15.12
Label two nodes for node affinity demo, so that the pods can be placed on labeled nodes by affinity rule:
Spend less time optimizing Kubernetes Resources. Rely on AI-powered Kubex - an automated Kubernetes optimization platform
Free 60-day Trial
$ kubectl label node k8s-node-worker-3 app=frontend
                    node/k8s-node-worker-3 labeled

                    $ kubectl label node k8s-node-worker-4 app=frontend
                    node/k8s-node-worker-4 labeled
Next, create a namespace for the demo:
$ kubectl create ns test
                    namespace/test created
Next, create the following deployment file with node affinity in the pod spec:
apiVersion: apps/v1
                    kind: Deployment
                    metadata:
                      name: node-affinity
                      namespace: test
                    spec:
                      replicas: 4
                      selector:
                        matchLabels:
                          run: nginx
                      template:
                        metadata:
                          labels:
                            run: nginx
                        spec:
                          containers:
                          - image: nginx
                            imagePullPolicy: Always
                            name: nginx
                          affinity:
                            Node affinity:
                              requiredDuringSchedulingIgnoredDuringExecution:
                                nodeSelectorTerms:
                                - matchExpressions:
                                  - key: app
                                    operator: In
                                    values:
                                    - frontend
Spend less time optimizing Kubernetes Resources. Rely on AI-powered Kubex - an automated Kubernetes optimization platform
Free 60-day TrialNow, create the deployment using the YAML file:
$ kubectl create -f deployment-node-affinity.yml
                    deployment.apps/node-affinity created
Next, see if the deployment was created successfully:
$ kubectl get deploy -n test
                    NAME            READY   UP-TO-DATE   AVAILABLE   AGE
                    node-affinity   4/4     4            4           10s
Next, get the list of pods created:
$ kubectl get pods -n test
                    NAME                             READY   STATUS    RESTARTS   AGE
                    node-affinity-7fd7f8f75f-dng7b   1/1     Running   0          30s
                    node-affinity-7fd7f8f75f-frsxz   1/1     Running   0          30s
                    node-affinity-7fd7f8f75f-nn6jl   1/1     Running   0          30s
                    node-affinity-7fd7f8f75f-wpc66   1/1     Running   0          30s
Next, to check if the pod affinity rule worked, get the list of pods on nodes and make sure the pods were placed on nodes with label app=frontend, i.e worker3, worker4 in this case:
$ kubectl get pod -o=custom-columns=NODE:.spec.nodeName,NAME:.metadata.name -n test

                    NODE                                            NAME
                    k8s-node-worker-4   node-affinity-7fd7f8f75f-dng7b
                    k8s-node-worker-4   node-affinity-7fd7f8f75f-frsxz
                    k8s-node-worker-3   node-affinity-7fd7f8f75f-nn6jl
                    k8s-node-worker-3   node-affinity-7fd7f8f75f-wpc66
Finally, clean up the demo resources:
$ kubectl delete ns test --cascade
                    namespace "test" deleted
Pod Affinity and Anti-Affinity Demo
Let’s assume we have a Redis cache for web applications and we need to run three replicas of Redis but we need to make
sure that each replica runs on a different node, we make use of pod anti-affinity here.
Redis deployment with pod anti-affinity rule, so that each replica lands on a different node:
cat redis.yaml

                    apiVersion: apps/v1
                    kind: Deployment
                    metadata:
                      name: redis-cache
                      namespace: test
                    spec:
                      selector:
                        matchLabels:
                          app: store
                      replicas: 3
                      template:
                        metadata:
                          labels:
                            app: store
                        spec:
                          affinity:
                            podAntiAffinity:
                              requiredDuringSchedulingIgnoredDuringExecution:
                              - labelSelector:
                                  matchExpressions:
                                  - key: app
                                    operator: In
                                    values:
                                    - store
                                topologyKey: "kubernetes.io/hostname"
                          containers:
                          - name: redis-server
                            image: redis:3.2-alpine
Create the deployment using the yaml file above:
kubectl create -f redis.yaml
                    deployment.apps/redis-cache created
Spend less time optimizing Kubernetes Resources. Rely on AI-powered Kubex - an automated Kubernetes optimization platform
Free 60-day TrialGet the deployment is up
$ kubectl -n test get deploy

                    NAME          READY   UP-TO-DATE   AVAILABLE   AGE
                    redis-cache   3/3     3            3           11s
Check if each pod is running on different node:
$ kubectl get pod -o=custom-columns=NODE:.spec.nodeName,NAME:.metadata.name -n test

                    NODE                                            NAME
                    k8s-node-worker-3   redis-cache-67786cc786-bgxtp
                    k8s-node-worker-1   redis-cache-67786cc786-btppc
                    k8s-node-worker-2   redis-cache-67786cc786-dchf7
We noticed that each pod is running on a different node.
Next, let’s assume we have a web server running and we need to make sure that each web server pod co-locates
with each Redis cache pod, but at the same time, we need to make sure two web server pods don’t run
on the same node, for this to happen we make use of pod affinity and pod anti-affinity both as below.
Create the deployment file with affinity and anti-affinity rules:
cat web-server.yaml
                    apiVersion: apps/v1
                    kind: Deployment
                    metadata:
                      name: web-server
                      namespace: test
                    spec:
                      selector:
                        matchLabels:
                          app: web-store
                      replicas: 3
                      template:
                        metadata:
                          labels:
                            app: web-store
                        spec:
                          affinity:
                            podAntiAffinity:
                              requiredDuringSchedulingIgnoredDuringExecution:
                              - labelSelector:
                                  matchExpressions:
                                  - key: app
                                    operator: In
                                    values:
                                    - web-store
                                topologyKey: "kubernetes.io/hostname"
                            podAffinity:
                              requiredDuringSchedulingIgnoredDuringExecution:
                              - labelSelector:
                                  matchExpressions:
                                  - key: app
                                    operator: In
                                    values:
                                    - store
                                topologyKey: "kubernetes.io/hostname"
                          containers:
                          - name: web-app
                            image: nginx:1.12-alpine
Create the deployment:
kubectl create -f web-server.yaml
                    deployment.apps/web-server created
List the pods along with nodes and check that they are placed as required by rules:
kubectl get pod -o=custom-columns=NODE:.spec.nodeName,NAME:.metadata.name -n test

                    NODE                                            NAME
                    k8s-node-worker-3   redis-cache-67786cc786-bgxtp
                    k8s-node-worker-1   redis-cache-67786cc786-btppc
                    k8s-node-worker-2   redis-cache-67786cc786-dchf7
                    k8s-node-worker-1   web-server-84b9456f9b-dhd9x
                    k8s-node-worker-3   web-server-84b9456f9b-lf6xs
                    k8s-node-worker-2   web-server-84b9456f9b-zbjq2
We noticed that each web pod is co-located with a redis pod, and no two web pods are running on the same node; this was done by using pod affinity and anti-affinity rules.
Conclusion
Affinity and anti-affinity provide flexible ways to schedule pods on nodes or place pods relative to other pods. You can use affinity rules to optimize
the pod placement on worker nodes for performance, fault tolerance, or other complex scheduling requirements.
Instant access to Sandbox
Experience automated Kubernetes resource optimization in action with preloaded demo data.


