Kubernetes Best Practices
Chapter 6- Introduction: 25 Essential Kubernetes Tools for Container Management
- Chapter 1: Managing Kubernetes Resource Limits
- Chapter 2: Use Terraform to Provision AWS EKS. Learn Why & How.
- Chapter 3: EKS vs GKE vs AKS: An In-Depth Comparison
- Chapter 4: The Guide to Helm & EKS
- Chapter 5: Kubernetes kOps
- Chapter 6: Kubernetes Best Practices
- Chapter 7: Kustomize Tutorial
- Chapter 8: How to Deploy a K8s Cluster Using Kubespray
- Chapter 9: Guide To Kube-State-Metrics
- Chapter 10: Kubeadm Tutorial
With containerization changing the face of IT architecture, Kubernetes has become the most popular tool in the DevOps domain. CNCF’s 2020 survey of 1,324 respondents showed 83% use Kubernetes in a production environment, which helps practitioners orchestrate containers by automating their deployment, scaling, and load balancing needs.
Although popular, Kubernetes is not necessarily easy to work with. As your Kubernetes cluster grows, so does the complexity in managing it. To get the most out of your growing Kubernetes cluster (and to minimize its complexity), we recommend following the best practices covered in this article.
1. Use the Latest Version
You must always have the latest stable version of Kubernetes in your production cluster. The new releases have many updates, additional features, and most importantly, patches to previous version security issues. It helps you in keeping your cluster away from vulnerabilities. Older versions also do not get enough support from the provider or the community. So, it is better to update the cluster on the latest version of Kubernetes.
2. Version Control for Configuration Files
Configuration files related to your deployment, ingress, services, and other files should be stored in a version control system (e.g., Github) before being pushed to a cluster. Doing so allows you to keep track of who made the changes and implement a change approval process to improve your cluster’s stability and security.
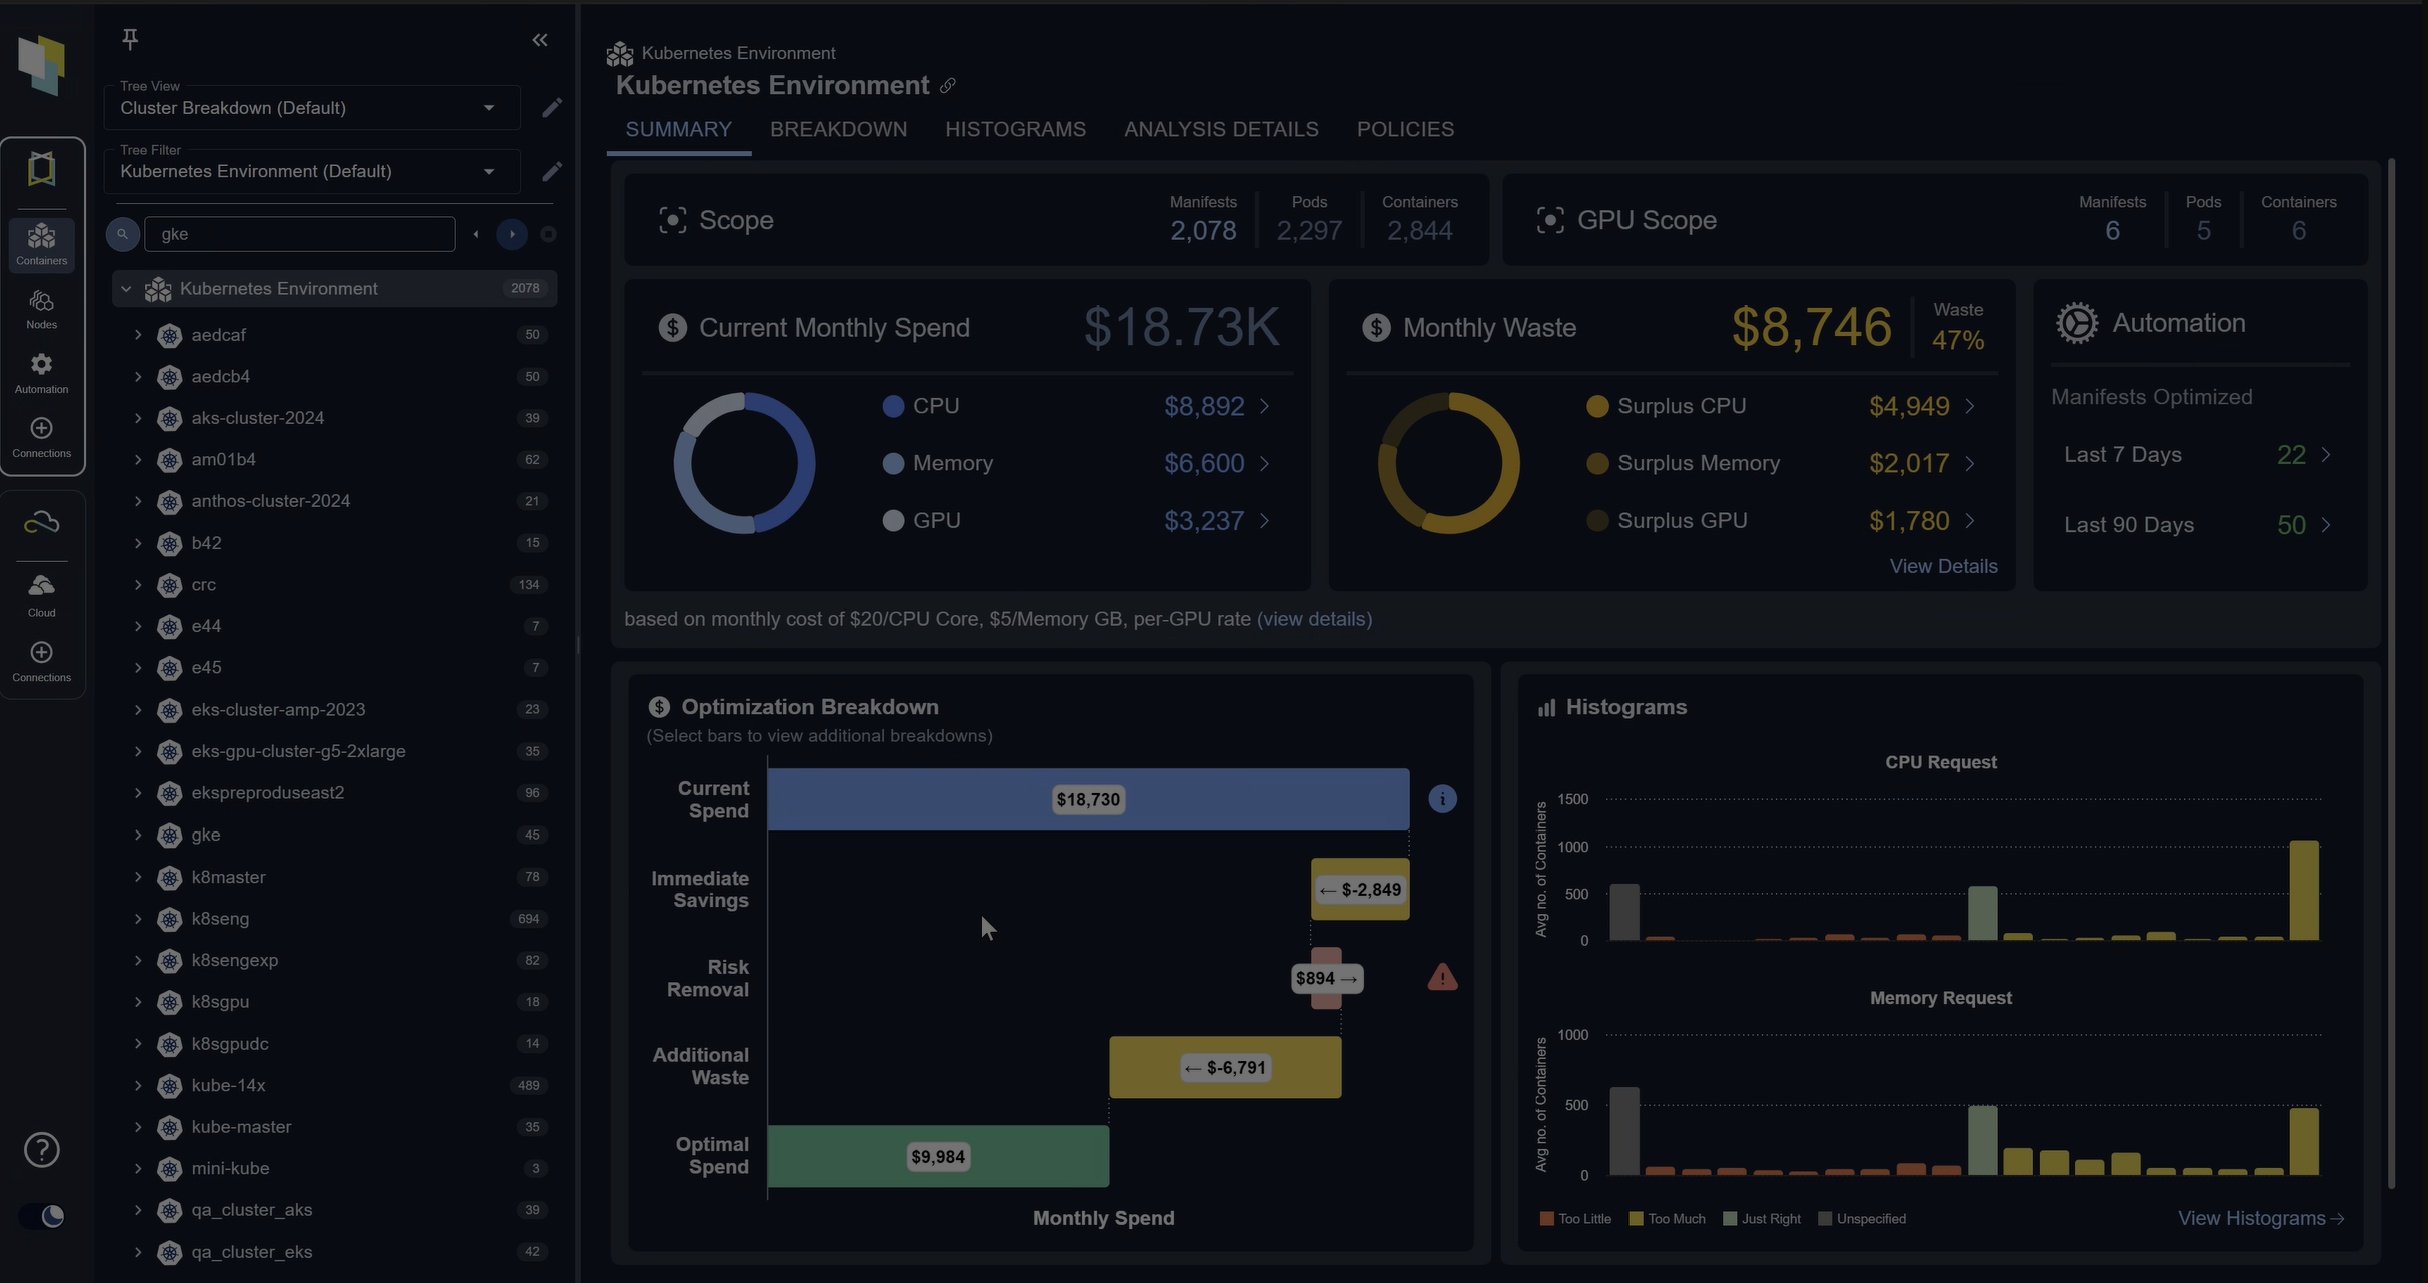
Spend less time optimizing Kubernetes Resources. Rely on AI-powered Kubex - an automated Kubernetes optimization platform
Free 30-day Trial3. Use Namespaces
By default, there are three different namespaces in Kubernetes in the beginning: default, kube-public and kube-system. Namespaces are very important in organizing your Kubernetes cluster and keeping it secured from other teams working on the same cluster. If your Kubernetes cluster is large (hundreds of nodes) and multiple teams are working on it, you need to have separate namespaces for each team. For example, you should create different namespaces for development, testing and production teams. This way, the developer having access to only the development namespace won’t be able to make any changes in the production namespace, even by mistake. If you do not do this separation, there is a high chance of accidental overwrites by well-meaning teammates.
apiVersion: v1
    kind: Pod
    metadata:
      name: development
      namespace: development
      labels:
        image: development01
    spec:
      containers:
        - name: development01
image: nginx4. Use Labels
A Kubernetes cluster includes multiple elements like services, pods, containers, networks, etc. Maintaining all of these resources and keeping track of how they interact with each other in a cluster is cumbersome. This is where labels come in. Kubernetes labels are key-value pairs that organize your cluster resources.
For example, let’s say you are running two instances of one type of application. Both are similarly named, but each application is used by different teams (e.g., development and testing). You can help your teams differentiate between the similar applications by defining a label which uses their team’s name to demonstrate ownership.
apiVersion: v1
    kind: Pod
    metadata:
     name: ops-pod
     labels:
       environment: operations
       team: ops01
    spec:
     containers:
       - name: ops01
         image: "Ubuntu"
         resources:
           limits:
cpu: 1Spend less time optimizing Kubernetes Resources. Rely on AI-powered Kubex - an automated Kubernetes optimization platform
Free 30-day Trial5. Readiness and Liveness Probes
Readiness and liveness probes are strongly recommended; it is almost always better to use them than to forego them. These probes are essentially health checks.
- Readiness probe
- Ensures a given pod is up-and-running before allowing the load to get directed to that pod. If the pod is not ready, the requests are taken away from your service until the probe verifies the pod is up.
- Liveness probe
- Verifies if the application is still running or not. This probe tries to ping the pod for a response from it and then check its health. If there is no response, then the application is not running on the pod. The liveness probe launches a new pod and starts the application on it if the check fails.
In this example, the probe pings an application to check if it is still running. If it gets the HTTP response, it then marks the pod as healthy.
apiVersion: v1
    kind: Pod
    metadata:
     name: prodContainer
    spec:
     containers:
    - image: nginx
    name: prodContainer
    livenessProbe:
           httpGet:
             path: /prodhealth
port: 8080Spend less time optimizing Kubernetes Resources. Rely on AI-powered Kubex - an automated Kubernetes optimization platform
Free 30-day Trial6. Security using RBAC and Firewall
Today, everything is hackable, and so is your Kubernetes cluster. Hackers often try to find vulnerabilities in the system in order to exploit them and gain access. So, keeping your Kubernetes cluster secure should be a high priority. The first thing to do is make sure you are using RBAC in Kubernetes. RBAC is role-based access control. Assign roles to each user in your cluster and each service account running in your cluster. Roles in RBAC contain several permissions that a user or service account can perform. You can assign the same role to multiple people and each role can have multiple permissions.
RBAC settings can also be applied on namespaces, so if you assign roles to a user allowed in one namespace, they will not have access to other namespaces in the cluster. Kubernetes provides RBAC properties such as role and cluster role to define security policies.
apiVersion: rbac.authorization.k8s.io/v1
    kind: ClusterRole
    metadata:
      name: read
    rules:
    - apiGroups: [""]
      resources: ["pods"]
verbs: ["get", "list"]You can create a firewall for your API server to prevent attackers from sending connection requests to your API server from the Internet. To do this, you can either use regular firewalling rules or port firewalling rules. If you are using something like GKE, you can use a master authorized network feature in order to limit the IP addresses that can access the API server.
7. Set Resource Requests & Limits
Occasionally deploying an application to a production cluster can fail due limited resources available on that cluster. This is a common challenge when working with a Kubernetes cluster and it’s caused when resource requests and limits are not set. Without resource requests and limits, pods in a cluster can start utilizing more resources than required. If the pod starts consuming more CPU or memory on the node, then the scheduler may not be able to place new pods, and even the node itself may crash.
- Resource requests specify the minimum amount of resources a container can use
- Resource limits specify the maximum amount of resources a container can use.
For both requests and limits, It’s typical to define CPU in millicores and memory is in megabytes or mebibytes. Containers in a pod do not run if the request of resources made is higher than the limit you set.
In this example, we have set the limit of CPU to 800 millicores and memory to 256 mebibytes. The maximum request which the container can make at a time is 400 millicores of CPU and 128 mebibyte of memory.
containers:
    - name: devContainer2
        image: ubuntu
        resources:
            requests:
                memory: "128Mi"
                cpu: "400m"
            limits:
                memory: "256Mi"
cpu: "800m"8. Use Smaller Container Images
A beginner developer often makes the mistake of going for the base image, which consists of up to 80% packages and libraries they won’t need. We recommend choosing smaller docker images that take less storage space. This helps you pull and build the image faster. Also, the smaller the docker image, the fewer the chances of security issues.
You can use alpine images (which are almost 10 times smaller than the base image), and then add any needed packages and libraries required to run your application.
9. Audit Your Logs Regularly
10. Monitoring Control Plane Components
One common mistake many practitioners make is to forget to monitor their control plane components. Control plane components include: Kubernetes API, kubelet, etcd, controller-manager, kube-proxy and kube-dns. These are the core of your Kubernetes cluster and you must keep a close eye on their performance. Kubernetes control plane components can emit metrics in Prometheus format that you can use to send alerts if these components have any issues. Monitoring control plane components helps you in keeping the overall workload and resource consumption in check.
Spend less time optimizing Kubernetes Resources. Rely on AI-powered Kubex - an automated Kubernetes optimization platform
Free 30-day TrialConclusion
Kubernetes is a popular containerization solution that continues to see climbing adoption rates. That being said, using it successfully requires thorough consideration of your workflows and departmental best practices. Want to learn more about Kubernetes? See the next chapter of our guide to containers.
FAQs
What are Kubernetes Best Practices?
Kubernetes Best Practices are guidelines for running clusters efficiently, securely, and reliably. They cover areas like version upgrades, namespaces, RBAC, resource limits, and monitoring.
Why should I always update to the latest Kubernetes version?
One of the core Kubernetes Best Practices is staying current with releases. Updates include security patches, new features, and community support, reducing risks from vulnerabilities.
How do namespaces improve Kubernetes Best Practices?
Namespaces isolate workloads by team or environment, preventing accidental overwrites and improving security. This aligns with Kubernetes Best Practices for organizing large, multi-team clusters.
Why are resource requests and limits part of Kubernetes Best Practices?
Defining resource requests and limits ensures workloads don’t consume excessive CPU or memory, which can crash nodes. They also help Kubernetes schedule pods effectively.
What monitoring practices are essential in Kubernetes Best Practices?
Monitoring logs, audit trails, and control plane components is critical. Probes like readiness and liveness checks, combined with Prometheus metrics, help maintain cluster health and reliability.
Try us
Experience automated K8s, GPU & AI workload resource optimization in action.
Try us
Experience automated K8s, GPU & AI workload resource optimization in action.