Kubernetes Service Load Balancer
Chapter 7- Introduction: Kubernetes Autoscaling
- Chapter 1: Vertical Pod Autoscaler (VPA)
- Chapter 2: Kubernetes HPA
- Chapter 3: K8s Cluster Autoscaler
- Chapter 4: K8s ResourceQuota Object
- Chapter 5: Kubernetes Taints & Tolerations
- Chapter 6: Guide to K8s Workloads
- Chapter 7: Kubernetes Service Load Balancer
- Chapter 8: Kubernetes Namespace
- Chapter 9: Kubernetes Affinity
- Chapter 10: Kubernetes Node Capacity
- Chapter 11: Kubernetes Service Discovery
- Chapter 12: Kubernetes Labels
The robust and scalable architecture of Kubernetes has changed the way we host our applications. When configured correctly, Kubernetes avoids application downtime. It means that you can prevent a planned downtime from deploying a new software release or even an unplanned downtime due to a hardware issue. Kubernetes Service plays a significant role in making this level of uptime possible.
In this article, we explain how service load balancing helps achieve high availability in a Kubernetes cluster. We cover the basic concept behind Kubernetes Service, review the different services available, and provide an example to get you started.

Kubernetes Service
In the Kubernetes world, the pods, where the application lives, are temporary and get a new IP address every time they are launched. The pods are usually dynamically destroyed and recreated with each deployment. In the absence of the Kubernetes service, we would have to track the IP addresses of all active pods. It would be a difficult task, especially as our application scales up, thereby increasing the risk of downtime.
The Kubernetes service creates an abstraction that maps to one or more pods. This abstraction allows other applications to reach the service by simply referring to the service name. It means that other applications no longer need to know the IP addresses assigned to the pods. External applications and end-users can also access the services assuming that they are exposed publicly to the internet.
An example of a service definition, exposing the pods with the label app=redis to a service named redis-service on a TCP port of 6379:
apiVersion: v1
  kind: Service
  metadata:
    name: redis-service
  spec:
    selector:
      app: redis
    ports:
      - protocol: TCP
        name: redis
        port: 6379
        targetPort: 6379
The selector ensures that we map the service correctly to the corresponding pods. When a service gets a matching label pod, it updates the pod’s IP address to a Kubernetes object called Endpoint. An Endpoint tracks the IP address of all the matching pods, updates its list automatically. Each service creates its Endpoint object.

Let us look at our example of Redis Service. If you describe the service, you would see a line called Endpoints, a list of the pods’ IP addresses.
❯ kubectl describe service redis-service
  Name:              redis-service
  Namespace:         prod
  Labels:            <none>
  Annotations:       Selector:  app=redis
  Selector:          app=redis
  Type:              ClusterIP
  IP:                10.0.215.46
  Port:              redis  6379/TCP
  TargetPort:        6379/TCP
  Endpoints:         10.244.0.234:6379,10.244.1.74:6379
  Session Affinity:  None
  Events:            <none>
Kubernetes would create an Endpoint object with the same name as that of service:
❯ kubectl describe endpoints redis-service
Name: redis-service
Namespace: prod
Labels: app=redis
Annotations: endpoints.kubernetes.io/last-change-trigger-time: 2021-07-07T13:22:09Z
Subsets:
Addresses: 10.244.0.234,10.244.1.74
NotReadyAddresses: <none>
Ports:
Name Port Protocol
---- ---- --------
redis 6379 TCP
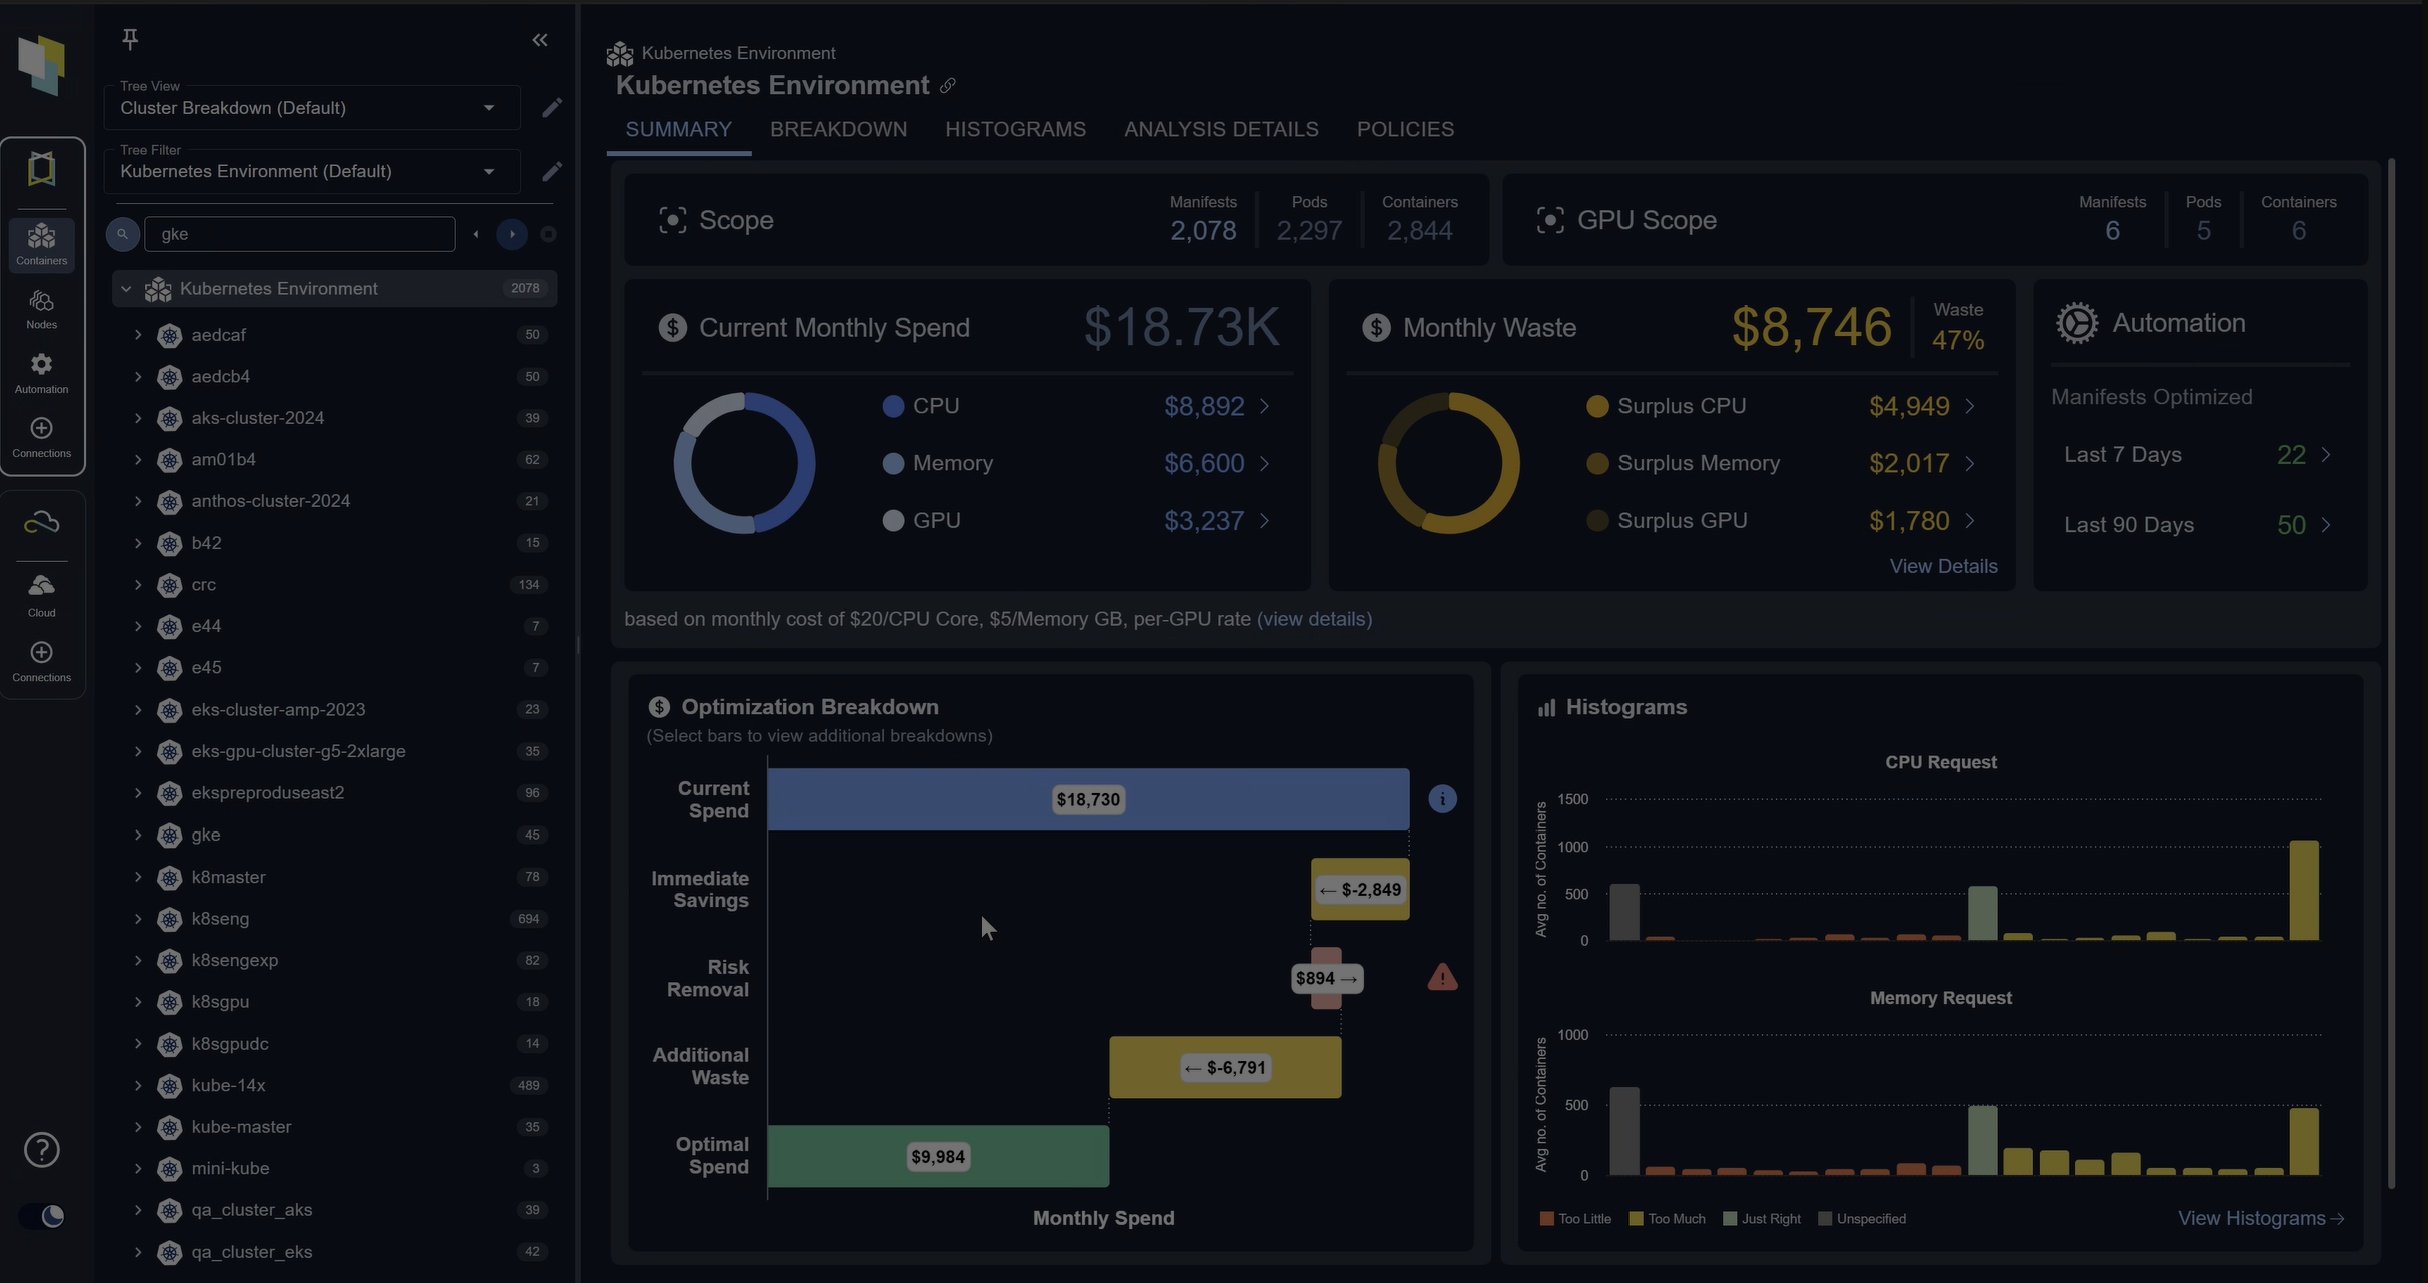
Events: <none>Spend less time optimizing Kubernetes Resources. Rely on AI-powered Kubex - an automated Kubernetes optimization platform
Free 30-day TrialWe don’t need to get into more details about endpoints. Just remember that it’s the Endpoints that keep the list of IP addresses up to date for the service to forward its traffic. It is the most common way of defining a service (using a selector).
We can also define a service without the selector. For example, if we migrate our application to Kubernetes, we can evaluate how it behaves without migrating the Redis server. We want to use the existing Redis server, which is still in the old server. In such a scenario, we create a service as shown below:
apiVersion: v1
  kind: Service
  metadata:
    name: redis-service-without-ep
  spec:
    ports:
      - protocol: TCP
        port: 6379
        targetPort: 6379
Then we create an endpoint object with the same name and point it to the Redis server IP address:
apiVersion: v1
  kind: Endpoints
  metadata:
    name: redis-service-without-ep
  subsets:
    - addresses:
        - ip: 172.0.0.103
      ports:
        - port: 6379
We can then simply use the service name redis-service-without-ep in our application to connect to the Redis server.
Types of Services
By default, Kubernetes creates a ClusterIP type of service. We can build different kinds of services by having a spec.type property in the service YAML file.
The four types of services are:
ClusterIP
Accessible within the cluster. Dependent applications can interact with other applications internally using the ClusterIP service.
apiVersion: v1
  kind: Service
  metadata:
    name: redis-service
  spec:
    type: ClusterIP #optional for ClusterIP
    selector:
      app: redis
    ports:
      - protocol: TCP
        port: 6379
targetPort: 6379NodePort
NodePort services are accessible outside the cluster. It creates a mapping of pods to its hosting node/machine on a static port. For example, you have a node with IP address 10.0.0.20 and a Redis pod running under it. NodePort will expose 10.0.0.20:30038, assuming the port exposed is 30038, which you can then access outside the Kubernetes cluster.
apiVersion: v1
  kind: Service
  metadata:
    name: redis-service
  spec:
    type: NodePort
    selector:
      app: redis
    ports:
      - protocol: TCP
        port: 6379
        targetPort: 6379
nodePort: 30038LoadBalancer
This service type creates load balancers in various Cloud providers like AWS, GCP, Azure, etc., to expose our application to the Internet. The Cloud provider will provide a mechanism for routing the traffic to the services. The most common example usage of this type is for a website or a web app.
apiVersion: v1
  kind: Service
  metadata:
    name: redis-service
  spec:
    type: LoadBalancer
    selector:
      app: redis
    ports:
      - protocol: TCP
        port: 6379
targetPort: 6379Spend less time optimizing Kubernetes Resources. Rely on AI-powered Kubex - an automated Kubernetes optimization platform
Free 30-day Trial
ExternalName
For any pod to access an application outside of the Kubernetes cluster like the external DB server, we use the ExternalName service type. Unlike in the previous examples, instead of an endpoint object, the service will simply redirect to a CNAME of the external server.
apiVersion: v1
  kind: Service
  metadata:
    name: redis-service
  spec:
    type: ExternalName
externalName: my.redis-service.example.comDNS
Each service will get a DNS name that other microservices can use. The format of the DNS record would be: service-name.namespace.svc.cluster.local
Example: redis-service.default.svc.cluster.local
This DNS record will resolve to the Cluster IP address of a standard service. In contrast, a headless service will point to the individual IP addresses of the pods.
Additionally, one SRV record is also created for some special use-cases: _port-name._protocol.service.namespace.svc.cluster.local
Accessing the Services
Now that we know the concepts of services in Kubernetes, we need to understand how humans or other microservices can use them. We will divide broadly based on Internal and external accessibility.
Internal Service Load balancing
For internal purposes, we use the ClusterIP type. For example, pods of service-A can talk to pods of service-B, as long as they are in the same Kubernetes cluster.
We have two options to access:
- DNS
- As mentioned in the previous section, each service will create a DNS record. It is the most common and recommended way for the microservices to interact. The microservices could be from the same or a different namespace. However, DNS will only work if we configure the Kubernetes Cluster with a DNS server addon like CoreDNS.
- Environmental Variables
- Kubernetes sets environment variables in a new pod at its launch time. The application in their runtime can use these variables. Some of the service-related variables are:
service-name_SERVICE_HOSTservice-name_PORTservice-name_PORT
Spend less time optimizing Kubernetes Resources. Rely on AI-powered Kubex - an automated Kubernetes optimization platform
Free 30-day TrialExternal Service Load balancing
For external access, we require either a NodePort or LoadBalancer type of service.
External Load balancing using NodePort
We can use the NodePort service type if we have a limited number of services. It gives connectivity to our application without actually having a dedicated external load balancer.
Please keep in mind that it will work as long as the node is reachable via its IP addresses. In most cases, the worker nodes reside in our private network(like office networks or private VPC). In such cases, we can not access the NodePort service from the Internet.
Another disadvantage of the NodePort service type is that it creates a mapping to Node’s IP address on a static port. The allocatable port range is 30000–32767, and the service must allocate the same port on each node while provisioning. It becomes problematic when the application scales up into multiple microservices.
External Load balancing using LoadBalancer
The public cloud providers like AWS, GCP, Azure, etc., automatically create load balancers when creating a service with spec.type: LoadBalancer.
LoadBalancer type provides a Public IP address or DNS name to which the external users can connect. The traffic flows from the LoadBalancer to a mapped service on a designated port, which eventually forwards it to the healthy pods. Note that LoadBalancers doesn’t have a direct mapping to the pods.

Example of an External LB
Let us see how to create and use an External LB with LoadBalancer service type. In this example, we will expose a RabbitMQ (RMQ) Pod and connect its Admin GUI from the Internet. Please note that LoadBalancer doesn’t do any filtering of the incoming or outgoing traffic. It is just a mere proxy for the external world, forwarding the traffic to respective pods/services.
In this example, we are relying on AWS EKS for providing the Load Balancers. You can consider Kubernetes in any public cloud as long as they provide support for Load Balancer. If you do not have an EKS setup, you can refer to this user guide. You can also refer to this link, or these commands can help you to get started quickly:
aws ec2 create-key-pair --region us-west-2 --key-name myKeyPair


  eksctl create cluster
  --name myEKSCluster
  --region ap-south-1
  --with-oidc
  --ssh-access
  --ssh-public-key <myKeyPair-public-key-path>
  --managed
Once we have our Kubernetes Cluster ready, we need to launch an RMQ pod. We will use the below Pod manifest, rmq-pod.yaml:
apiVersion: v1
  kind: Pod
  metadata:
    name: rabbitmq
    labels:
      app: rabbitmq
  spec:
    containers:
    - name: rabbitmq
      image: rabbitmq:latest
Then create the pod:
kubectl apply -f rmq-pod.yamlVerify the pod is up and running:
❯ kubectl get pods --selector='app=rabbitmq'
  NAME       READY   STATUS    RESTARTS   AGE
  rabbitmq   1/1     Running   0          91m
Now, let us create the Service manifest, rmq-svc.yaml:
apiVersion: v1
  kind: Service
  metadata:
    name: rmq-external-service
  spec:
    type: LoadBalancer
    selector:
      app: rabbitmq
    ports:
      - name: rmq-admin
        protocol: TCP
        port: 15672
        targetPort: 15672
Create the service:
❯ kubectl apply -f rmq-svc.yaml
  service/rmq-external-service created
Verify the service:
❯ kubectl get svc
  NAME                   TYPE           CLUSTER-IP      EXTERNAL-IP                                                              PORT(S)           AGE
  rmq-external-service   LoadBalancer   10.100.37.235   a8e294d5ad3d74562ac0ca47e8eaec9a-34496842.ap-south-1.elb.amazonaws.com   15672:31716/TCP   4m45s
If you have noticed, we have an LB DNS name under EXTERNAL-IP. It is the ELB created in AWS as shown below:

Copy the DNS name in a browser with port 15672. In our case, it would be http://a8e294d5ad3d74562ac0ca47e8eaec9a-34496842.ap-south-1.elb.amazonaws.com:15672.
You can share this URL/DNS name with anyone who wants to have access to your RMQ Admin. We have seen how easy it is to create and configure an external Load Balancer to expose our application. However, there are some limitations in Load Balancer, which we will see in the next section, and how Ingress can help.
Spend less time optimizing Kubernetes Resources. Rely on AI-powered Kubex - an automated Kubernetes optimization platform
Free 30-day TrialIngress
We saw that the LoadBalancer service type creates an Application/Network Load Balancer for each service. It is fine as long as we have few services to expose. However, it could be expensive as well as hard to manage multiple services. Also, the LoadBalancer type doesn’t support URL routing, SSL termination, etc.
What is Ingress
Consider Ingress as an extension of the NodePort or LoadBalancer service type. It sits between the external traffic and the Kubernetes Cluster, processing the traffic internally to determine which pods or services to forward. The main features of Ingress are load balancing, name-based virtual hosting, URL routing, and SSL termination.

The definition of such Ingress object would be:
kind: Ingress
  apiVersion: extensions/v1beta1
  metadata:
    name: "example-ingress"
    namespace: production
    annotations:
      kubernetes.io/ingress.class: alb
      alb.ingress.kubernetes.io/scheme: internet-facing
      alb.ingress.kubernetes.io/listen-ports: '[{"HTTPS":443}, {"HTTP":80}]'
  spec:
    rules:
      - host: abc.com
        http:
          paths:
            - path: /orders
              backend:
                serviceName: order-service
                servicePort: 8080
            - path: /blog
              backend:
                serviceName: blog-service
                servicePort: 8081
In the above YAML representation, the rules under the spec section determine how the traffic from the end-users would flow. In this case, the Ingress Controller will forward all the traffic to https://abc.com/oders to an internal service named the order service on port 8080.
Please note that Ingress is not a Kubernetes service type like LoadBalancer or NodePort; instead, it is a collection of rules which uses LoadBalancer or NodePort service type for its functionality. For Ingress to work, the cluster needs an Ingress Controller.
Some of the well-known Ingress Controllers are:
- AWS Load Balancer Controller
- Nginx Ingress Controller
- Istio Ingress
- Traefik Kubernetes Ingress provider
Various controllers have different features and capabilities. You should evaluate them based on your requirements. Whichever controllers we use, Ingress makes it much easier to configure and manage the routing rules, implements SSL-based traffic, etc. We recommend reading more about Ingress.
Load Balancing Algorithms for External LB
Like traditional load balancers, Ingress controllers support various algorithms for their load balancing. The most commonly endorsed are Least connection and Round Robin.
For example, the AWS ALB Ingress controller supports the following algorithms:
round_robinleast_outstanding_requests
The Nginx Ingress controllers support both the above algorithms and Least Time Load Balancing and IP Hashing.
Depending on the workload, we can consider the optimal algorithms for the best performance of our applications. If you are unsure of it, just leave it to the default. The intention here is to be aware of such configurations which might help us in the future.
Best practices/tips for effective use of Service
- Always use DNS for connecting to other services within the cluster
- Use Ingress whenever possible while exposing externally
- Expose only standard ports like 80 or 443 to the external. We can have various Ingress rules to route the traffic to a specific service
- Always enable SSL in external load balancers
- Use Network Policies to manage access restrictions
Conclusion
Services make it so simple for the microservices to interact and load balance with hundreds of resources. We have learned the differences between various service types, how to access each of those types, launch an external load balancer, and why Ingress is so cool. To use Kubernetes Services effectively, we need to understand which type will fit into each use-case and implement them accordingly. If set up correctly while designing the architect, it will surely save us time debugging and help maintain uptime SLA. Additionally, all the service definitions are declarative Kubernetes manifest in YAML or JSON, like any other Kubernetes object.
FAQs
What is a Kubernetes Service Load Balancer?
A Kubernetes Service Load Balancer is a service type that provisions a cloud provider’s load balancer (such as AWS ELB or Azure LB) to expose Kubernetes applications to external traffic. It routes requests to healthy pods inside the cluster.
How does a Kubernetes Service Load Balancer differ from NodePort?
NodePort exposes services on a static port of each node’s IP, requiring direct node access. A Kubernetes Service Load Balancer, on the other hand, creates a managed cloud load balancer with a public IP or DNS, simplifying external access.
When should I use a Kubernetes Service Load Balancer?
Use a Kubernetes Service Load Balancer when you need to expose a service to the internet with built-in load balancing. It’s best for production workloads like websites or APIs that require stable external connectivity.
What are the limitations of Kubernetes Service Load Balancers?
They can become costly if each service gets its own external load balancer, and they don’t provide advanced features like URL routing, SSL termination, or traffic shaping. For those capabilities, Ingress is recommended.
What are best practices for Kubernetes Service Load Balancer usage?
Best practices include using DNS instead of static IPs, enabling SSL for external traffic, applying network policies for access control, and preferring Ingress for complex routing scenarios while keeping load balancers for core external access.
Try us
Experience automated K8s, GPU & AI workload resource optimization in action.
Try us
Experience automated K8s, GPU & AI workload resource optimization in action.