Overriding Cloud Recommendations
Overriding Cloud Recommendations
#380500
Instance Type Override Attribute
Setting this attribute allows you to closely control how your cloud instances are re-sized.
This feature is primarily intended for self-aware automation integration and ensures recommendations are consistent with your business practices.
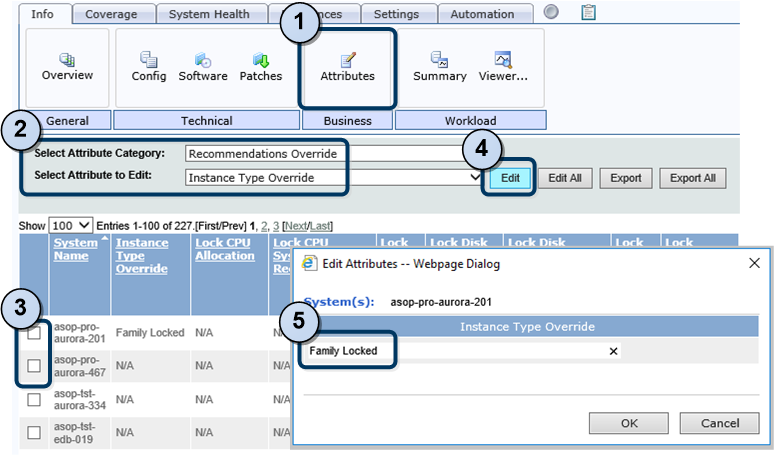
You can use the feature to control the recommendations that Densify makes for a specific instance. The feature is enabled by populating the "Instance Type Override" attribute in the "Recommendations Override " category.
This attribute can be used in many ways:
Locking Recommendations to a Specific Family or Generation
Attribute: Instance Type Override
Attribute Category:: Recommendations Override
|
Attribute Value |
Description |
|
Family Lock |
Use this value to override the current recommendation and force the instance to stay in the same family. The instance can be upsized or downsized, but must stay within the same family. i.e. recommendation to resize an "m" type instance to m3 or to m5. |
|
Family Gen Lock |
Use this value to override the current recommendation and force the instance to stay in the same family and generation. i.e. instances on an "m5" type instance can be resized up or down (m5.xlarge or m5.4xlarge) but must stay in the m5 family and generation. |
|
Locked |
Use this value to force the instance to stay on the same instance type. If you set a group of instances to Locked, then Densify will not exclude those instances from being analyzed but rather force the recommendation to be "Just Right" for the tagged instances, potentially suppressing Upsize/Downsize recommendations. This may be apparent from the Detailed Utilization charts. |
|
Unlocked |
This attribute value is used to specify that a particular cloud instance will NOT be bound by policy setting(s) responsible for a recommendation to keep that particular cloud instance within the current instance family and/or instance generation. For example, policy settings can be used to keep the majority of cloud instances within their current family and/or generation (rather that setting Family Lock or Family Gen Lock override on many instances) while allowing some instances with "Instance Type Override" set to Unlocked to be excluded and to be optimized across family and/or generations. |
Note: These values are case-sensitive.
Direct Recommendation Override
You can use the "Instance Type Override" attribute to override the original recommendation for a selected instance and set it to the specified instance type. e.g. m4.medium.
Note: This might result in a score rating of "Impossible".
Attribute: Instance Type Override
Attribute Category:: Recommendations Override
|
Attribute Value |
Description |
|
m4.medium |
If you set Instance Type Override= m4.medium, then all instances tagged with this attribute/value will generate recommendations to move to m4.medium |
Note: These values are case-sensitive.
Customizing Catalog Instances
You can use the "Instance Type Override" attribute to tag catalog entries.
These settings can be used to customize the catalog used for making Densify optimization recommendations. You can remove a particular instance type or a whole instance family from consideration.
Choosing whether to use "Disabled" versus "Vacate" is based on whether the customer is prepared to move to a higher cost instance in order to avoid using a particular instance type. This means “vacate at any cost” or the customer just wants the instance type to be “Disabled for use as an optimization target.
In some cases, customers want to use a smaller catalog due to special agreements with their cloud vendor so "Disabled" is used for the majority of the instance types to enforce their smaller catalog.
Note: Catalog tooling is an advanced feature and it is often easier to use a policy setting (eg. to restrict Intel to AMD recommendation or recommendations onto Basic or Burstable) rather than customizing the catalog. Custom effort rating rules that refer to a specific property of a given instance type are also an alternative to customizing the catalog.
Note: Any changes to the catalog might need to be re-done following the addition of new instance types by cloud vendors.
Use the following settings for supply-side catalog instances:
Attribute: Instance Type Override
Attribute Category:: Recommendations Override
|
Attribute Value |
Description |
|
Disabled |
Use this value to suppress Densify from a making recommendation to the tagged catalog instance. If a VM is already on this instance type a "Just Right" recommendation can be made. |
|
Vacate |
Use this value to suppress Densify from a making recommendation to the tagged catalog instance. and if any instance is currently on this instance type, then move it to another instance. |
Note: These values are not case-sensitive.
Azure Generation 1/Generation 2 Overrides
Microsoft Azure will stop supporting both Generation 1 and Generation 2 VMs on new hardware. Densify supports optimizing Gen1 VMs onto Gen2-only instance types. Densify compares/checks against the metadata to determine the optimal target instance type. The default behaviour is to not make recommendations to move between generation types.
You can control the behaviour using the "Instance Type Override" attribute
- After data collection, the VM's HyperV Generation (V1 or V2) is mapped to the "VM Virtualization Type" attribute.
- The Azure rulesets include a check of the "VM Virtualization Type" attribute against the supported target instances.
- The Densify set of metadata includes the supported VM virtualization type (Gen1 or Gen2) for Azure instances. Azure catalog model target instances then include the metadata of V1, V2 or V1;V2.
- The default behaviour is to leave VMs on the same generation. i.e. Gen1 on Gen1 and Gen2 on Gen2.
- Gen1 VMs cannot go to a V2-only instance type
- Gen2 VMs cannot go to a V1-only instance type
The following settings apply to Azure instance only.
Attribute: Instance Type Override
Attribute Category:: Recommendations Override
|
Attribute Value |
Description |
|
Gen2 Allowed |
Intended for Gen1 VMs and if set, recommendations can be made to move Gen 1 apps/workloads to Gen2-only instance types. Instances will not be forced onto Gen2-only instance types and the recommendation will only be made based on the analysis. There will still be a hit on the effort rating to represent the work required to rebuild the instance on the new hypervisor. There is no difference to the effort rating when the attribute is set to this value on a Gen2 VM, as instance upgrade is not required. |
|
Gen1 Required |
If set on Gen2 VMs it prevents it from moving to a Gen2-only instance type. There is no difference to the effort rating when the attribute is set to this value on a Gen1 VM, as instance upgrade is not required. |
|
Gen 2 Required |
If set on Gen1 VMs it prevents them from moving to Gen1-only instance types. There is no difference to the effort rating when the attribute is set to this value on a Gen2 VM, as instance upgrade is not required. |
Note: These values are not case-sensitive.
You can control how your scale groups scale vertically and horizontally using the attributes in the Scale Group Overrides category. Overrides are not regulated by the policy. The analysis/sizing extension will always use the override values, if they are provided.
Also see, Auto Scaling Group Optimization [Cloud Optimization] in the Policy Reference guide for details of the associated policy settings.
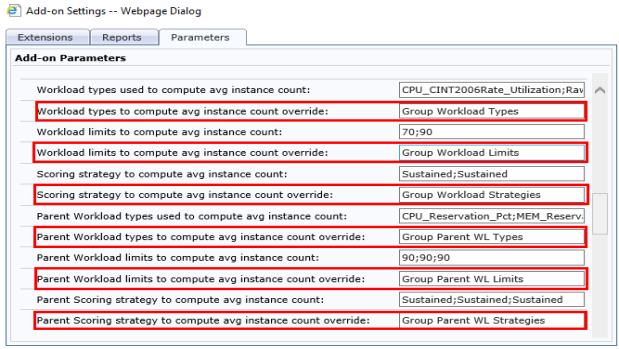
Note: The number of input/output workloads and limits must match. If they do not, the extension will not run properly.
Use the following attributes to configure overrides for an ASG or VM Scale Set:
Attribute: Various. See the following table.
Attribute Category: Scale Group Overrides
|
Attribute |
Description |
Value |
|
Group Max Size Override |
Specifies a custom maximum size for the scaling group. The analysis does not calculate the recommended value and the attribute value is used, instead. |
Integer > 0 |
|
Group Min Size Override |
Specifies a custom minimum size for the scaling group. The analysis does not calculate the recommended value and the attribute value is used instead. |
Integer > 0 |
|
Group Parent Workload Limits |
If specified, the attribute values are used when analyzing the parent workload. This attribute is not currently available for VM Scale Sets because they have not yet been linked to their AKS parent. |
Semicolon separated string, e.g. 80;80;80 |
|
Group Workload Limits |
If specified, the attribute values are used when analyzing the ASG or VMSS workload. |
Semicolon separated string, e.g. 70;70;70 |
|
Group Parent Workload Types |
Specifies the types of parent workloads to be used in the analysis. This attribute is not currently available for VM Scale Sets because they have not yet been linked to their AKS parent. |
Semicolon separated string, e.g. CPU_Reservation_Pct;MEM_Reservation_Pct;Mem_Utilization_As_Pct |
|
Group Parent Workload Outputs |
Specifies the workload types to be used to create representative workloads for the ASG workload charts. This attribute is not currently available for VM Scale Sets because they have not yet been linked to their AKS parent. |
Semicolon separated string, e.g.'CPU_infReservation_Pct;MEM_Reservation_Pct;Mem_Utilization_As_Pct |
|
Group Workload Types |
Specifies the types of workloads to be used in the analysis. |
Semicolon separated string, e.g. CPU_CINT2006Rate_Utilization;Raw_Mem_Utilization |
|
Group Workload Outputs |
Specifies the workload types to be used to create representative workloads for the ASG or VM Scale Set workload charts. |
Semicolon separated string, e.g. CPU_Util_Predicted_Day;Mem_Utilization_As_Pct |
|
Parent Workload Strategies |
Specifies the scoring strategies used in optimization analysis of the group's parent. This attribute is not currently available for VM Scale Sets because they have not yet been linked to their AKS parent. |
Semicolon separated string, e.g. Sustained;Sustained |
|
Workload Strategies |
Specifies the scoring strategies used in optimization analysis of the group. |
Semicolon separated string, e.g. Sustained;Sustained |
Setting System Attributes
Use the following procedure to tag you instances:
- Navigate to the Analysis Console > Analysis Workbench > Data Center Explorer.
- Use the default Cloud Environment view and select the instances to tag. You can configure one instance at a time using this method. You can also create custom views and filters to select multiple systems and then set the attribute.
- In the Info tab click Attributes.
- On the attribute page, click the Select Attribute Category dropdown menu and select the appropriate category.
- In the Select Attributes to Edit dropdown menu select the required attribute.
- Check the instances that you want to tag, and then click Edit.
- Enter the desired attribute value and then click OK to close the dialog box and set the attribute value.
|
Attribute Category |
Attribute Name |
|
Public Cloud |
Reserve Override |
|
Recommendations Override |
Instance Type Override |
|
Scale Group Overrides |
10 attributes, listed above |
Once the instances are tagged, you need to refresh the environment containing the tagged instances.
- Navigate to Analysis Console > Cloud Environments.
- Select the environment that needs to be refreshed and right-click to open the context menu.
- Select Refresh to begin the analysis.
When an analysis refresh is in progress, the Cloud Environment landing page shows the refresh progress for an environment in Last Refresh column. After the refresh is finished, the Refresh Duration column displays appropriate value and a status icon is displayed in the Name column.
Lastly you also need to re-populate the RDB before the updated results are displayed in the Densify Console.
- At the command line, start the customer CLI pod and open the customer CLI shell.
- Navigate to %CIRBA_HOME%\bin and execute the following command:
cirba-rdb.bat Populate