Google Cloud Platform Data Collection Prerequisites
Google Cloud Platform Data Collection Prerequisites
#380300
The following prerequisites are required for each Google Cloud Platform (GCP) project in order to connect to and collect compute engine (GCE) instance data from GCP:
- Data collection APIs
- Enable Cloud Resource Manager API;
- Verify Cloud Monitoring API is enabled.
- Google Cloud Platform Service Account
- Create a service account with Project role set to "Viewer". Alternatively, you can create a role with the minimum permissions required for data collection.
- Create the JSON key credentials;
- Optionally, link this service account to other GCP projects from which you want to collect data.
- Optionally, you can install the Ops agent on each GCE instance to collect memory data. See https://cloud.google.com/stackdriver/docs/solutions/agents/ops-agent for details.
Verify GCP Data Collection APIs are Enabled
You need to verify that the following APIs are enabled for your project:
- Cloud Resource Manager API—Needs to be enabled, if not listed.
- Cloud Monitoring API—is enabled by default when the project is created.
Verify these APIs are enabled before creating the service account. When you create the keys for the service account the permissions for the required APIs will be included in the key file and are required by Densify.
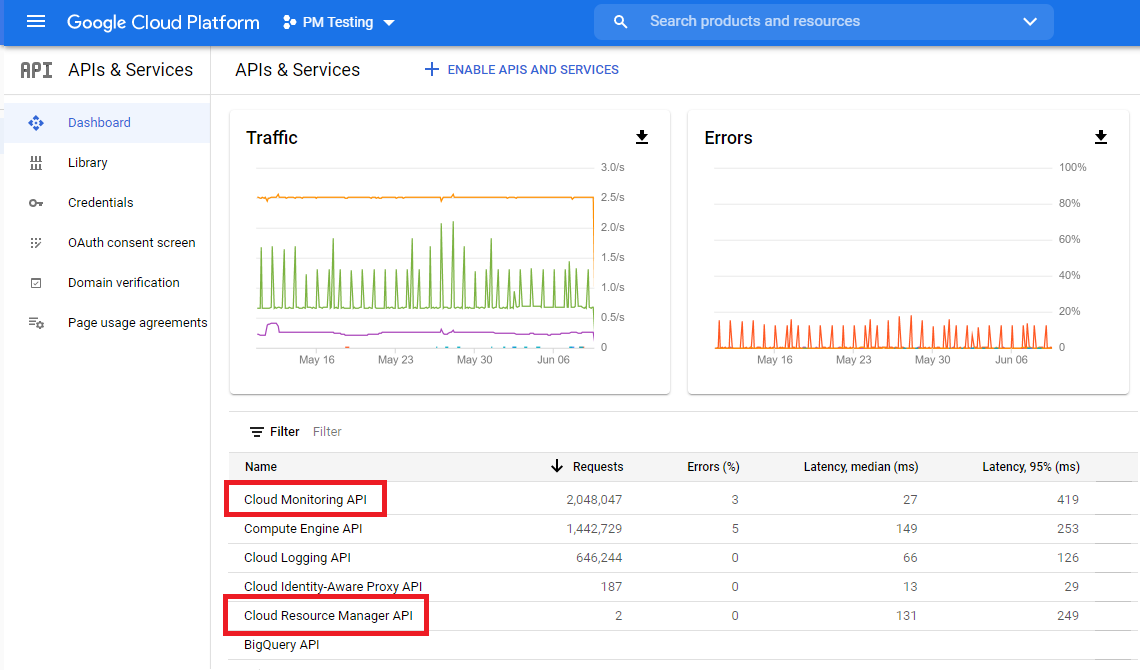
- Login to the GCP console and select your project.
- From the GCP console main menu, navigate to APIs & services > Dashboard.
- From the APIs & services Dashboard, ensure that the following APIs are enabled and listed in the Enabled APIs and services list:
- Cloud Resource Manager API
- Cloud Monitoring API (previously named, Stackdriver Monitoring API )
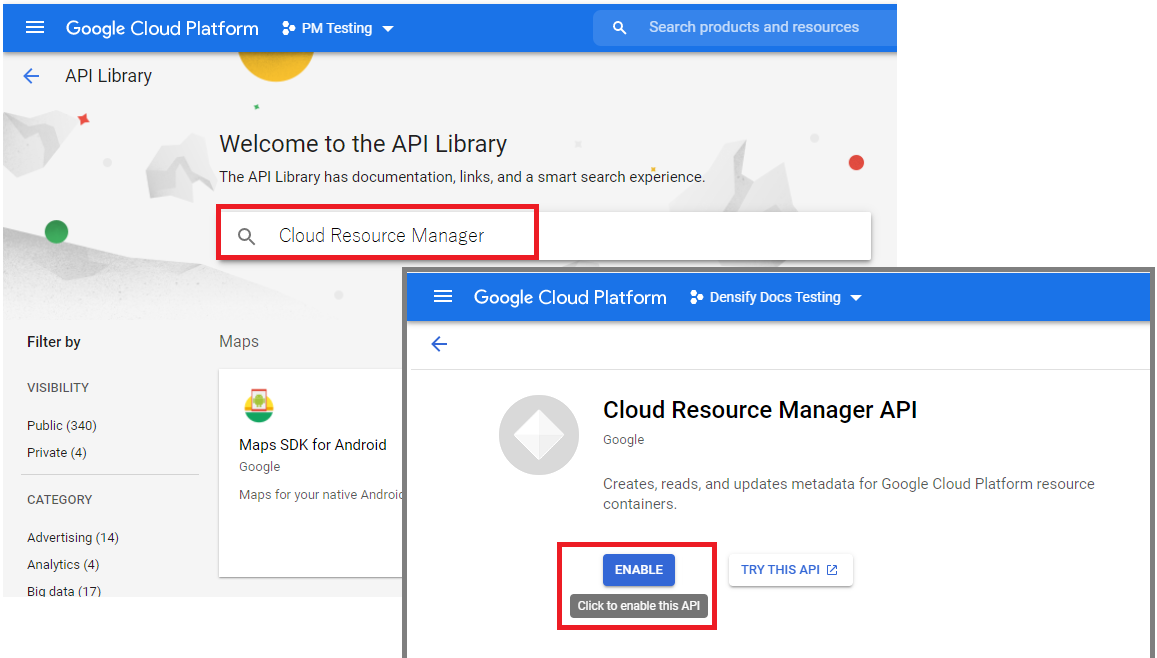
- If the Cloud Resource Manager API is not listed, click on ENABLE APIS AND SERVICES at the top of the dashboard. Search for the Cloud Resource Manager API and click Enable:
Creating a GCP Service Account
To connect Densify to your GCP project, you will need a GCP service account and corresponding credentials in JSON format. You need to repeat this process for each of your GCP projects and save the credential JSON files in an encrypted .ZIP file. You will then import this file to create a connection to collect data from your GCP projects.
Use the following instructions to create and configure the GCP service account:
- Login to the GCP console and select your project.
- From the main menu, select IAM & Admin > Service accounts.
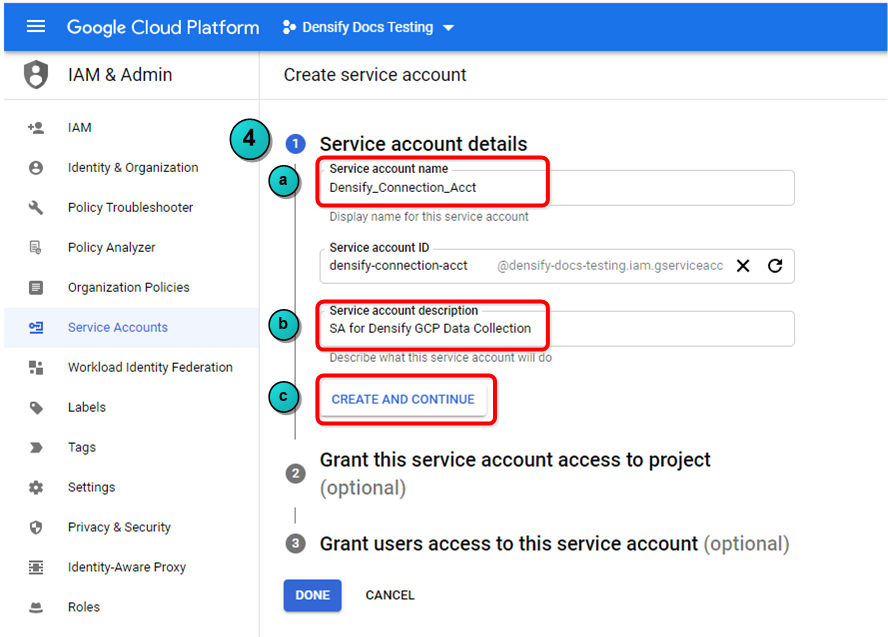
- From the Service Accounts page, click Create Service Account.
- In the Create service account pane:
- Specify Service account name. As a best practice, use the display name to keep track of what the account will be used for and what permissions are assigned. (e.g. Densify_Connection_Viewer)
- Provide a description of the service. This step is optional, but may help you link this account to other projects later on.
- Click Create and Continue to create the service account.
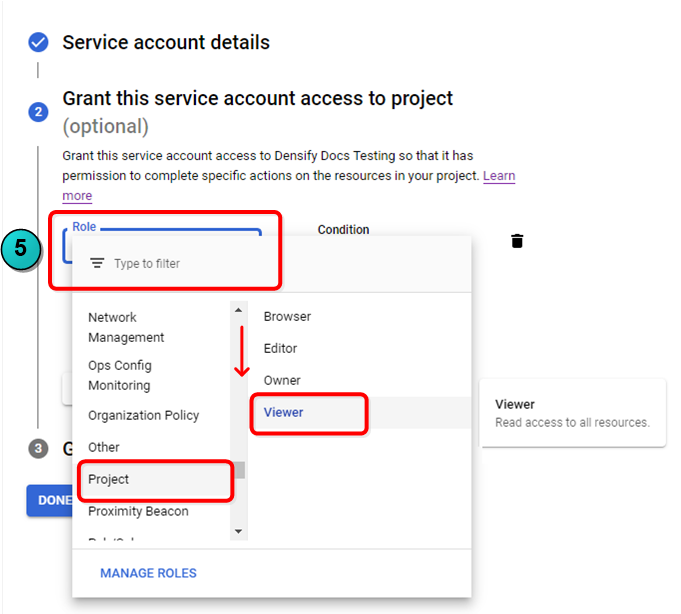
- In the Role field scroll down the list and select "Project" and then set the role for the whole project to "Viewer".
- You do not need to add users to the this account so click DONE.

Creating Credentials for the Service Account
You now need to create the key for the service account. Densify uses this key to verify its identity
- In the GCP console, from the main menu, select IAM & Admin > Service accounts.
- You should see the account that you just created. In the Key ID column you can see that no keys have been created.
- Click the options in the Actions column. Select Manage keys from the dropdown menu.
- Select Add Key and then Create new key.
- The key is generated and downloaded to your computer. Retain the generated keys for creating the Densify cloud connection.
Note: Do not check these service account keys into your source code or leave them in the download directory.
Creating a Role with Minimum Permissions for Data Collection
Densify recommends using the viewer role, as indicated above, to simplify setup and maintenance of data collection. The viewer role provides read-only access to your GCP services and resources and supports the requirements of Densify data collection and analysis. As the Densify data collection continues to evolve and expand, you do not need to update this permission policy to include newly added services and features.
Alternatively, you create a custom role and grant the minimum required permissions to the service account to be used Densify for data collection.
You must have the iam.roles.create permission, to create the custom role. The custom role must be created at the Organization level.
Note: This custom role must be updated periodically as Densify’s standard data collection requirements are updated to support additional services and features.
The custom role must have the following permissions to perform the GCP data collection:
|
|
Use the following instructions to create the custom role:
- Login to the GCP console and navigate to Roles in the main menu.
- Select your organization from the Organization drop-down.
- From the Roles page, click Create Role.
- Enter a Title, Description for the role.
- Click Add Permissions. See the above list and select all 15 permission for your custom role.
- Click Add to grant the selected permissions to your custom role.
- Click CREATE to create the role. You will now see your new role in the list on the Roles page.
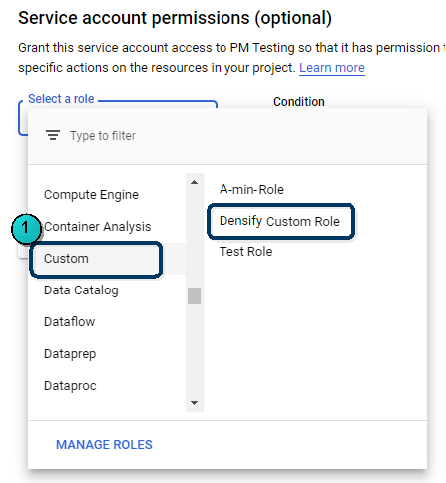
- When you create the service account, select this custom role as follows:
Roles have both an ID and a title. The role ID is a unique identifier for the role and can be auto-generated. The role title appears in the list of roles in the GCP Console.
The Role Launch Stage property is optional for this use case.

Refer to Creating a GCP Service Account, above for details.
Using a Single GCP Service Account to Access Multiple Projects
In order to simplify data collection you can grant a single GCP service account access to other projects. This can be done by adding the service account ID from one project to another, through the account's IAM & admin dashboard.
You would then use this master service account to create your Densify cloud connection.
- Login to the GCP console and select the project that contains the service account that will become the master account.
- From the GCP console main menu, select IAM & admin > Service accounts.
- Select the Service account ID to be used as the master account, from the list of service accounts. Copy the Service account ID onto the clipboard, as you cannot search from the Add Members function (in the steps below).
- Select the project to which you want to add the service account.
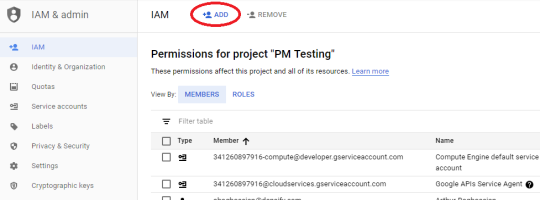
- From the IAM & admin menu, select IAM.
- Click the ADD in the toolbar.
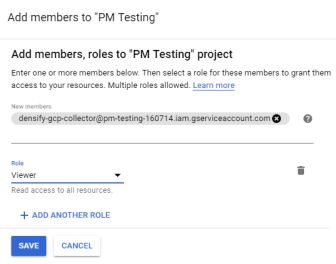
- The Add Members dialog box opens. Paste the Service Account ID into the New Members field,
- Select the account’s role in the project. Select the Project > Viewer role for the newly added member.
- Click Add to complete and save the change. You can now use the private key previously generated from the service account to access the selected project.
- You can repeat these steps for your other projects.
The Ops Agent is the primary agent for collecting memory and other metrics from your Compute Engine instances. The Ops Agent replaces the stackdriver agent and cloud monitoring agent.
Refer to https://cloud.google.com/stackdriver/docs/solutions/agents/ops-agent for details of installing and configuring the agent.
Creating the Cloud Connection in Densify
Once all of the prerequisites are complete, you can create the cloud connection through the Cloud Connection wizard. See
Modifying Your Google Cloud Connection
When you create the GCP cloud connection for the first time, Densify discovers all of the projects, associated with the role or service account. Upon saving the connection Densify will schedule data collection from each of the discovered and selected projects.
If subsequently, projects are added, they will not be included in data collection. Additionally, projects that are removed will continue to be included, resulting in wasted time and resources. To add new projects or remove old ones, edit the cloud connection. See