Deploying the Data Forwarder with Prometheus
Deploying the Data Forwarder with Prometheus
#410170
This topic shows you how to configure the data forwarder with a Prometheus server for data collection for a single cluster configuration.
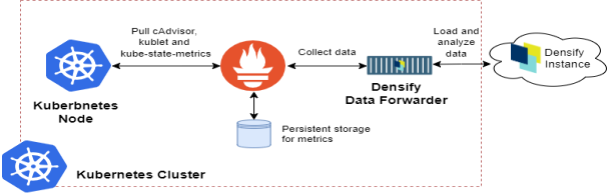
Deploying the Data Forwarder in a Single Cluster
Before you begin, ensure you have met all of the prerequisite software and configuration requirements. See Container Data Collection Prerequisites.
To deploy the data forwarder, you need to:
- Navigate to: https://github.com/densify-dev/container-data-collection/tree/main/single-cluster/examples/standard and save the following files to your local working directory:
- configmap.yaml
- pod.yml
- cronjob.yml
- Edit the configmap.yaml. See the table below for details of the required settings.
- The additional, required configuration is provided in the readme on Densify's github page.
- Once the data forwarder is able to send the collected container metrics,
Configuring the Data Forwarder Using configmap.yaml
- Open configmap.yaml and provide connectivity details for Densify, Prometheus and identity details for all of the clusters to be analyzed. See
- Once you have updated the files with your settings, then place them in the CLI working directory from where you manage your clusters.
Table: Data Forwarder Settings in config.yaml
|
Term |
Description |
Value |
|
Forwarder Section |
||
|
scheme |
Specify the protocol to be used to when connecting to the Densify REST API interface. |
https |
|
host |
Specify your Densify server host (e.g. myCompany.densify.com). You may need to specify the Densify server’s DNS name or fully qualified domain name (FQDN) or IP address. If your Densify instance is running in the same cluster as the Data Forwarder, you can use the internal service name: webservice-service.<namespace>.svc If you use the internal service name for the Densify host, you must use port 8086 as the Densify port. |
<name>.densify.com |
|
port |
Specify the TCP/IP port used to connect to the Densify server. You should not need to change this port number. See the Densify URL. |
443 |
|
username |
Specify the Densify user account that the data forwarder will use. This user must already exist in your Densify instance and have API access privileges. Contact [email protected] for the Densify user and epassword required to connect to your Densify instance. This user will be authenticated by the Densify server. |
<username> |
|
password |
Specify a password associated with the Densify user, indicated above. If using this option then specify the password in plain text. You must uncomment one of the password options. |
<password> |
|
encrypted_password |
Specify encrypted password for the Densify user. The password must be encryptedand supersedes any value that has been specified in the password field, above. Typically, the encrypted password is used. Typically, [email protected] will provide a Densify username and corresponding encrypted password when you are setup for container data collection. Ensure that only one of the password options is uncommented. |
<encrypted password> |
|
endpoint |
This is the connection endpoint for the API. You can leave the default value. |
/api/v2/ |
|
retry |
The retry settings are optional and if not set specifically, then the default values are used. See Configuring Retry Connection Attempts for setting details. |
|
|
proxy |
If you need to configure data collection through a proxy server, see Configuring a Proxy Host. |
|
|
prefix |
Specify a prefix for the compressed filename. |
<zip file name> |
|
Prometheus Settings |
||
|
scheme |
Specify the protocol to be used to connect to the Densify REST API interface. Select http or https. |
http |
|
host |
Specify the Prometheus hostname. In a single cluster configuration, the Container Optimization Data Forwarder can be deployed in the same cluster as the Prometheus server. In this case you need to specify the internal service name of Prometheus, in the following format: <service name>.<namespace>.svc If the Container Optimization Data Forwarder is not deployed in the same cluster as Prometheus, you need to specify a fully qualified domain name. (i.e. kubemain.int.company.com) |
<Prometheus hostname> |
|
port |
Specify your Prometheus service connection port. The default port is 9090. |
9090 |
|
username |
Specify the Prometheus basic authentication username that the Container Optimization Data Forwarder will use to connect and collect data. This user must be setup on your Prometheus server and have the required access privileges. The value can be the actual username or the name and location of a file containing the information. This user will be authenticated by the Prometheus server. |
<username> |
|
password |
Specify a password associated with the username, indicated above. The value can be the actual password or the name and location of a file containing the information. |
<password> |
|
epassword |
Specify encrypted password for the Densify user. The password must be encryptedand supersedes any value that has been specified in the password field, above. Ensure that only one of the password options is uncommented. |
<encrypted password> |
|
bearer_token |
Enable this parameter if you are using bearer-token authentication. The value can be the actual token or the name and location of a file containing the token. Use this setting to specify the path to the authentication token. i.e. :/var/run/secrets/kubernetes.io/serviceaccount/token The value can be the token or a filename, containing the token. |
<path> |
|
ca_cert |
Enable this parameter (i.e. uncomment this line) if you are using SSL. If enabled then specify the path to the certificate: /var/run/secrets/kubernetes.io/serviceaccount/service-ca.crt |
<filename> |
|
sigv4 |
This is required if you are using AWS Signature Version 4 to access your Amazon Managed Prometheus. If you have enabled this option, only region is mandatory. The other options can be inferred from the service account (if you are running on EKS), or from a secret (if you are not using EKS) or configured explicitly. See https://docs.aws.amazon.com/prometheus/latest/userguide/AMP-onboard-query-APIs.html |
|
|
retry |
The retry settings are optional and if not set specifically, then the default values are used. See Configuring Retry Connection Attempts, below for setting details. |
|
|
Collection Settings |
||
|
include |
Use this section to specify the infrastructure to be included for data collection. If commented or empty then all entity types are included. |
|
|
interval |
Optional: Specify interval type. Set one of Days, Hours or Minutes. These interval settings need to correspond with cron job settings. |
minutes |
|
interval_size |
Optional: Specify a numerical value for the interval size. i.e. if the interval is set to hours and you set the interval to 4, then data is collected every 4 hours. These interval settings need to correspond with your cron job settings. |
1 |
|
history |
Optional: Specify a numerical value for the interval history. i.e. if the interval . |
1 |
|
offset |
Specify an offset value. |
|
|
sample_ rate |
Specify the sample rate. |
|
|
node_group_list |
Optional: Specify a nodegroup label reference. By default, the "node_group_list" parameter is commented out and the data forwarder use the values, listed:
If you want to specify a node group label that is not included in the following list, uncomment this parameter and specify your node group label. See Configuring Node Group Collection for more details. |
<nodegroup label reference> |
|
Cluster Settings |
||
|
name |
When configuring multiple clusters, you must specify the name of each cluster to be included as well as each cluster's set of unique identifiers. In a multi-cluster configuration, each cluster must have a unique name. The cluster name is mandatory and must be unique customer-wide. |
<cluster_name> |
|
identifiers |
Identifiers map Prometheus labels (name:value) to uniquely identify each cluster. One or more identifiers must be specified for each cluster in a multi-cluster configuration. <label name>: <label value> |
|
Building and Configuring the Data Forwarder
You may need to build your own version of the Data Forwarder container. This may be the case, if your security policies do not allow you to pull the containers from Docker Hub. You can then obtain the required code from GitHub: