AWS Data Collection Prerequisites for an IAM Role
AWS Data Collection Prerequisites for an IAM Role (CloudWatch only)
#410070
Overview
Densify collects resource utilization metrics (CloudWatch data) for your AWS services (e.g. EC2, RDS, ECS, etc.), analyzes the AWS data and then makes recommendations to save costs and reduce risks in your AWS environments.
Collecting data via a cross-account IAM Role simplifies the process of connecting to multiple AWS accounts from Densify since the same role and external ID can be used across your multiple AWS accounts. As accounts are added or removed, you do not need to update the Densify cloud connection.
Densify also supports connecting to AWS using;
- An IAM Role and CloudFormation template—See
Note: Though the cloud connection wizard provides the option to use an IAM user and an access key, Densify recommends using the IAM Role.
Using an IAM Role
When you create a role for cross-account access, you establish trust from the customer's account that owns the role and the resources (trusting account) to the Densify account containing the user that will collect data (trusted account). You specify the trusted account number as the Principal in the role's trust policy when you create the role. This allows the Densify user in the trusted account to assume the role and collect utilization data.
In addition to creating connections from your linked accounts, you also need to create a connection for your payer accounts. The payer account connection provides the name of each linked accounts.
Follow the process below to create and configure the IAM role for CloudWatch data collection.
Creating the IAM Role and Attaching a Permission Policy to Collect CloudWatch Data
This role allows you to collect resource utilization data for the selected account. You need to attach a policy that allows the role to collect the required CloudWatch resource utilization metrics.
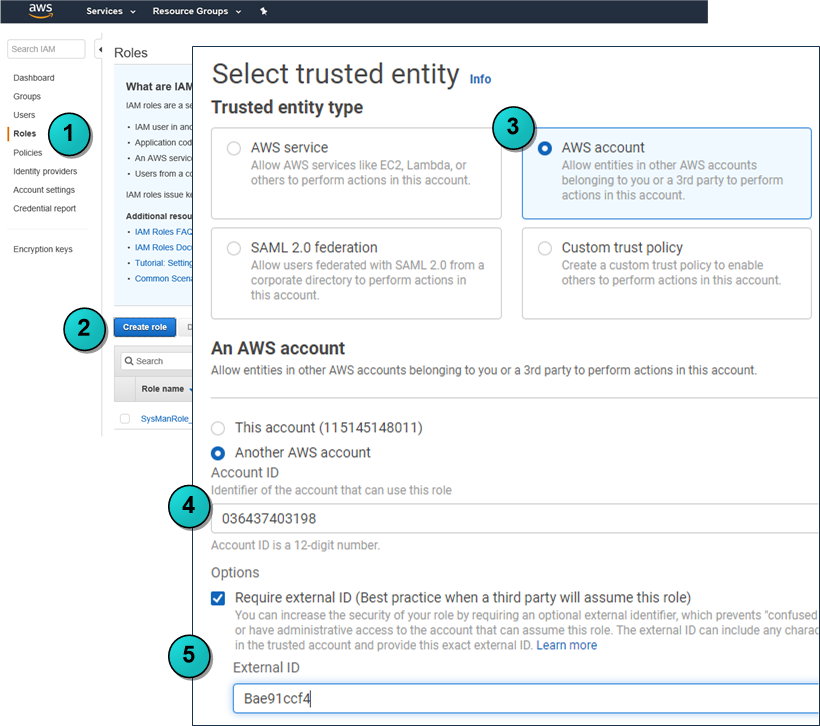
- Log into the AWS Management Console and navigate to Identity and Access Management (IAM). In the navigation tree on the left, click Roles.
- Click Create Role in the Roles dashboard.
- Select AWS account as the of trusted entity type .
- Enter an Account ID. This is the Densify account that will assume the role. Enter the following Densify account ID: 036437403198.
- Select Require external ID and enter your external ID. This value is similar to a password and should be unique and difficult to guess. Densify recommends using a password generator to create a random, alphanumeric string (e.g. ae73mcf4ldjpet96) for the external ID.
- Click Next.
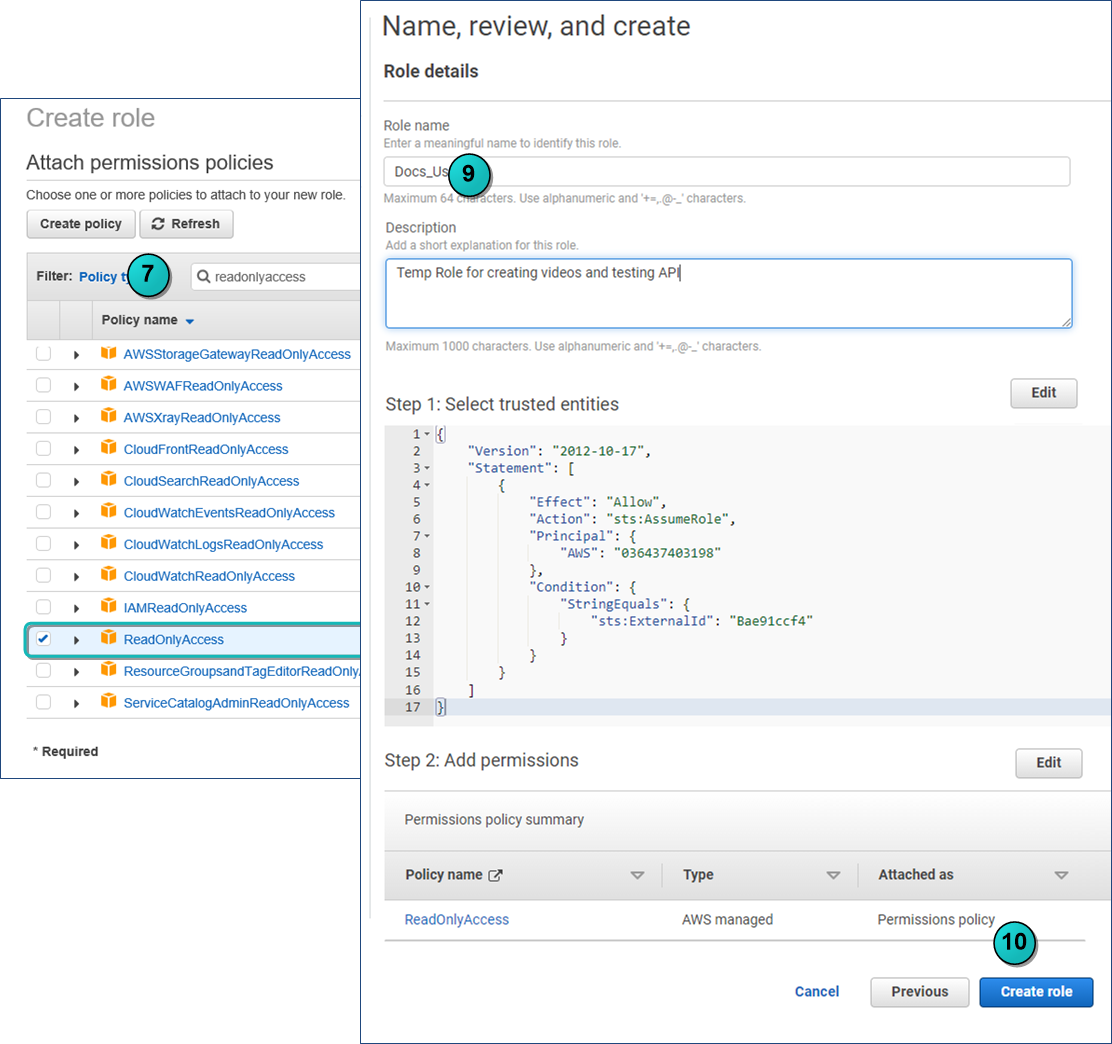
- Attach the appropriate permission policy to the role. Select AWS's predefined ReadOnlyAccess policy. Use the filter to find the ReadOnlyAccess policy. Even with the filter set you will need to go to the last page to find the "ReadOnlyAccess" policy.
- After selecting the permission policy for the role, click Next.
- In the Review page, specify the Role name and Role description. The role name can be any string used to identify and describe the role within the AWS account (e.g. DensifyCrossAccountRole).
- Click Create role. The new role is created.
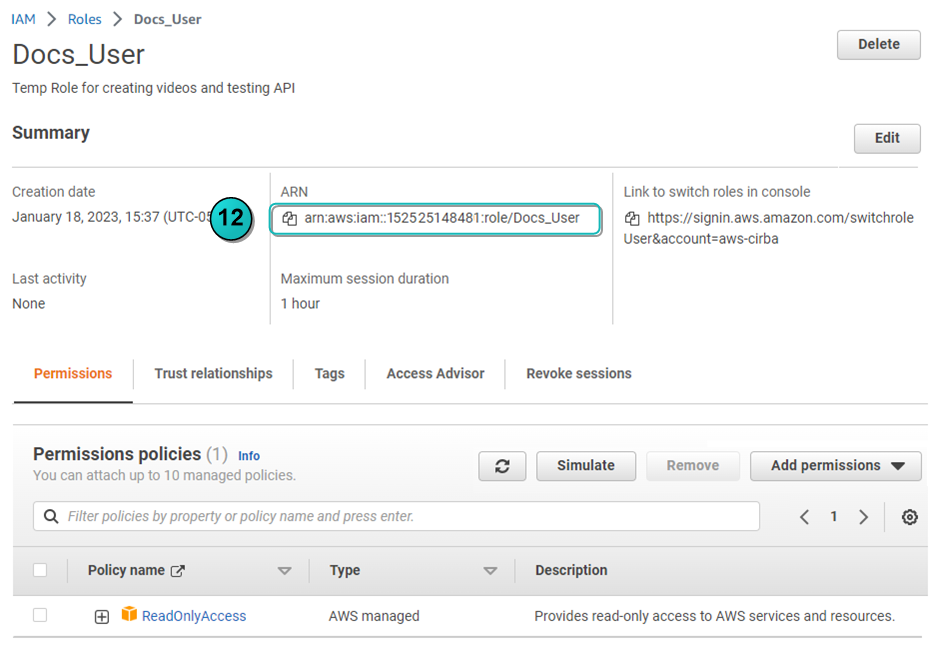
- From the Roles page, click on the role name that you have just created, to view the role summary.
- Copy and save the Role ARN as you will need to paste this string into the Densify Cloud Connection wizard to create the connection.
- You can now create an AWS connection through the Densify Public Cloud Connection wizard. See
You will need this external ID later, when creating the cloud connection in Densify.
Note: The ReadOnlyAccess policy is provided here as an easy option for non-sensitive accounts. In most cases, you need to create a custom permission policy to grant Densify, the permissions to collect only the required CloudWatch data. Refer to Creating an IAM Policy with Minimum Permissions for the CloudWatch Data Collection for details.
You can also use the Densify API.See
Optional Configuration
The following sections contain detailed instructions for optional configuration. Some of this configuration is referenced in the procedures above.
- Creating an IAM Policy with Minimum Permissions for the CloudWatch Data Collection
- Enabling Collection of AWS Memory Usage Metrics
Creating an IAM Policy with Minimum Permissions for the CloudWatch Data Collection
To simplify setup and maintenance of either an IAM user account or an IAM role for performing the CloudWatch audit, Densify recommends attaching the AWS-managed “ReadOnlyAccess” policy to the user or role. This policy provides read-only access to your AWS services and resources and supports the requirements of the Densify CloudWatch audit. As the Densify CloudWatch audit continues to evolve and expand, you do not need to update permission policy to include newly added services and features.
Alternatively, if you must restrict the IAM user or role with the minimum permissions to perform the CloudWatch audit, you can create a custom policy with only the required permissions, as shown below.
Note: This custom policy must be updated periodically as Densify’s standard audit requirements are updated to support additional AWS services and features.
Example: AWS Minimum User Permission Policy
{
"Version": "2012-10-17",
"Statement": [
{
"Sid": "Stmt1499171905000",
"Effect": "Allow",
"Action": [
"autoscaling:DescribeAutoScalingGroups",
"autoscaling:DescribeLaunchConfigurations",
"autoscaling:DescribeScalingActivities",
"ce:GetCostAndUsage",
"cloudformation:DescribeStackResource",
"cloudformation:DescribeStackResources",
"cloudformation:ListStackInstances",
"cloudformation:ListStackResources",
"cloudwatch:GetMetricData",
"cloudwatch:GetMetricStatistics",
"cloudwatch:ListMetrics",
"ec2:DescribeHosts",
"ec2:DescribeImages",
"ec2:DescribeInstances",
"ec2:DescribeLaunchTemplateVersions",
"ec2:DescribeRegions",
"ec2:DescribeSnapshots",
"ec2:DescribeVolumes",
"ec2:DescribeSubnets",
"ec2:DescribeSecurityGroupRules",
"ec2:DescribeSecurityGroups",
"ec2:DescribeVpcs",
"ecs:DescribeCapacityProviders",
"ecs:DescribeClusters",
"ecs:DescribeContainerInstances",
"ecs:DescribeServices",
"ecs:DescribeTaskDefinition",
"ecs:ListClusters",
"ecs:ListContainerInstances",
"ecs:ListServices",
"ecs:ListTagsForResource",
"ecs:ListTaskDefinitions",
"eks:DescribeCluster",
"eks:ListClusters",
"iam:ListAccountAliases",
"organizations:DescribeOrganization",
"organizations:ListAccounts",
"rds:DescribeDBInstances",
"rds:DescribeReservedDBInstances",
"rds:DescribeDBClusters",
"rds:ListTagsForResource"
],
"Resource": "*"
}
]
}Note: The permissions related to CloudFormation are used for linking ASGs with ECS clusters. If these permissions are not included and the data is not available, linking the ASGs to ECS clusters may be done based on existing container instances. If the permissions are missing, Densify may not link some ASGs to their ECS clusters,
- Log into the AWS management console and navigate to Services > IAM.
- Select Policies and click Create policy.
- Click the JSON tab and enter the policy from the example above.
- Review the policy and enter a policy name (e.g. DensifyMinimumReadAccess) and a description (e.g. Minimum permissions required for Densify standard audit).
Enabling Collection of AWS Memory Usage Metrics
Memory metrics are not collected by default and they are not required to complete the Densify analyses; however, you can manually enable collection of specific memory metrics to improve the quality of your recommendations.
Note: Additional metrics collected by the CloudWatch agent incur charges. See Amazon CloudWatch Pricing for details.
|
Scenario |
AWS Memory Metric |
Collected by the CloudWatch Agent, by Default |
|---|---|---|
|
CloudWatch agent for |
mem_used_percent |
Yes |
|
mem_active |
No |
|
|
mem_used |
No |
|
|
CloudWatch agent for Windows |
Available MBytes |
No |
|
% Committed Bytes In Use |
Yes |
Note: The CloudWatch agent must be installed and configured on each instance for which you want to obtain memory. Refer to the AWS user documentation for details. See https://docs.aws.amazon.com/AmazonCloudWatch/latest/monitoring/Install-CloudWatch-Agent.html
Once the CloudWatch agent is installed and configured, Densify requires that you use the default "CWAgent" namespace for the collected metrics collected.
Memory Metrics for ASGs
Additionally, when working with ASGs, the ASG's EC2 members provide memory utilization data using the basic memory settings, but you need to specify "aggregation_dimensions" to collect memory, aggregated at the ASG level.
For Linux instances, the memory metric, “mem_used_percent” is collected by default, as specified in the config.json file. However, the metrics “mem_active” and “mem_used” need to be added for Densify's analysis.
Use the following example to customize the default CloudWatch agent's configuration, to collect the required parameters and metrics that Densify requires for memory analyses. The CloudWatch agent configuration file is located in the CWAgent namespace,
Example: CloudWatch Agent Configuration For Linux Instances
{
"agent": {
"metrics_collection_interval": 60,
"run_as_user": "root"
},
"metrics": {
"append_dimensions": {
"AutoScalingGroupName": "${aws:AutoScalingGroupName}",
"ImageId": "${aws:ImageId}",
"InstanceId": "${aws:InstanceId}",
"InstanceType": "${aws:InstanceType}"
},
"aggregation_dimensions":[
["AutoScalingGroupName"]
],
"metrics_collected": {
"mem": {
"measurement": [
"mem_used",
"mem_active",
"mem_used_percent"
],
"metrics_collection_interval": 60
}
}
}
}
For Windows instances, the default CloudWatch agent config.json file are the same as listed above.
The memory metric, "% Committed Bytes in Use" is collected by default, as specified in the config.json file. However, the metric “Available MBytes” needs be added to the CloudWatch agent's settings, for Densify's analysis.
Use the following example to customize the default CloudWatch agent's configuration, to collect the required parameters and metrics that Densify requires for memory analyses. The CloudWatch agent configuration file is located in the CWAgent namespace,
Use the following example to customize the default CloudWatch agent configuration to collect the required parameters and metrics that Densify requires for memory analyses.
Example: CloudWatch Agent Configuration For Windows Instances
{
"agent": {
"metrics_collection_interval": 60,
"logfile": "c:\\ProgramData\\Amazon\\AmazonCloudWatchAgent\\Logs\\amazon-cloudwatch-agent.log"
},
"metrics": {
"append_dimensions": {
"AutoScalingGroupName": "${aws:AutoScalingGroupName}",
"ImageId": "${aws:ImageId}",
"InstanceId": "${aws:InstanceId}",
"InstanceType": "${aws:InstanceType}"
},
"aggregation_dimensions":[
["AutoScalingGroupName"]
],
"metrics_collected": {
"Memory": {
"measurement": [
"Available MBytes",
"% Committed Bytes In Use"
],
"metrics_collection_interval": 60
}
}
}
}
If you are using a third-party application to collect memory metrics, the collected data can be loaded using the Receive Metrics API endpoint. See Importing Metrics for Existing Services in the API documentation.
Refer to the AWS user documentation for details on using the CloudWatch Agent to collect memory metrics.
Enabling the Collection of GPU Metrics
To support collection of the NVIDIA® GPU data, the required metrics must be enabled through the CloudWatch agent.
Install the NVIDIA driver and CloudWatch agent on your instances. See Collecting NVIDIA GPU Metrics.
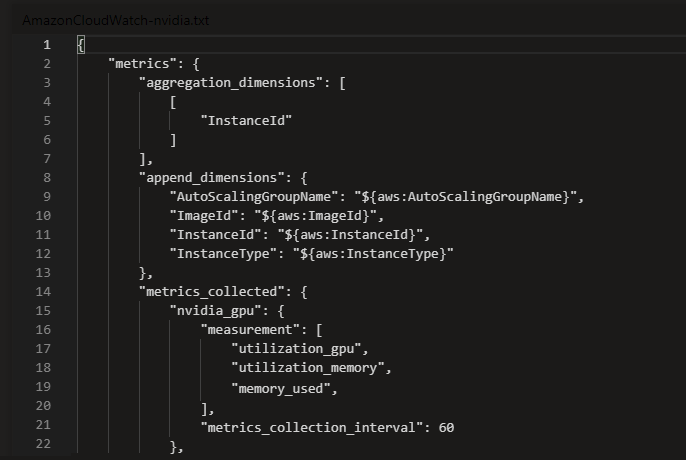
- Linux Servers—You need to add the section, nvidia_gpu inside the metrics_collected section of the CloudWatch agent configuration file. For more information, see: https://docs.aws.amazon.com/AmazonCloudWatch/latest/monitoring/CloudWatch-Agent-NVIDIA-GPU.html
- Window Servers—Configure and use Amazon Custom CloudWatch Metrics. See https://repost.aws/questions/QUcyzZfm3UR96Qj8JiadlCAA/how-to-monitor-and-collect-gpu-metrics-for-windows-ec2-instances-using-amazon-cloudwatch
Alternatively, you can use a third party tool such as Telegraf for metrics collection from Window Servers.
Densify requires the following GPU metrics:
|
NVDIA Metric |
CloudWatch Metric Name |
Unit |
Description |
|---|---|---|---|
|
utilization_gpu |
nvidia_smi_utilization_gpu |
% |
The percentage of time over the past sample period during which one or more kernals on the GPU was running. |
|
utilization_memory |
nvidia_smi_utilization_memory |
% |
The percentage of time over the past sample period during which global (device) memory was being read or written. |
|
memory_used |
nvidia_smi_memory_used |
MB |
Memory used. |
The following new workloads, based on the above metrics are available in the metrics viewer:
- GPU_Utilization—GPU utilization in percent
- GPU_Mem_Utilization_As_Pct—GPU memory utilization as a percent of the total memory
- GPU_Mem_Used—GPU memory used, in MB
Prerequisites
- NVIDIA Driver—Ensure you have the correct NVIDIA driver installed on your instances. Refer to the NVIDIA website for the driver installation guide for your specific operating system.
- NVIDIA Toolkit—Install the NVIDIA Toolkit to gather GPU metrics. Refer to the NVIDIA website for details.
- CloudWatch Agent—Refer to the AWS documentation for the latest agent installation instructions on your specific operating system. Configure the CloudWatch Agent as outlined below.
- Ensure that the IAM role attached to your EC2 instances has the necessary permissions to publish metrics to CloudWatch.
Install the NVIDIA Toolkit
The driver and toolkit may be pre-installed on your instance. Verify the elements contained on your instance before installing the toolkit or driver.
On Ubuntu:
sudo apt-get update sudo apt-get install -y nvidia-cuda-toolkit
On Amazon Linux 2:
sudo yum install -y nvidia cuda
Create the CloudWatch Agent Configuration File
- Modify the CloudWatch Agent configuration file (amazon-cloudwatch-agent.json) to add GPU metrics.
- Upload the CloudWatch Agent configuration file to your instance. For example, if using Amazon Linux 2:
- Start the CloudWatch Agent:
- You can also modify the metrics_collection_interval to change how often metrics are collected and sent to CloudWatch.
sudo /opt/aws/amazon-cloudwatch-agent/bin/amazon-cloudwatch-agent-ctl \ -a fetch-config -m ec2 -c file:/path/to/your/amazon-cloudwatch-agent.json -s
sudo /opt/aws/amazon-cloudwatch-agent/bin/start-amazon-cloudwatch-agent
Verifying the Configuration
- Verify that the CloudWatch Agent is running:
- Open the CloudWatch console to review the metrics.
- Navigate to Metrics and selec tthe CWAgent namespace.
- You should see GPU metrics under this namespace.
sudo /opt/aws/amazon-cloudwatch-agent/bin/amazon-cloudwatch-agent-ctl -m ec2 -a status