External User Authentication Example Configuration for Azure Active Directory
External User Authentication Example Configuration for Azure Active Directory
#111420
You can use the following process to setup Azure Active Directory (AD). You need to register Densify as a web application in your Azure AD and then provide the following information to Densify:
- Application (client) ID
- Directory (tenant) ID
- Client secret (password)
An auto-provisioning feature allows users to access the Densify Console without needing to manually create user accounts in Densify. Additional configuration is required as outlined in, Creating User Groups for Users. Contact [email protected] to enable the auto-provisioning feature.
Register an Application
You must have permission to manage applications in Azure AD. i.e. Application administrator or Application developer, etc.
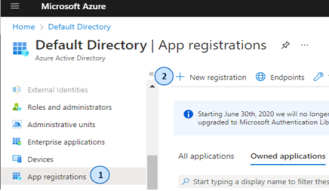
- In the Azure portal. If you have access to multiple tenants, use the Directories + subscriptions filter in the top menu to switch to the tenant in which you want to register the application.
- Navigate to Azure Active Directory > App Registrations > New registration.
- In the Register an application pane, enter the following information:
- The Name of the application (i.e. Densify_Connection)
- Specify who can use the application. You can leave the default setting, Accounts in this organizational directory only (Default Directory only – Single tenant).
- You do not need to add anything under the Redirect URI. You can will configure the URIs in the next section.
- Once you have entered the required information the Register button becomes available. Click Register to complete the process.
- Once you have completed the registration, you will be directed to the overview page for your new application registration.

New app registrations are hidden to other users by default. Refer to Microsoft.com for details on enabling your app registration for other users, if required.
Obtaining the Application and Directory IDs
- In the Azure portal, navigate to Azure Active Directory > App Registrations.
- Select your new App Registration and copy the following values:
- Application (client) ID
- Directory (tenant) ID
You need to provide these values to Densify to complete the authentication process.

Configuring the URIs
A redirect URI is the location where the Microsoft identity platform redirects a user's client and sends back the security tokens after authentication.
- In the Azure portal, in App registrations, select your application registration.
- Select Authentication from the side menu.
- Under Platform configurations, click Add a platform and then choose Web applications > Web.
- Under Redirect URIs, add the following URIs:
- https://<instancename>.densify.com:443/redirect
- https://<instancename>.densify.com:443/
- https://<instancename>.densify.com:443/densify
- https://<instancename>.densify.com:443/openIdError
- Click Add URI to add each entry. You should have a total of 4 URIs.
- Click Save to commit all your information.
Note: These are examples only. Contact Densify for the actual URIs.

Obtaining the Credentials
The credentials generated here allow Densify to authenticate as itself, requiring no interaction from the user at runtime.
A client secret is sometimes called an application password. It is a string value that Densify can use in place of a certificate to identity itself.
- In the Azure portal, in App registrations, select your application registration.
- Navigate to Certificates & secrets > Client secrets > New client secret.
- Add a description for your client secret. i.e.Densify-Client-Secret
- Select an expiration for the client secret or specify a custom lifetime. Please note the following:
- Client secret lifetime is limited to 24 months, or less.
- Microsoft recommends that you set an expiration value of less than 12 months.
- You will need to renew the secret prior to the expiry date and provide the new value to Densify each time the value expires.
- Click Add to save your settings and to generate the client secret.
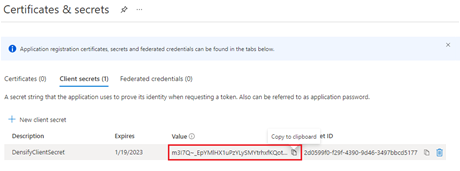
Record the displayed value, as this value will not be displayed again once you leave this page and you need to provide this value to Densify.
Configuring the API Permissions for the Connection
In this section, you provide Densify, now registered with the Microsoft identity platform with access to your own web API. You also provide the client app access to Microsoft Graph.
- In the Azure portal, select App registrations and then select your application registration.
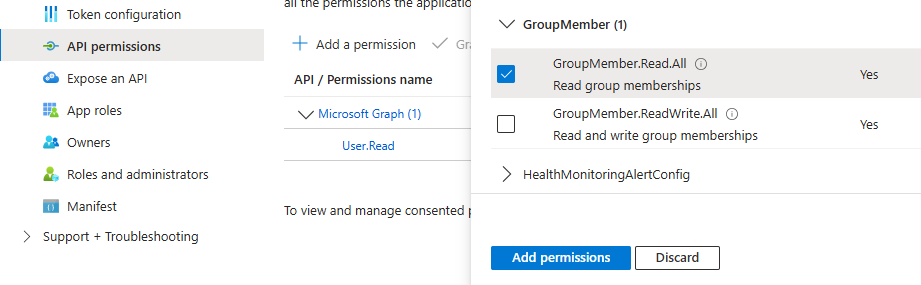
- Navigate to Manage > API permissions > Add a Permission > Microsoft Graph.
- Choose ‘Delegated Permissions’. Microsoft Graph exposes many permissions, with the most commonly used permissions shown at the top of the list.
- Under OpenId permissions, select:
- email—Allow Densify to view the users’ email address;
- profile—Allow Densify to view the users’ basic profile;
- Under GroupMember select:
- GroupMember.Read.All—Allow Densify to read all user groups.
- Under User select:
- User Read—should already be delegated. Allows Densify to sign in and read user profile.
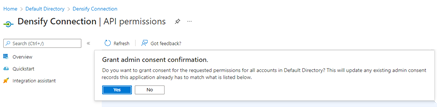
- Click Add Permissions and choose Grant admin consent confirmation. Then click ‘Yes’ when prompted.
- Click Yes when prompted.


Note: If the auto-provisioning feature is enabled, you need to add this permission. If the auto-provisioning is not enabled you do not need this permission.
Creating User Groups for Densify Users
Note: If the auto-provisioning feature is enabled, you need to create these groups, otherwise you can skip these steps.
The auto-provisioning feature allows users to access the Densify Console without needing to manually create user accounts in Densify. Once the feature is enabled, you must create groups in your Azure AD, that correspond to Densify's user groups and add users to grant the required permissions.
Contact [email protected] to enable the auto-provisioning feature.
You need to create user groups that correspond to the commonly used Densify user groups: DENSIFY_USER, DENSIFY_USER_ADMIN and DENSIFY_AUDIT_ADMIN.
- Navigate to Manage > Groups. You will see the list of existing groups.
- Click New group at the top of the list and configure the group settings:
- Group Type—Select "Security"
- Group name—Specify the name, DENSIFY_USER. Use this exact name (uppercase, underscore and no spaces) for your new group.
- Group description—Optional: Provide a description for this group.
- Membership type—Specify how users will be added to the group i.e. "Assigned".
- Click Create to create the group.
- Repeat the process to create a group for DENSIFY_USER_ADMIN and for DENSIFY_AUDIT_ADMIN.
Note: These new user groups cannot be hidden groups.
Adding Densify Users to Groups
Add the users to one or more groups. You can add users to all groups or add them to a specifc group , based on their requirements.
- SaaS_User—Users with this role can access all features in the Densify Console.
- SaaS_User_Admin—Users with this role can add, edit and remove Densify user accounts through the user management dialog box.
- SaaS_Audit_Admin—Users with this role can create, edit or delete cloud audits, but cannot manage user accounts.
Note: User management is not required within Densify when Open ID is configured and the auto-provisioning feature is enabled.
- Navigate to one of the groups created above.Groups. You will see the list of existing groups.
- Click Add members at the top of the list and select the users to be added:
- Click Add.
- Repeat the process to add users to the other groups.
- After any changes, existing users must log out and clear their browser before logging in again. This is required regardless of the type or version of browser you are using.
You now need to provide the following information to Densify to complete the setup:
- Application (client) ID;
- Directory (tenant) ID;
- client secret value
These settings are all configured for you by Densify. Contact [email protected] for details.