Viewing the Reservation Details Pane
Viewing the Reservation Details Pane
#330030
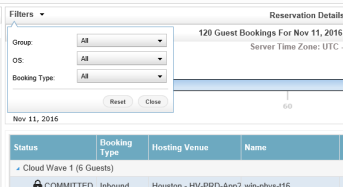
Similar to how booking requests are arranged in the Booking Requests To Be Routed pane, bookings are organized by project or application. Booking information is shown in the following columns:
- Status—"PENDING COMMIT", "COMMITTED" or "LATE"
- Booking Type—"Inbound" or "Outbound"
- Hosting Venue—assigned <environment> - <hosting venue>
- Name—expected System Name of the booking
- Planned Start Date—planned expected date
- CPUs
- Memory (GB)
- Storage (GB)
- OS
- Expiry Date—Planned Start Date plus Hold Reservation grace days plus 1 day to get the expiry date (i.e. the day that the booking expires), with the number of days to the due date in brackets for bookings in "COMMITTED/LATE" status (note: number of days updated every analysis refresh)
You can use any of these columns to sort the bookings within each group in ascending or descending order.
Only bookings that have not expired are shown in this list. The bookings can be filtered on their planned start date based on the timeline selection—only bookings that have not expired with a planned start date up to and including the date selected by the timeline slider are shown. The timeline selection is maintained when navigating between the Route Demand and Manage Reservations screens.
Selecting a hosting venue tile in the Hosting Venues pane will filter bookings in the Reservation Details based on the selected hosting venue. A tile remains selected when navigating between the Route Demand and Manage Reservations screens.
When the environment is refreshed before the booking expires and the corresponding new workload comes online (through an audit), the booking is completed and is no longer shown in the Reservation Details pane. If the booking expires (i.e. the corresponding workload is not found within the expiry date), the booking is also removed from the Reservation Details pane.
Late Bookings
When the incoming VM is delayed and a grace period is configured (through field Hold Reservation after Planned Start Date), the booking shows a status of "LATE (<x> days)". This means the VM is late after the planned start date by <x> days.
Editing Routed Bookings
You can edit bookings in this pane if you need to modify the expected System Name. The System Name is the only field you can modify once a booking is routed.
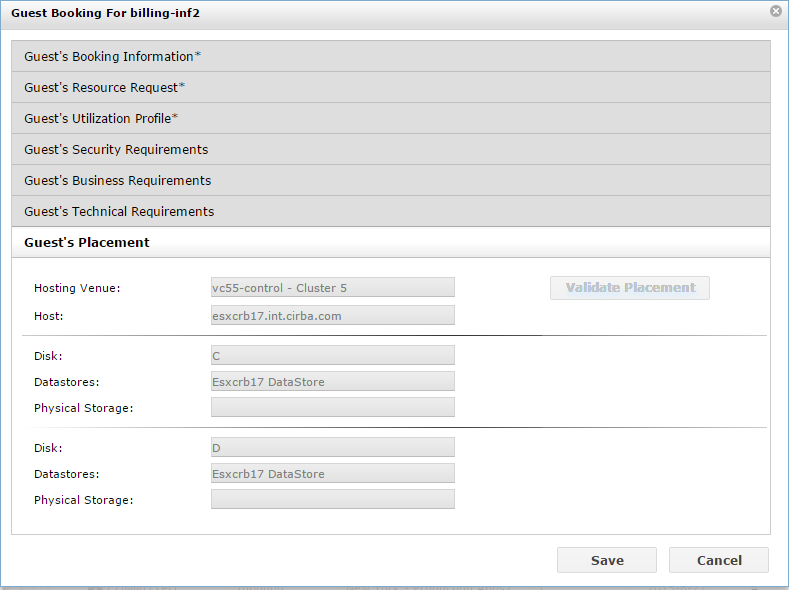
You can view the guest placement of any routed booking, by looking at the Guest's Placement section of the Guest Booking dialog box. This section includes the hosting venue, host and sensor placement answer.
When routed to an internal hosting venue, Densify selects the least full host and datastores, even if policy limits are violated or capacity is in the negative. Note that the host and sensor placement answer is provided only after the environment or infrastructure group is refreshed.
For an internal hosting venue with real-time placement health checks enabled, you can also re-validate the placement answer. This Validate Placement button is enabled when the booking's Planned Start Date is for today or the booking is late. After clicking Validate Placement, a message is displayed stating that either the placement is still valid or has changed. With a change, all updated fields are marked with asterisk (*). Note that the placement update is in effect irrespective of a subsequent Save or Cancel.
For an internal hosting venue, the placement answer is automatically updated when the environment or infrastructure group is refreshed, or when you open the Guest Booking dialog box and the incoming workload is scheduled for today or is late but not yet expired.
For an external hosting venue, the host and sensor placement answer is not provided as this information is not available.
Filtering Routed Bookings Using the Filter Dropdown
You can filter the content of the Reservation Details list by applying filters directly through the Filters option dropdown from the Reservation Details pane and indirectly by filtering the hosting venues displayed on the Hosting Venues pane.
For details on filtering by hosting venues, see
With the Filter option dropdown, you can filter based on the project group, the OS type and booking type. Clear the filter by clicking Reset. You can collapse the timeline slider in this pane to better view the results.
Filtering Bookings Using the Timeline Slider
The Reservation Details pane has a timeline slider so bookings can be viewed at set intervals in the future so you can see projected VMs that are expected to be coming online at that time. Since only those bookings that have a planned start date less than or equal to the date selected on the timeline are shown, you can filter requests by selecting a date on the timeline slider. Bookings earlier than the today's date are also displayed as long as they have not completed or expired. For example, if today's date is July 26 and the timeframe is set to 60-days (Sep. 24), the Reservation Details pane shows bookings with a planned start date from July 26 to Sep. 24, plus bookings with an expiry date from July 26 to Sep. 24 (taking into account late bookings). When the timeline slider is moved, the bookings shown update based on the selected date. For more information on the booking lifecycle, see Guest Booking Life Cycle.
- When opening the Route and Reserve Demand page, the timeframe is set to "All".
Note: Any settings that you have applied to filter the hosting venues will still be applied as you move between timeframes.