Microsoft Azure Data Collection Prerequisites for a Service Principal
Microsoft Azure Data Collection Prerequisites for a Service Principal
#410010
Overview
A Service Principal is an identity created within your on-premises Active Directory (AD) and that is allowed to access one or more resources within your AD. You can delegate the minimum required permissions to the service principal so that it can be used to create a connection to Densify to collect data.
Note: Azure Stack is not supported. This data collection method currently only supports Azure Cloud.
If you are using a standalone Azure Active Directory account (i.e. an Azure AD), then see
The Service Principal possesses the following characteristics:
- An application that is created within your Microsoft Entra ID
 Microsoft Entra ID (formerly Azure Active Directory) is a cloud-based identity and access management solution. It provides Identity as a Service (IDaaS) for all Microsoft apps across cloud and on-premises environments.. This application will be associated with the user that creates it.
 - A service principal is then created for that application;
- The service principal is granted access to your Azure subscription.
The following procedure allows you to use a federated Microsoft Entra ID account to create a cloud connection to Densify. In this case a Service Principal is required to connect Densify to your Azure subscriptions.
Note: In this case "federated" indicates that your on-premise Active Directory is linked with your Azure Cloud's Entra ID so you can use your existing on-premise AD credentials to access your Azure portal.
Requirements to Create a Cloud Connection
To connect Densify to your Azure subscriptions, you need the following items to setup data collection:
- Tenant ID/Directory ID
- Service Principal/Application ID
- Secret Key
- Subscription ID—Only required when using the Densify API.
Additionally, the application must be assigned the role of "Reader" for each of the subscriptions from which data will be collected. The Reader role is sufficient for resource utilization data.
You must have admin/owner privileges for your Azure portal to create the account required for Densify. Typically, your on-premise Active Directory is federated with the Azure AD. In this case, the admin access is likely provided from an on-premise Active Directory account (via federation) and will possess the required Azure admin privileges.
The user account/Service Principal to be used for data collection only requires the "Reader" role privileges to collect resource utilization data.
If necessary you can configure a custom role that is more restrictive than the "Reader" role privileges. See Configuring a Role with Minimum Permissions for Data Collection for details.
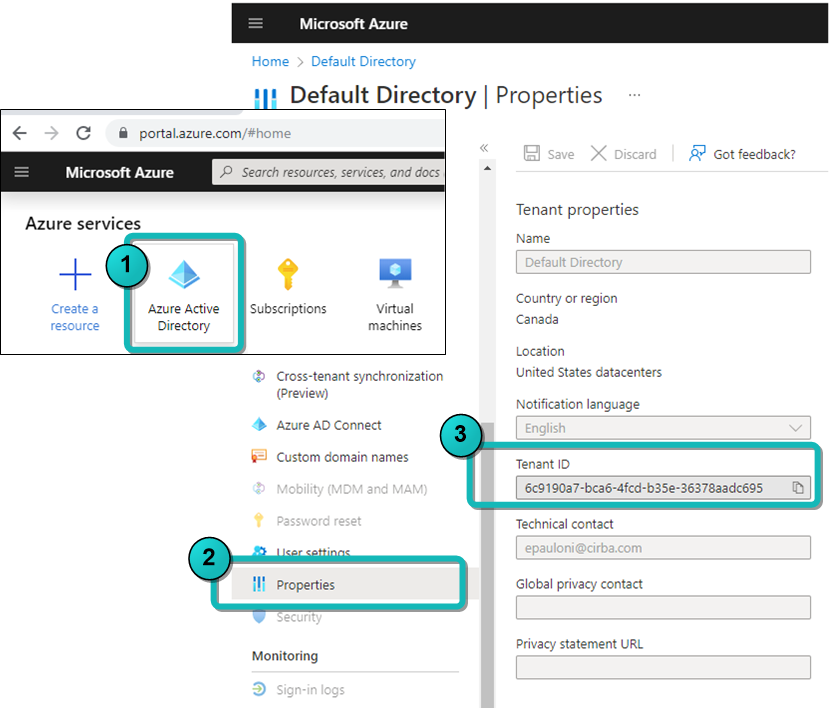
Obtaining the Tenant ID/Directory ID
The tenant ID corresponds to the Microsoft Entra ID.
- Login into your Azure account and click on Microsoft Entra ID> Overview .
- In the Overview pane, copy the Tenant ID.
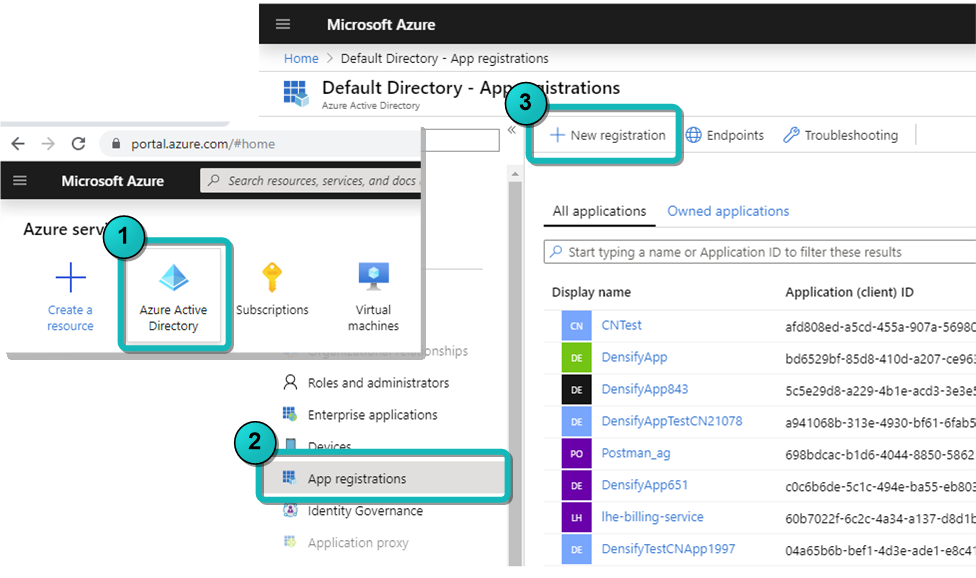
Obtaining the Application ID and Client Secret
You now need to create a new application registration. This will be the service principal for Densi. You will need the Application ID and corresponding client secret (key), to complete the Densify connection.
- Click App Registration.
- In the App Registration pane, click New registration.
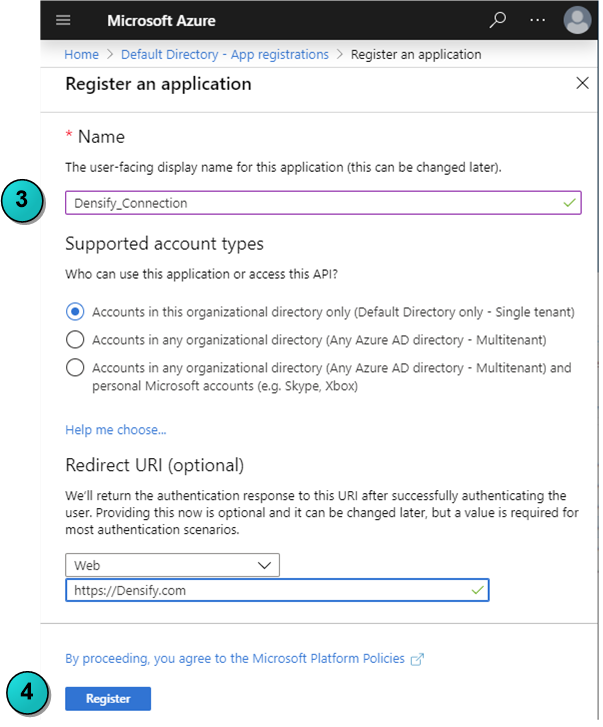
- In the Create pane enter the following information:
- The Name of the application (e.g. Densify_Connection).
- Select who can access the application. Leave the default of "Accounts in this organizational directory only (Default Directory only - Single tenant)".
- Select the Redirect URI (optional) as “Web” and specify a Sign-on URI (e.g. https://Densify.com).
- Click Register to create and register the application. This is the service principal that Densify will use to collect data.
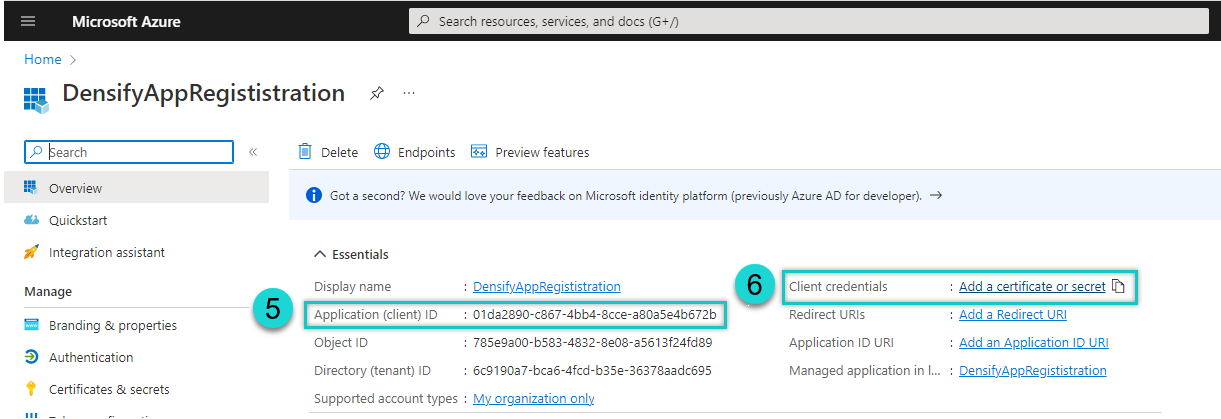
- Copy the Application ID (e.g. 7d16fbf8-1fc3-4e08-b48a-626). You need to copy this ID and save it to a location from which you can easily retrieve it. You will need the Application ID to create the Densify connection.
- Click Client credentials to see create the credential.
- Click on New client secret to create a new key.
- In the Add a new client secret pane, enter a Description (e.g. DensifyKey) and an expiration period (e.g. 1 year, 2 years or never expires).
- Click Add to create the key.
- Copy the secret key Value to a location from which you can easily retrieve it. You will need this key to create the Densify connection.
The Register button becomes available once you enter valid data.

If you are using the API, data collection and analysis are created and then refreshed daily on a per subscription basis (1-to-1). You can associate many subscriptions with a service principle, but when using the API to initiate data collection, you must specify a subscription ID and the audit and analysis are created for each subscription, separately.
When using the Connection Wizard in the Densify UI, you do not need the subscription ID, as all subscriptions that are associated with the service principle are collected and listed once the connection has been verified. You can then select one or more of the subscriptions that you want to analyze (1-to-Many). When using the Connection Wizard, data collection and analysis are created and then refreshed daily for all of the subscriptions that you selected when you created the connection.
Use the following instructions to get the Subscription ID.
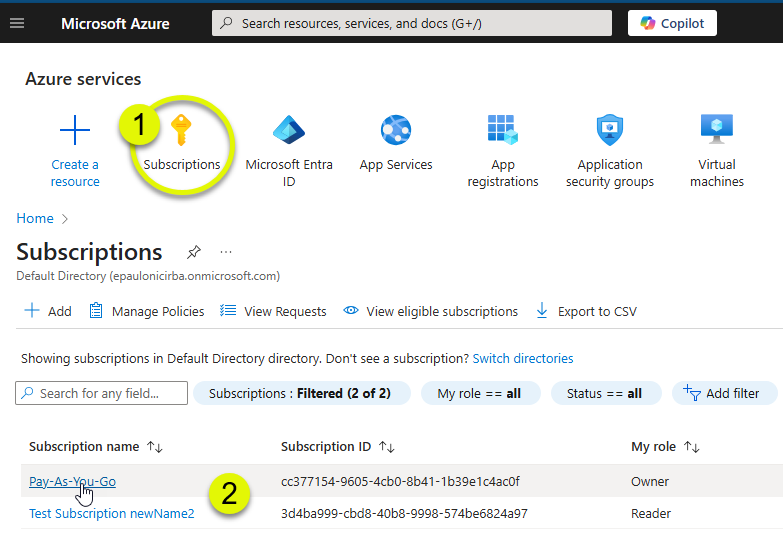
- Navigate to Subscriptions in the main menu. You may need to click on More services to see Subscriptions.
- Click on a subscription to open the configuration page.
- Copy the Subscription ID. You need to copy this ID and save it to a location from which you can easily retrieve it. You will need the Subscription ID to initiate data collection, when using the Densify API.
Assigning Access to Subscriptions
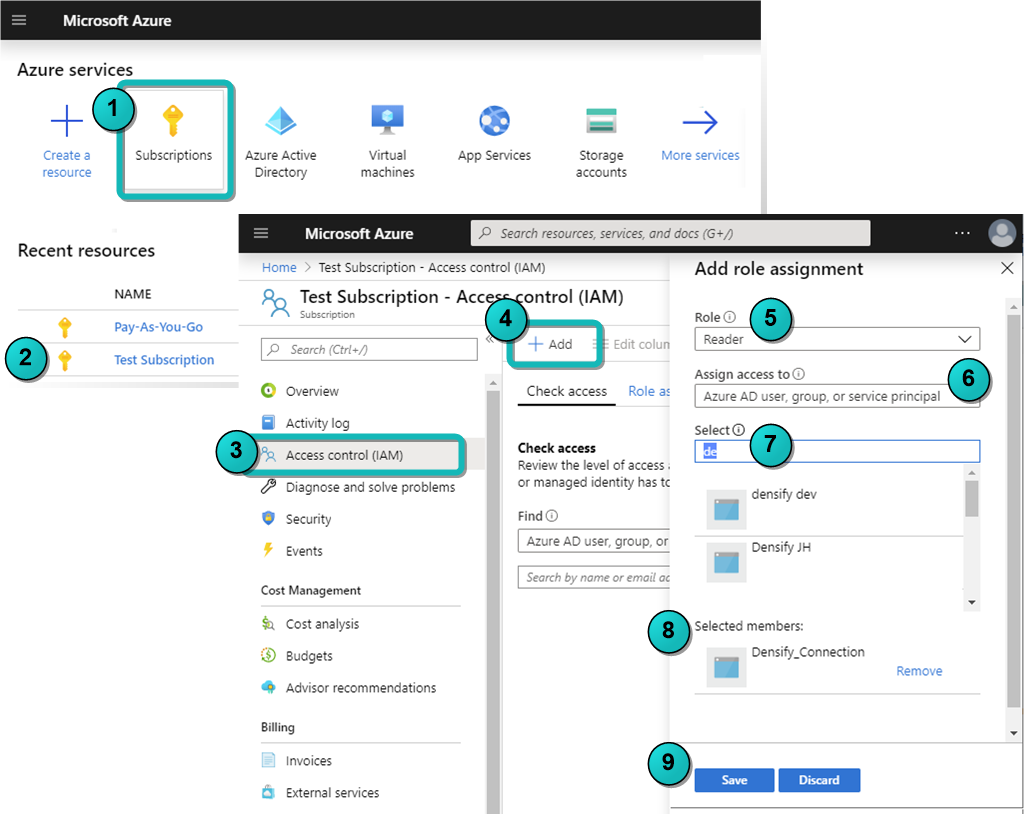
The application registered above, now needs access to each of your subscriptions. You need to assign the "Reader" role to the Application for each subscription being audited. Use the following process:
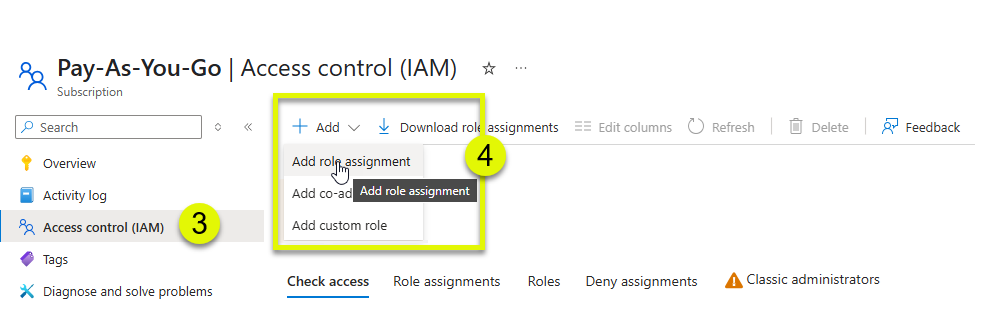
- Navigate to Subscriptions in the main menu. You may need to click on All services to see Subscriptions.
- Click on a subscription to select and open the configuration pane.
- Click Access Control (IAM).
- Click Add > Add role assignment.
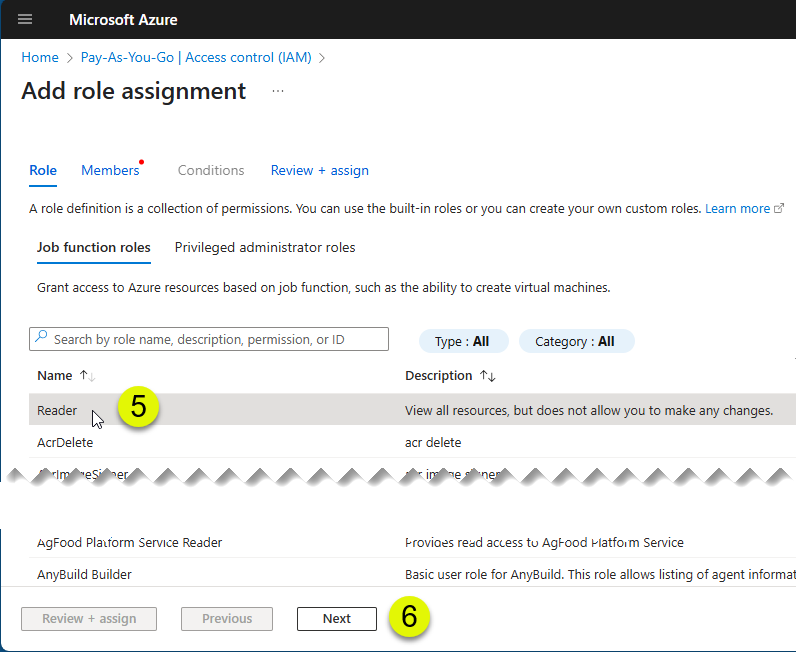
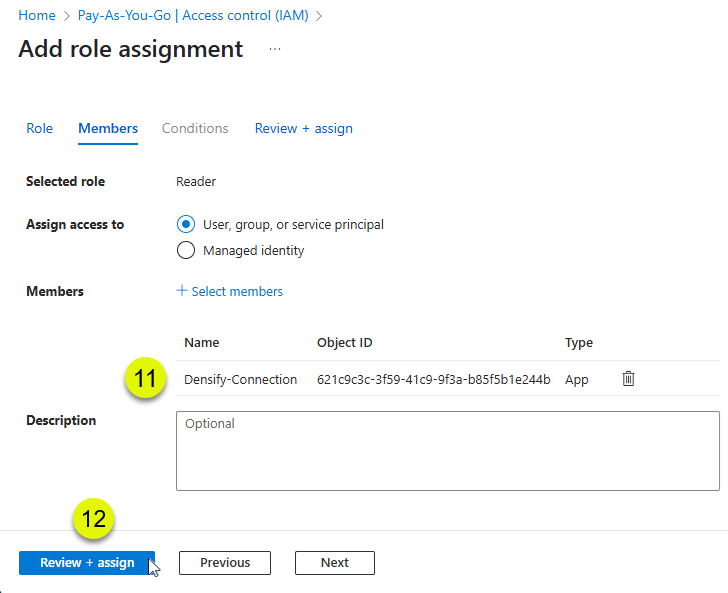
- In the Add role assignment pane select the Role of "Reader".
- Click Next .
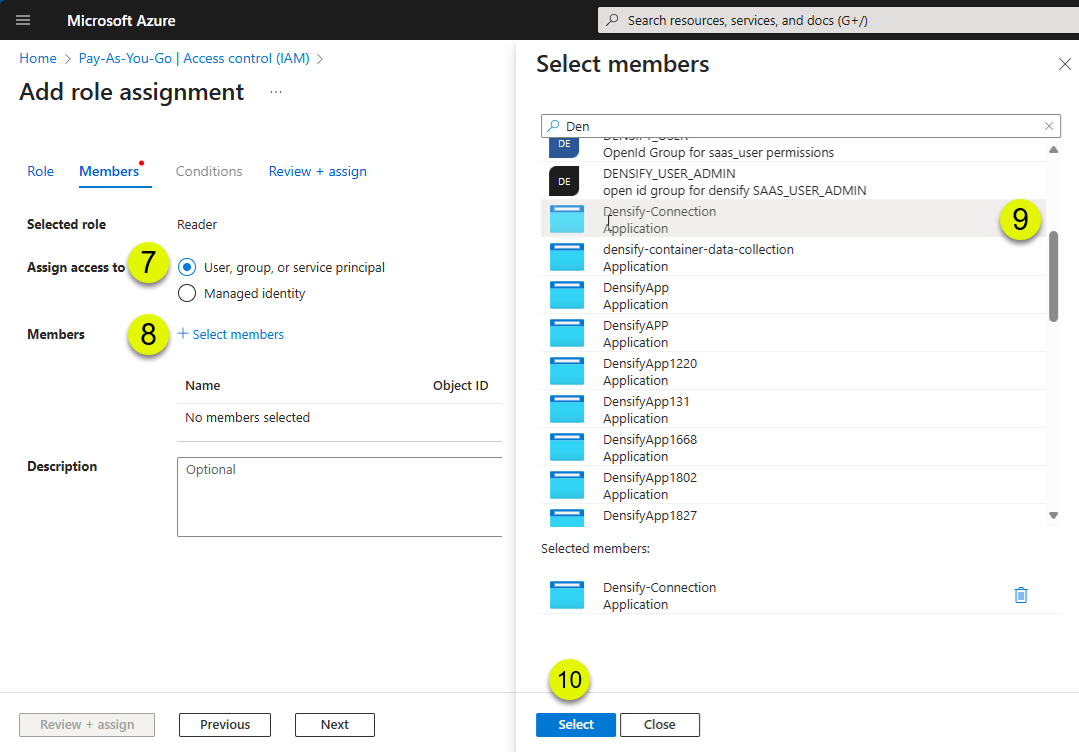
- On the Add role assignment pane, ensure Assign Access to is set to "User, group or service principal".
- Click Select members.
- Search for or scroll to locate the service principle (Densify_Connection), created above.
- Click Select.
- The selected application will appear in the Members section.
- Click Review + Assign to save these changes.
- Repeat this process for each subscription to be included in Densify data collection.
Once the account has been configured you can use the tenant ID, application ID and secret key to create the cloud connection as outlined in
Advanced Topics
The following sections contain detailed instructions for more advanced configuration. Some sections are referenced in the procedures above. Other advanced topics cover optional configuration.
- Configuring a Role with Minimum Permissions for Data Collection
- Collecting Azure Memory Metrics
- Create the Service Principal Through the Azure CLI
Configuring a Role with Minimum Permissions for Data Collection
To simplify setup and maintenance of the role used for performing data collection, Densify recommends using the "Reader" role. This role provides read-only access to your Azure services and resources and supports the requirements for resource utilization data collection. As the Densify continues to evolve and expand, you do not need to update permission policy to include newly added services and features, when using the "Reader" role.
Alternatively, if you must restrict the role with the minimum permissions you can create a custom role with only the required permissions. These custom roles provide an alternative method for granting permissions that are more restrictive than the built-in “Reader” role. These custom roles (JSON) define the minimum permissions required by Densify to collect resource utilization metrics data, respectively.
The “Densify Resource Utilization Metrics Reader” custom role grants read-only permissions for collecting data related to VMs, SQL servers and reservations in the subscriptions specified in the assigned scope.
Custom Role: Densify Resource Utilization Metrics Reader
{
"properties": {
"roleName": "DensifyResourceUtilizationMetricsReaderCustomRole",
"description": "This custom role defines the minimum read-only permissions required by Densify for collecting data related to VMs, SQL servers and reservations associated in the subscriptions specified in the assigned scope",
"assignableScopes": [
],
"permissions": [
{
"actions": [
"Microsoft.Capacity/appliedreservations/read",
"Microsoft.ClassicCompute/virtualMachines/read",
"Microsoft.Compute/virtualMachines/read",
"Microsoft.Compute/virtualMachines/instanceView/read",
"Microsoft.Compute/virtualMachineScaleSets/read",
"Microsoft.Compute/virtualMachineScaleSets/virtualMachines/read",
"Microsoft.Compute/virtualMachineScaleSets/virtualMachines/instanceView/read",
"Microsoft.Insights/Metrics/read",
"Microsoft.Insights/MetricDefinitions/read",
"Microsoft.Resources/subscriptions/read",
"Microsoft.Resources/subscriptions/resourceGroups/read",
"Microsoft.Sql/servers/databases/read",
"Microsoft.Sql/servers/elasticPools/read",
"Microsoft.Sql/servers/read"
],
"notActions": [],
"dataActions": [],
"notDataActions": []
}
]
}
}Use the following instructions to create the custom roles:
- Copy the above sample and save it as JSON files.
- Login into your Azure account. You must have admin or owner privileges for your Azure portal. See Microsoft Azure Data Collection Prerequisites for a Service Principal.
- Navigate to Subscriptions in the main menu. You may need to click on All services to see Subscriptions. Select a subscription.
- Click Access Control (IAM).
- Click Add > Add custom role.
- In Create a custom role, select Start from JSON and then select one of the custom role JSON files, that you saved above. The role name and description fields are populated with details from the JSON file. The file will also be validated.
- Click Next and review the list of permissions.
- Click the Assignable scope tab and select subscription as the Type. Select the subscriptions to which the custom role will be assigned.
- Click the JSON tab to review your settings and then create the custom role and click Save.
- Assign the custom role to the Densify service principal. See Assigning Access to Subscriptions.
Collecting Azure Memory Metrics
Agent is no longer needed.
You can configure your VM so that memory metrics can be collected as part of the Densify audit. There are two ways to configure memory metrics for each VM depending on whether the VM is a classic V1 guest or a V2 guest and which OS the VM is running.
Note: Ensure you have the latest version of the diagnostic agent running on each VM.
Table: Versions of Azure VMs and Collection of Memory Metrics
|
Azure Version |
Windows OS |
Collected Memory Metric |
Linux OS |
Collected Memory Metric |
|
Classic Portal |
Method B |
|
Method B |
|
|
Azure Resource Manager |
Method A |
|
Method B |
|
Method A - Collection of Memory Metrics
Use the following procedure to configure memory metrics for Azure Resource Manager VMs that are configured with a Windows OS:
- Navigate to Virtual machines in the main menu.
- Click on the VM to be modified.
- In the monitoring section, click on Monitoring > Diagnostics and then select the Basic metrics checkbox.
By default, these metrics are turned on when you create a VM.
Method B - Collection of Memory Metrics
Use the following procedure to configure memory metrics for Azure Classic Portal VMs (Windows and Linux) and Azure Resource Manager VMs configured with a Linux OS:
- Navigate to Virtual machines in the main menu.
- Click on the VM to be modified.
- In the monitoring section, click on Monitoring > Diagnostics Settings and then select Performance Counters from the top menu.
- Select the CPU, Memory, Disk and Network metrics check boxes.
Create the Service Principal Through the Azure CLI
If you are comfortable working with the command line, you can create the service principle through the Azure CLI. You can then use the resulting .JSON file when working with the Densify API. Refer to the Azure website for details: Create an Azure service principal with the Azure CLI.
Creating the Cloud Connection in Densify
Once all of the prerequisites are complete, you can create the cloud connection through the Cloud Connection wizard. See
Modifying Your Azure Cloud Connection
When you create the Azure cloud connection for the first time, Densify discovers all of the subscriptions, associated with the user or service principal. Upon saving the connection it will schedule data collection from each of the discovered and selected subscriptions.
If subsequently, subscriptions are added, they will not be included in data collection. Additionally, subscriptions that are removed will continue to be included, resulting in wasted time and resources. To add new subscriptions or remove old ones, edit the cloud connection. See