Containers Data Forwarder Using a Helm Chart
Containers Data Forwarder Using a Helm Chart
#410210
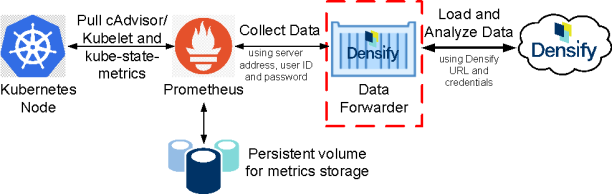
The Data Forwarder is an on-demand container that collects your container environment data from Kubernetes via Prometheus and forwards that data to Densify for analysis.
This topic shows you how to configure and deploy the Data Forwarder for data collection using a Helm chart.
After deploying the Data Forwarder, contact [email protected] to enable your Densify instance with container optimization.
The following items are necessary for Densify container data collection and optimization.
- Densify account— Contact Densify for details of your subscription or sign up for a free trial.
- Kubernetes or OpenShift must be deployed.
- kubelet with cAdvisor is required to provide workload data to Densify
- kube-state-metrics—This is a service that monitors the Kubernetes API server and generates metrics from the various objects inside the individual Kubernetes components, such as deployments, nodes and pods. The collected metrics allow Densify to get a complete picture of how your containers are setup. i.e. Replica Sets, Deployments, Pod and Container Labels.
- Requires v1.5.0 or later. There are additional considerations when using v2.x. See below.
- https://github.com/kubernetes/kube-state-metrics
- Prometheus—Provides the monitoring/data aggregation layer. It must be deployed and configured to collect kube-state-metrics and cAdvisor/kubelet metrics.
- Helm—To deploy the Data Forwarder using a Helm chart, install the latest Helm version.
The following item is not mandatory but does provide additional environment information for Densify container optimization.
- Node Exporter—Collects data about the nodes, on which the containers are running.
Contact [email protected] for configuration details.
Note: The Data Forwarder is only supported on Linux OS and AMD64 architecture.
Additional Configuration for kube-state-metrics v2.x and Higher
Kubernetes Labels in kube-state-metrics
In kube-state-metrics v2.x features have been added to improve performance of both kube-state-metrics, itself and the Prometheus server that collects the resulting data.
One of these improvements affects the usage of Kubernetes object labels and annotations as Prometheus labels of the kube-state-metrics datapoints. In v2.x kube-state-metric, the default settings no longer include the collection of the Kubernetes object labels nor annotations and you need to configure the collection of these items using the command-line options.
Densify Container Data Collection and Kubernetes Labels
Though Densify's container data collection will work without the Kubernetes object labels as kube-state-metrics labels, you may want to enable the kube-state-metrics labels for the following use cases:
- Node group data collection requires the node labels.
- Data collection of other Kubernetes objects attempts to collect labels and annotations. These can be used to sort and filter containers in the UI or API and to create customized reports.
Node Groups
Node groups are not a Kubernetes feature, but rather are implemented by the public cloud provider's Kubernetes solution (e.g. AWS EKS, GCP GKE, Azure AKS). They are also used by 3rd party tools to provision the Kubernetes cluster (e.g. eksctl, kops).
Collecting node group data is only meaningful if you are able to match it to the public cloud provider's node group data (e.g. AWS ASG). In this case you need to enable node group data collection with kube-state-metrics version v2.x or higher.
- Add the following command-line argument to the kube-state-metrics container:
["--metric-labels-allowlist=nodes=[*]"]
If the performance of kube-state-metrics and/or Prometheus is a consideration, you can replace the wildcard (*) with a comma-separated list of specific node labels. This requires specific knowledge of the available node labels in the cluster, which depends on the cloud provider's Kubernetes solution and/or the 3rd party tool used to provision the cluster and their versions.
Labels of other Kubernetes objects
In addition to node labels, Densify attempts to collect the following data, which can be further used as sort/filter criteria and to generate custom reports:
Table: Optional Node Labels and Annotations
|
Labels |
Annotations |
|
|
|
|
- If you want to collect this data with kube-state-metrics v2.x or higher, add the following command-line arguments to the kube-state-metrics container:
["--metric-labels-allowlist=nodes=[*],namespaces=[*],pods=[*],deployments=[*],replicasets=[*],daemonsets=[*],statefulsets=[*],jobs=[*],cronjobs=[*],horizontalpodautoscalers=[*]", "--metric-annotations-allowlist=namespaces=[*]"]
Optionally, you can specify only the Kubernetes object labels that you need. Contact [email protected] for details.
Deploying Data Forwarder for Data Collection
To configure and deploy the Data Forwarder, you need to:
- Setup the repository using Helm from Densify's GitHub page. See Setting Up the Densify Repo Using Helm.
-
Update the required parameters in the values.yaml file. See Configuring the Data Forwarder.
- Deploy and schedule the Data Forwarder pod to run regularly. See Deploying and Scheduling the Data Forwarder.
Setting Up the Densify Repo Using Helm
The Densify Helm repository can be obtained from https://densify-dev.github.io/helm-charts/. For details on the Data Forwarder Helm chart, see https://github.com/densify-dev/helm-charts/tree/master/charts/container-optimization-data-forwarder. Follow the steps below to add and explore the repository :
- From your working Helm environment CLI, add the Densify Helm repository :
- To view details about charts within the Densify repository, use Helm search:
- To view the parameter values of the Densify Data Forwarder chart, use the following command:
- Edit the chart parameters using the Helm CLI, or edit and save the downloaded values.yaml file according to the parameters described in the next section.
helm repo add densify https://densify-dev.github.io/helm-charts
helm search repo densify
helm show values densify/container-optimization-data-forwarder
Alternatively, you can download a copy of the values.yaml file from https://raw.githubusercontent.com/densify-dev/helm-charts/master/charts/container-optimization-data-forwarder/values.yaml.
Configuring the Data Forwarder
To configure the Data Forwarder for your environment, you need to edit the values.yaml file with the following connectivity parameters, listed in the table below. For a list of all the available parameters, refer to https://github.com/densify-dev/helm-charts/tree/master/charts/container-optimization-data-forwarder#configuration.
Table: Required Connectivity Parameters for the Data Forwarder
|
Parameter |
Description |
Default |
|
config.densify.hostname |
Specify the Densify instance hostname. You may need to specify a fully qualified domain name. |
<instance>.densify.com |
|
config.densify.protocol |
Specify the Densify connection protocol: http or https. |
<http|https> |
|
config.densify.port |
Specify the Densify connection port. |
443 |
|
config.densify.user |
Specify the Densify user account. You must specify either a password or an epassword along with this parameter. This user must already exist in your Densify instance and have API access privileges. Alternatively, you can use config.densify.UserSecretName for authentication instead of user/(e)password combination (see config.densify.UserSecretName below). |
nil |
|
config.densify.password |
Specify the password for the Densify user. Only specify a password or an encrypted password (not both). If you specify a password , then disable the config.densify.epassword parameter. |
nil |
|
config.densify.epassword |
Specify the encrypted password (i.e. epassword) for the Densify user. If you specify an epassword, then disable the config.densify.password parameter. |
nil |
|
Specify the secret name used to store the Densify user and epassword (the keys must contain username and epassword). If this parameter is used, then disable the following parameters: config.densify.username, config.densify.epassword, config.densify.password. |
nil |
|
|
config.prometheus.hostname |
Specify the Prometheus address. Using the internal service name is recommended: <service name>.<namespace>.svc |
nil |
|
config.prometheus.protocol |
Specify the Prometheus connection protocol: http or https. |
<http|https> |
|
config.prometheus.port |
Specify the Prometheus service connection port. |
9090 |
|
config.prometheus.clustername |
Optional, but recommended: Specify a name by which to identify this cluster within Densify. If this parameter is disabled, then the specified Prometheus hostname is used to identify the cluster in the Densify Console. |
nil |
|
config.prometheus.oauth_token |
Specify the path to the OAuth token used to authenticate with a secured Prometheus server. |
/var/run/secrets/kubernetes.io/ serviceaccount/token |
|
config.prometheus.ca_certificate |
Specify the CA certificate used to communicate with a secured Prometheus server. |
/var/run/secrets/kubernetes.io/ serviceaccount/service-ca.crt |
|
config.zipname |
Specify the name of the zipfile to send to Densify. |
data/<zipfilename> |
Deploying and Scheduling the Data Forwarder
After customizing the values.yaml file for your environment, deploy the pod using the command below. The pod is automatically scheduled to run at the top of each hour, which is based on the configuration in the values.yaml file.
- Install Data Forwarder helm chart with the updated values.yaml file, which contains your connectivity parameters.
- Review your logs to ensure that the pod completed successfully and metric data files were sent to Densify. The name of the config map and cronjob is in the format: <helm-chart-name>-densify-forwarder. In the example above, the config map and cron job would be labeled as densify-helm-densify-forwarder.
helm install densify-helm densify/container-optimization-data-forwarder -f values.yaml
This example uses the default namespace, however, you should use an appropriate namespace for the Densify pod. The output should be similar to the following:
NAME: densify-helm
LAST DEPLOYED: Wed Dec 1 15:00:00 2020
NAMESPACE: default
STATUS: deployed
REVISION: 1
TEST SUITE: NoneNote: You can customize the "densify-forwarder" part of the name by editing the nameOverride parameter in values.yaml. See https://github.com/densify-dev/helm-charts/tree/master/charts/container-optimization-data-forwarder#configuration.
When the Data Forwarder pod completes successfully, contact your [email protected] to enable your Densify instance with container optimization.