AWS Data Collection Using a CloudFormation Template
AWS Data Collection Using a CloudFormation Template
#410250
Overview
Densify's CloudFormation template creates a stack comprised of the AWS resources required by Densify to collect the Resource Utilization Metrics (via CloudWatch) that are then used for cloud optimization analysis.
If your accounts are setup using an AWS organization/management account structure, in which many accounts are linked to one management account, you can use the CloudFormation template to create, update and delete StackSets across multiple accounts and also create the cloud connection within Densify for each of the linked accounts.
|
Pick up the template from here: https://densify-cf-template.s3.us-east-2.amazonaws.com/Densify_CloudFormation.yml |
If you are not using an organizational account structure you can provide a list of accounts to be updated when you are configuring the stack.
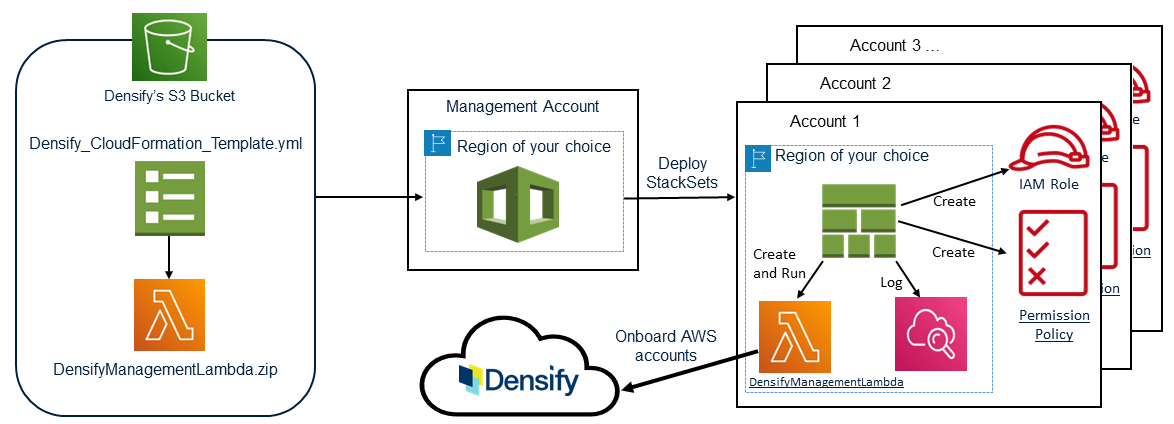
This template creates the IAM role and access policy and assigns the policy to the role using native CloudFormation capabilities. The template then uses a Lambda function to make an API call to Densify to create the cloud connections required to collect resource utilization data.
If you need to update the IAM role or policy after they have been created, see Editing the Stackset . This may be necessary if the IAM access policy needs additional permissions.
You can run Densify's CloudFormation template in any of the following regions;
|
|
|
Densify CloudFormation template can must be run in a single region even if the target accounts span multiple regions. The template creates an IAM role and permission policy which are both global and are not region-specific.
Please contact [email protected] if you need to run the template in regions, not listed above.
Additional Considerations Regarding Regions
When you create the StackSet, you need to specify a region from where the stack is deployed to each account and from where the Lambda function runs. Ensure you specify a single region as the IAM role and permission policy are globally accessible and as such will work from any region.
If you try to re-run the template in a different region it will fail as the IAM role and the permission policy already exist.
The Lambda function is region-specific but it only runs once to create the cloud connections within Densify. The StackSet and the CloudWatch logs that result from running the template are also region-specific and are defined within a specific region. You need to log into the specified region to manage your Stack and view its related log files. These log files will be required by the Densify support team, if troubleshooting any data collection issues.
Using the CloudFormation Template
If your AWS accounts are setup using an organizational structure, in which many accounts are linked to one master account, you can use the CloudFormation template to create, update and delete stacks across multiple accounts and also create the cloud connection within Densify for each of the linked accounts. If you are using the organizational account structure, you need an IAM user that has sufficient execute permissions to create the required roles and IAM policies in each linked account.
If you are not using an organizational account, you can provide a list of accounts in which the CloudFormation template will run and create the required prerequisites for data collection.
In addition to creating connections from your linked accounts, you also need to create a connection for your payer accounts. The payer account connection provides the name of each linked accounts.
Prerequisites
Obtain the following required inputs for the template before starting:
- External ID for IAM Role—This value is similar to a password and should be unique and difficult to guess. Densify recommends using a password generator to create a random, alphanumeric string (e.g. ae73mcf4ldjpet96) for the external ID.
- Both the URL and user credentials for your Densify instance—Contact your Densify Account Manager for details if you do not have this information.
- IAM User with Execute Permissions—If you are using an AWS Organization/management account structure with many linked accounts, you need an IAM user that has sufficient execute permissions to create the required roles and IAM policies in each linked account.
Considerations when Working with Large Environments
In large environments, Densify highly recommends batching your accounts into smaller groups for improved performance when using the CloudFormation templates. i.e. no more than 10 accounts at a time. You can use a resource tag, such as application or business unit to separate the CloudFormation stack so that data is collected in manageable batches.
Configuring and Running the Template
Step 1: Choose a Template
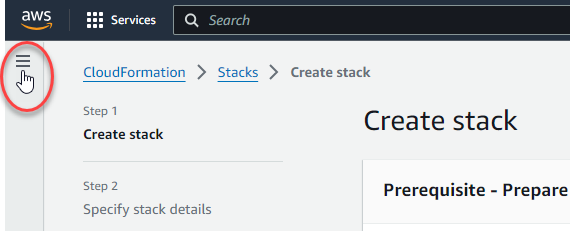
- Log into the AWS Management Console and navigate to CloudFormation and select StackSets. You may need to expand the options in the upper left corner of the page:
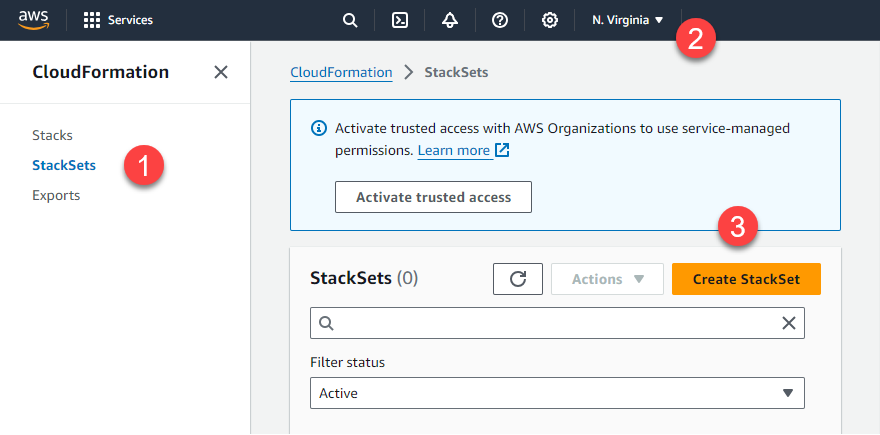
- At the top of the StackSets page, select a supported region. See the list of Supported Regions.
- Click Create StackSet to begin.
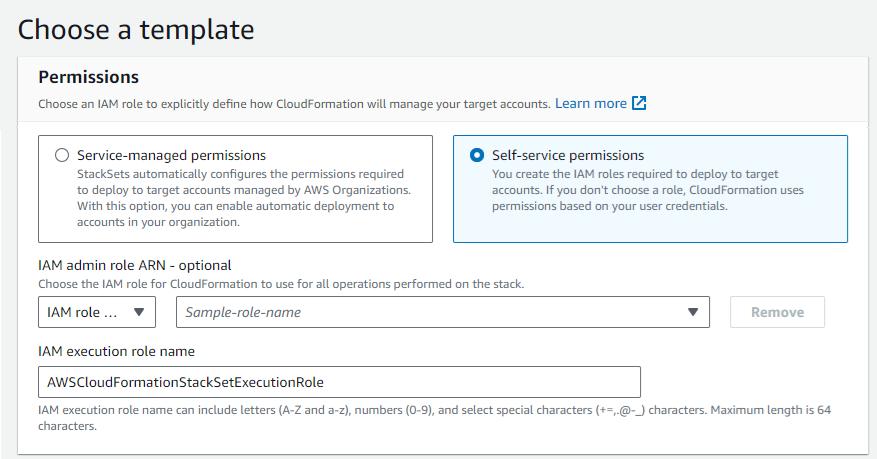
- In the Permissions section at the top of the page select the applicable option.
- Service-managed permissions—Use this option when you want the AWS Organization to automatically manage permissions. This is useful if you have a large number of accounts under an organization and you want to simplify the management of permissions across these accounts.
- Self-service permissions—Use this option when you need more granular control over permissions or when you are working in an environment where accounts are not part of the same AWS organizational structure.
- If you selected "Self-service permissions", then specify an IAM role that has execute privileges in your target linked accounts.
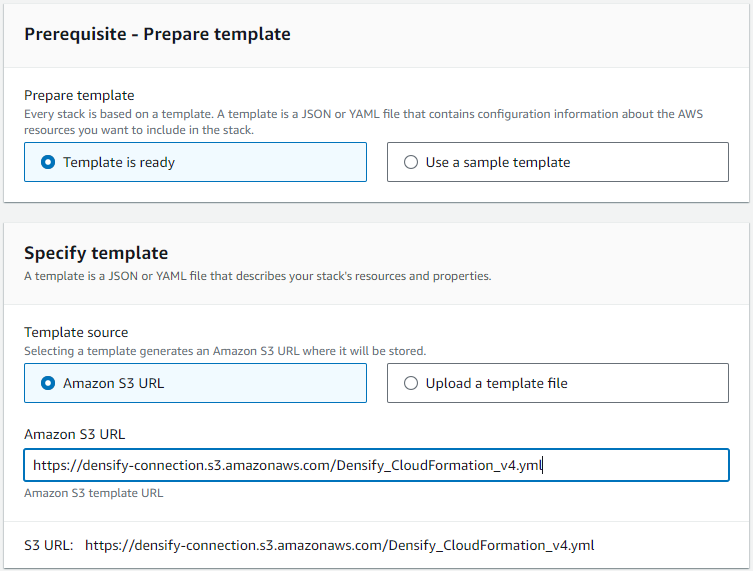
- In the next section, Prerequisite - Prepare template, select Template is ready
- In the next section, Specify template copy and then paste the following URL into the Amazon S3 URL field:
- Click Next to proceed with creating the stack.
Your selection, here depends on the nature of your organizational structure and your specific requirements for managing permissions across accounts.
|
Pick up the template from here: https://densify-cf-template.s3.us-east-2.amazonaws.com/Densify_CloudFormation.yml |
Step 2: Specify StackSet Details
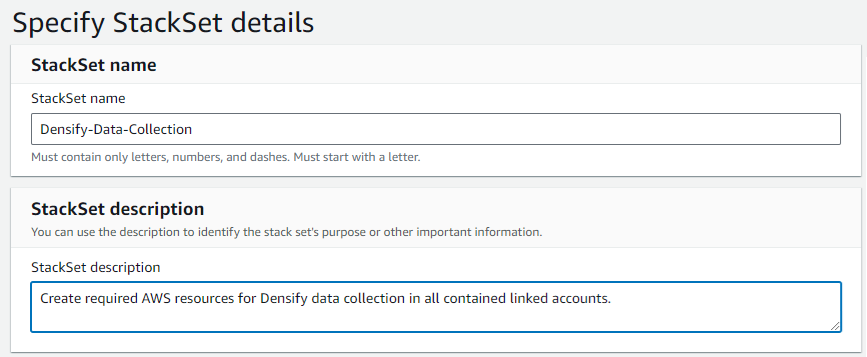
- Enter the following Stackset details:
- Stack name—Densify-Data-Collection, as an example.
- Stack description—Optionally enter a description for this StackSet
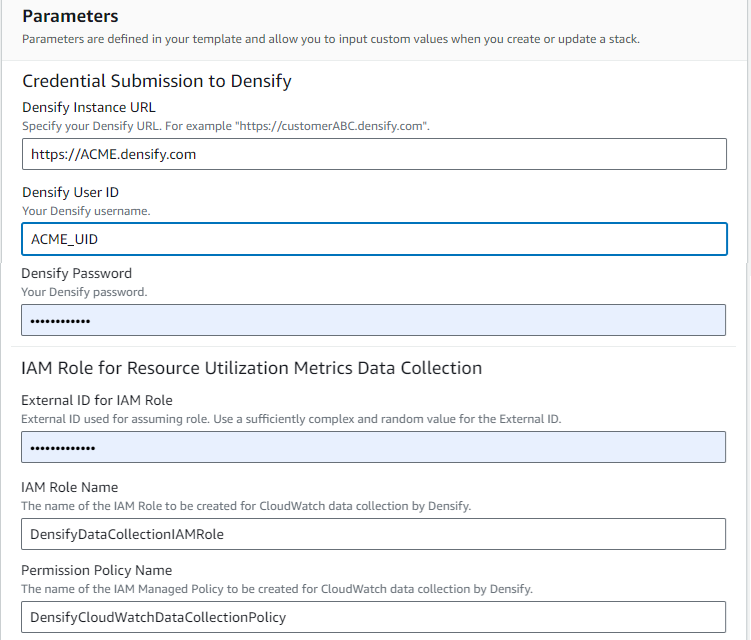
- Enter the following Densify instance details:
- Densify Instance URL—This is your Densify SaaS instance.
- Densify User ID—This is your Densify user name.
- Densify Password—This is the password for the listed user name.
- The values for IAM Role Name and the Permission Policy Name fields are provided. You do not need to enter any values here.
- Click Next to proceed with creating the stack.
Step 3: Configure StackSet Options
- In the Configure StackSet options page, accept the default values and then click Next.
- Tags—No tags need to be specified for the StackSet.
- Inactive—Leave this value to simplify StackSet execution.
Step 4: Set Deployment Options
Set the following deployment options
- In the first section, Add stacks to stack set select Deploy new stacks.
- Under Accounts > Deployment locations , define the accounts to which you want to deploy the StackSet:
- Deploy Stacks in accounts—Enter the 12-digit account numbers in the field.
- Deploy stacks in organizational units—Specify the organization units to use. The StackSet will be deployed to all account in the specified organizational units.
- In the next section, select one region from which the StackSet will be managed. This is typically the same region from which the StackSet is deployed. See the list of Supported Regions.
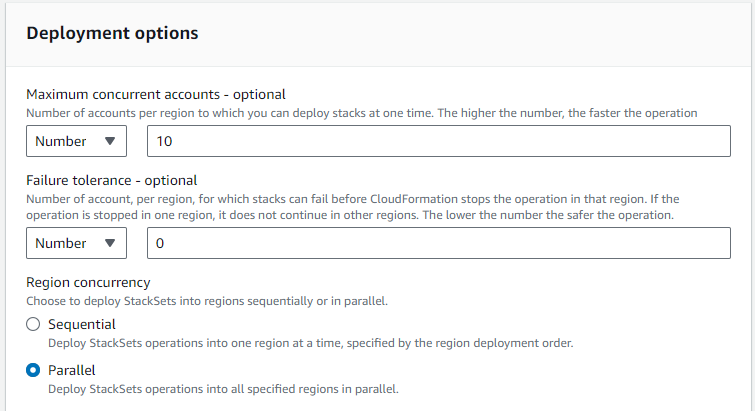
- Set the following Deployment Options:
- Maximum Concurrent Accounts—Choose Number from the dropdown list and enter a value of 10.
- Failure Tolerance (Optional)—Set this to an absolute number or a percentage of the total number of accounts being updated. If this value is exceeded, all resource changes will be rolled back.
- Region Concurrency—Select the desired option. As long as Maximum Concurrent Accounts is specified, parallel is preferred.
- Concurrency Mode—Leave the default value, of "Strict failure tolerance".
- Click Next to proceed with creating the stack.
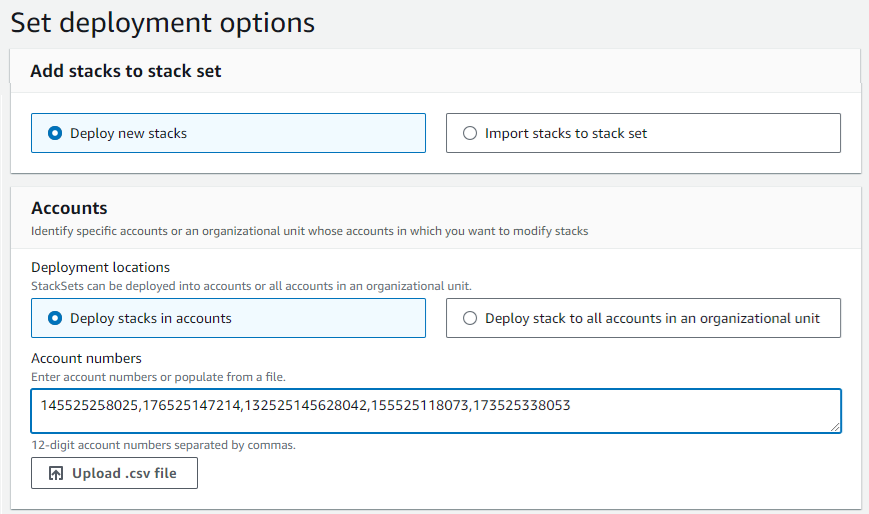
Alternatively, you can specify a .CSV file with the account information. The .CSV files must contain the 12-digit account numbers separated by commas.
Do not set this value greater than 10. Densify highly recommends batching your accounts into smaller groups for improved performance.
Setting a higher number is faster for AWS operations, but creating the cloud environments and initiating data collection within Densify is negatively impacted if more than 10 accounts are run concurrently.
Note: When setting this value you must set Failure Tolerance to a value that is ≥ (Maximum Concurrent Accounts – 1). So, if Maximum Concurrent Accounts = 10, then Failure Tolerance should be set to 9 or higher.
Step 5: Review
- Scroll through each section and verify the data you have entered.
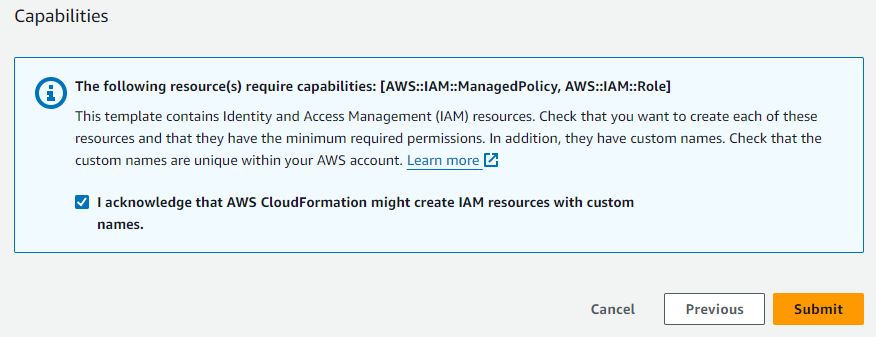
- At the bottom of the page, in the Capabilities section, click the checkbox to acknowledge that the StackSet will create IAM resources with custom names, as required.
Step 6: Run the Template
- Click Submit to begin the process. The CloudFormation dashboard displays the stack creation progress.
- Click on the Events tab to see both the progress and status of the stack creation process. Click the Refresh button to show the latest events.
- Once the StackSet has been created successfully, you can review the results.
- Click the Resources tab to see the list of created resources (e.g. IAM role, policies).
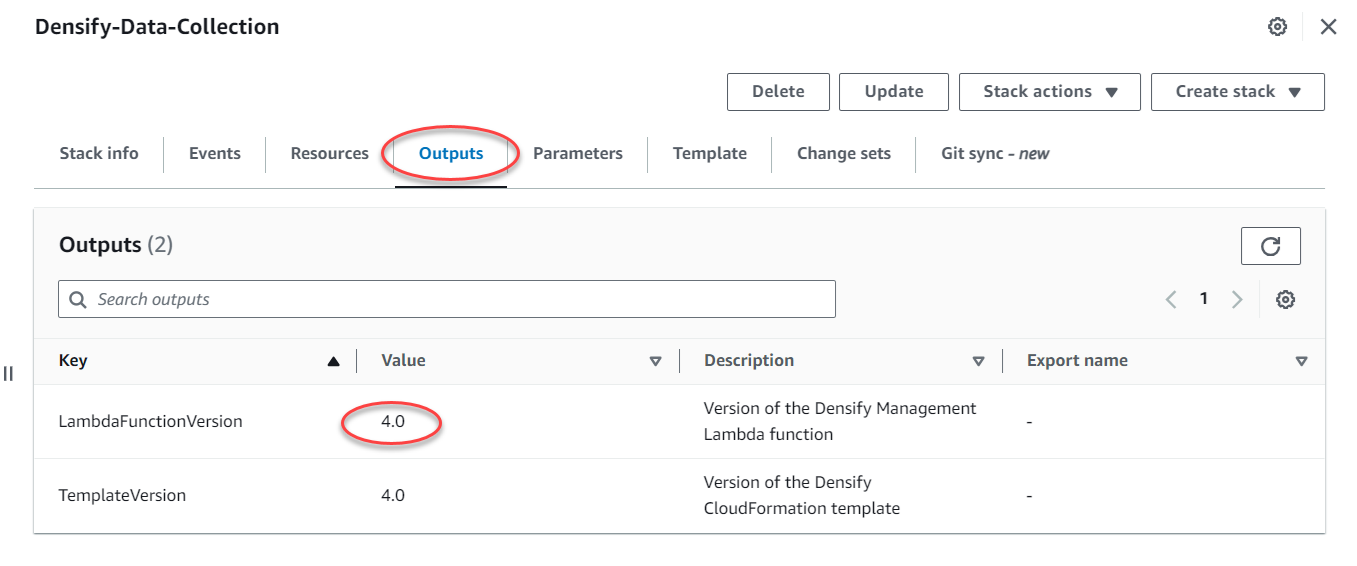
- Click the Outputs tab to see the version of both the CloudFormation template and Lambda function that were run. You will need this version information if you need to upgrade the stackset or the template.
- You can also log into your Densify instance and verify that the cloud connections are listed in the Cloud Connection wizard.
The initial audit will pick up historical data, if configured and available and each daily audit will collect the last 24-hours of data.
If this is a new or trial deployment, you will be contacted, once your data has been analyzed and is ready to review. Otherwise, analysis will be run overnight and you can review the optimization results the morning after creating the cloud connections. See Viewing the Optimization Overview Report for analysis results.
Note: When pushing changes to an existing StackSet, you must use the same version of the CloudFormation template that was used to create the stack, and then choose “Actions > Edit StackSet details” to update the existing stack.
If your accounts are setup using an organizational structure you can use the CloudFormation template to update stacks across the multiple linked accounts and also create the cloud connection within Densify for each of the linked accounts.
After the initial StackSet deployment you can do the following:
- Push changes to the existing stack in your accounts.
- Add the stack to additional accounts.
- Delete the stack from the accounts.
In most cases you will only need to edit the set of minimum required permissions. The list of minimum required permissions changes as Densify adds new features and functionality,
- Log into the AWS Management Console and navigate to CloudFormation and select StackSets.
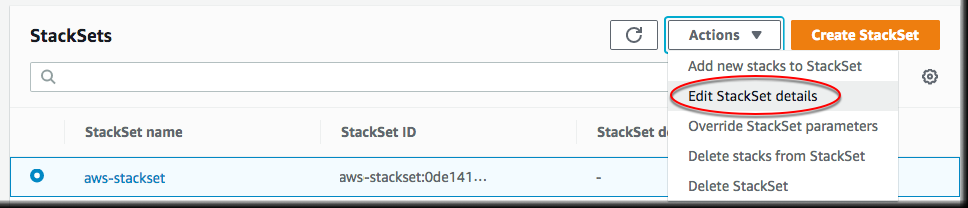
- Select the StackSet you want to edit and then choose Actions > Edit StackSet details from the dropdown menu at the top of the page.
Note: When pushing changes to an existing StackSet, you must use the same version of the CloudFormation template that was used to create the stack, and then choose “Actions > Edit StackSet details” to update the existing stack.
Refer to the AWS documentation for additional details on modifying a StackSet after it has been deployed.
Adding the Stackset to New Accounts
- Log into the AWS Management Console and navigate to CloudFormation and select StackSets.
- Select the StackSet you want to add and then choose Actions > Add new stacks to StackSet then specify the new accounts as outlined in Step 4.
Note: When deploying the StackSet, to new accounts use the same version of the CloudFormation template that was used to create the stack initially. The same version of the StackSet must be deployed in all accounts.
Deleting a Stackset from Accounts
- Log into the AWS Management Console and navigate to CloudFormation and select StackSets.
- Select the StackSet you want to delete and then choose Actions > Delete stacks from StackSet then specify the accounts as outlined in Step 4.
- Navigate to Set Deployment Options and edit the list of accounts.
- You need to remove any deleted accounts from Densify. See Deleting a Connection for details.
Refer to the AWS documentation for additional details on deleting a StackSet after it has been deployed.