Automation Overview
Automation Overview
#410
Automating Container Recommendation
Densify provides a solution to automate pod resource configuration using Densify’s optimization engine via a Mutating Admission Controller![]() The Mutating Admission Controller in Kubernetes is a special component that intercepts requests to the Kubernetes API server and modifies the objects before they are persisted to etcd (Kubernetes’ internal database). Densify provides the tools to enable your clusters for automation and a set of APIs to implement sizing recommendations.
The Mutating Admission Controller in Kubernetes is a special component that intercepts requests to the Kubernetes API server and modifies the objects before they are persisted to etcd (Kubernetes’ internal database). Densify provides the tools to enable your clusters for automation and a set of APIs to implement sizing recommendations.
Configuring the automation behaviour and the Mutating Admission Controller are separate from the data forwarder.
Enabling Automation
There are a few of steps to enable automation for your environment:
- Deploy the Mutating Admission Controller in each cluster with containers that you want to optimize. All of the required files and detailed instructions are provided in GitHub [Mutating Admission Controller].
- Request user credentials for the Densify API from [email protected]. These credentials will be used for automation. This is a separate user than the one that is used for the data forwarder.
- The configuration settings in the densify-automation-policy.yaml file, determine how you enable the automation:
- If you have set "remoteenablement" to False, then no external trigger is required and you only need to restart the pods, that are to be optimized, for the mutation to occur.
- If you have set "remoteenablement" to True, then in the Kubex tree viewer you need to remotely enable items for automated optimization. Right-click at any level of the tree viewer and enable or disable automation
- Open the Automation status page to monitor the details of the changes.
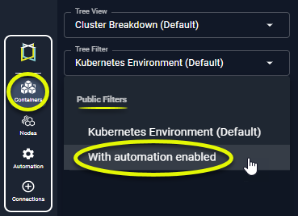
- You can also use the filter, "With Automation Enabled", in the tree viewer to see only those containers that are enabled for automation.
In this case, the trigger condition you have defined in the densify-mutating-webhook-config.yaml will be the source of what is actually enabled for automation.
In this case, a combination of what has been defined in the densify-mutating-webhook-config.yaml file, as well as what you have enabled for automation through the Kubex tree viewer, is enabled for automation
See [Multi-Policy Support], in GitHub for details of the required configuration switches.
|
Figure: Enabling Automation |
|
|
|
Once the Mutating Admission Controller has been deployed and the clusters are configured correctly, you can optionally enable or disable automation directly from the container tree viewer. Right-click at any level of the tree viewer and enable or disable automation. |
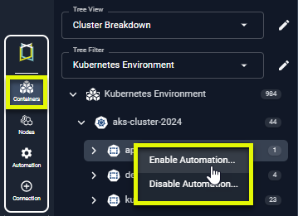
Figure: Filtering on Systems with Automation Enabled
Automation and Horizontal Pod Autoscaling (HPA)
When automation is enabled on containers that are also enabled for HPA, Kubex first determines which metrics HPA is configured to use.
If HPA is configured to scale on a single metric, for example CPU , then Kubex can optimize the containers based on recommended memory metrics.
If HPA is configured to scale on a both metrics, CPU and memory, Kubex still generates recommendations for these containers, but Kubex automation ignores the recommendations and HPA scales as configured.
Automation Policies
A set of automation policies are defined in the densify-automation-policy.yaml. Within each cluster, these policies will be triggered based on the webhook definition you have defined in the densify-mutating-webhook-config.yaml file.
You can also define your own conditions on which to trigger the webhook. Within the webhook, you can also describe which policy should be triggered. If no policy is explicitly defined, then Densify uses the default policy, cpu-reclaim, that is defined in densify-automation-policy.yaml.
By structuring multiple webhook rules within the same mutating webhook configuration, you can manage resource optimization different policies across different Kubernetes environments and workload types. Each webhook can use a specific policy path or the default policy.
See Multi-Policy-Support for detailed instructions